Saim Safdar from the Cloud Native Islamabad community generously invited me to his channel to conduct a Kubernetes 101 workshop. However, as often happens, I found myself pulled in a slightly different direction:
What if you don't start with Pods, Deployments, and Services and instead take a step back and look at how things were done in the past with good old VMs? Can it help you understand Kubernetes faster and deeper?
Below, I present a more polished version of the workshop, enriched with illustrations and runnable examples. You can experiment with these examples directly in your browser on labs.iximiuz.com.
Level up your server-side game — join 20,000 engineers getting insightful learning materials straight to their inbox.
Intro
Today, there are numerous "easy" options for deploying web apps, including:
- Heroku
- Vercel & Netlify
- Cloud Foundry
- fly.io (my personal favorite)
- AWS Lambda, Azure Functions,
- AWS App Runner, Google Cloud Run, etc.
You take a piece of code, push it as-is to a highly managed runtime environment, and call it a day.
However, if the above approach sounds too boring limiting or it doesn't fit your budget, you may want to consider a "fully-featured" (but less managed) execution environment like Kubernetes. But don't jump straight to learning all these fancy "new" concepts like Pods, Sidecars, Ingress Controllers, and whatnot!
To make the Kubernetes dive smoother, first, try to understand how things were deployed in the past - when people were running regular Linux daemons in VMs. Without the extra layers of abstraction, it'll be much easier to see what it actually takes to deploy and run a web service. And this knowledge then will allow you to get into Kubernetes much faster because Kubernetes is just an opinionated way to automate these age-old deployment techniques.
In this workshop, you'll see:
- How to run a single instance of your web app on a VM
- How to replicate and scale such app instances
- How to set up a
reliableingress gateway - How to set up zero-downtime and canary deployments
- How to achieve the same (but much faster) in Kubernetes.
The idea is to show the main evolution stages a typical app would go through on its way from a single process running on just one VM to a scalable and highly available service. I hope to expose the exact operations and the required infra adjustments to progress from one stage to another. And I'm sure you'll notice how painful tedious it used to be without a higher-level application runtime like Kubernetes.
After that, when the problem set becomes clear, I'll show how Kubernetes makes the above steps easier while not hiding the building blocks and still following the good old deployment patterns and practices.
Part 1: Self-hosting a simple python web app
From zero to desperate hero.
Get your hands dirty with the below examples using this Mini-LAN (Ubuntu, Docker) Playground 👨🔬
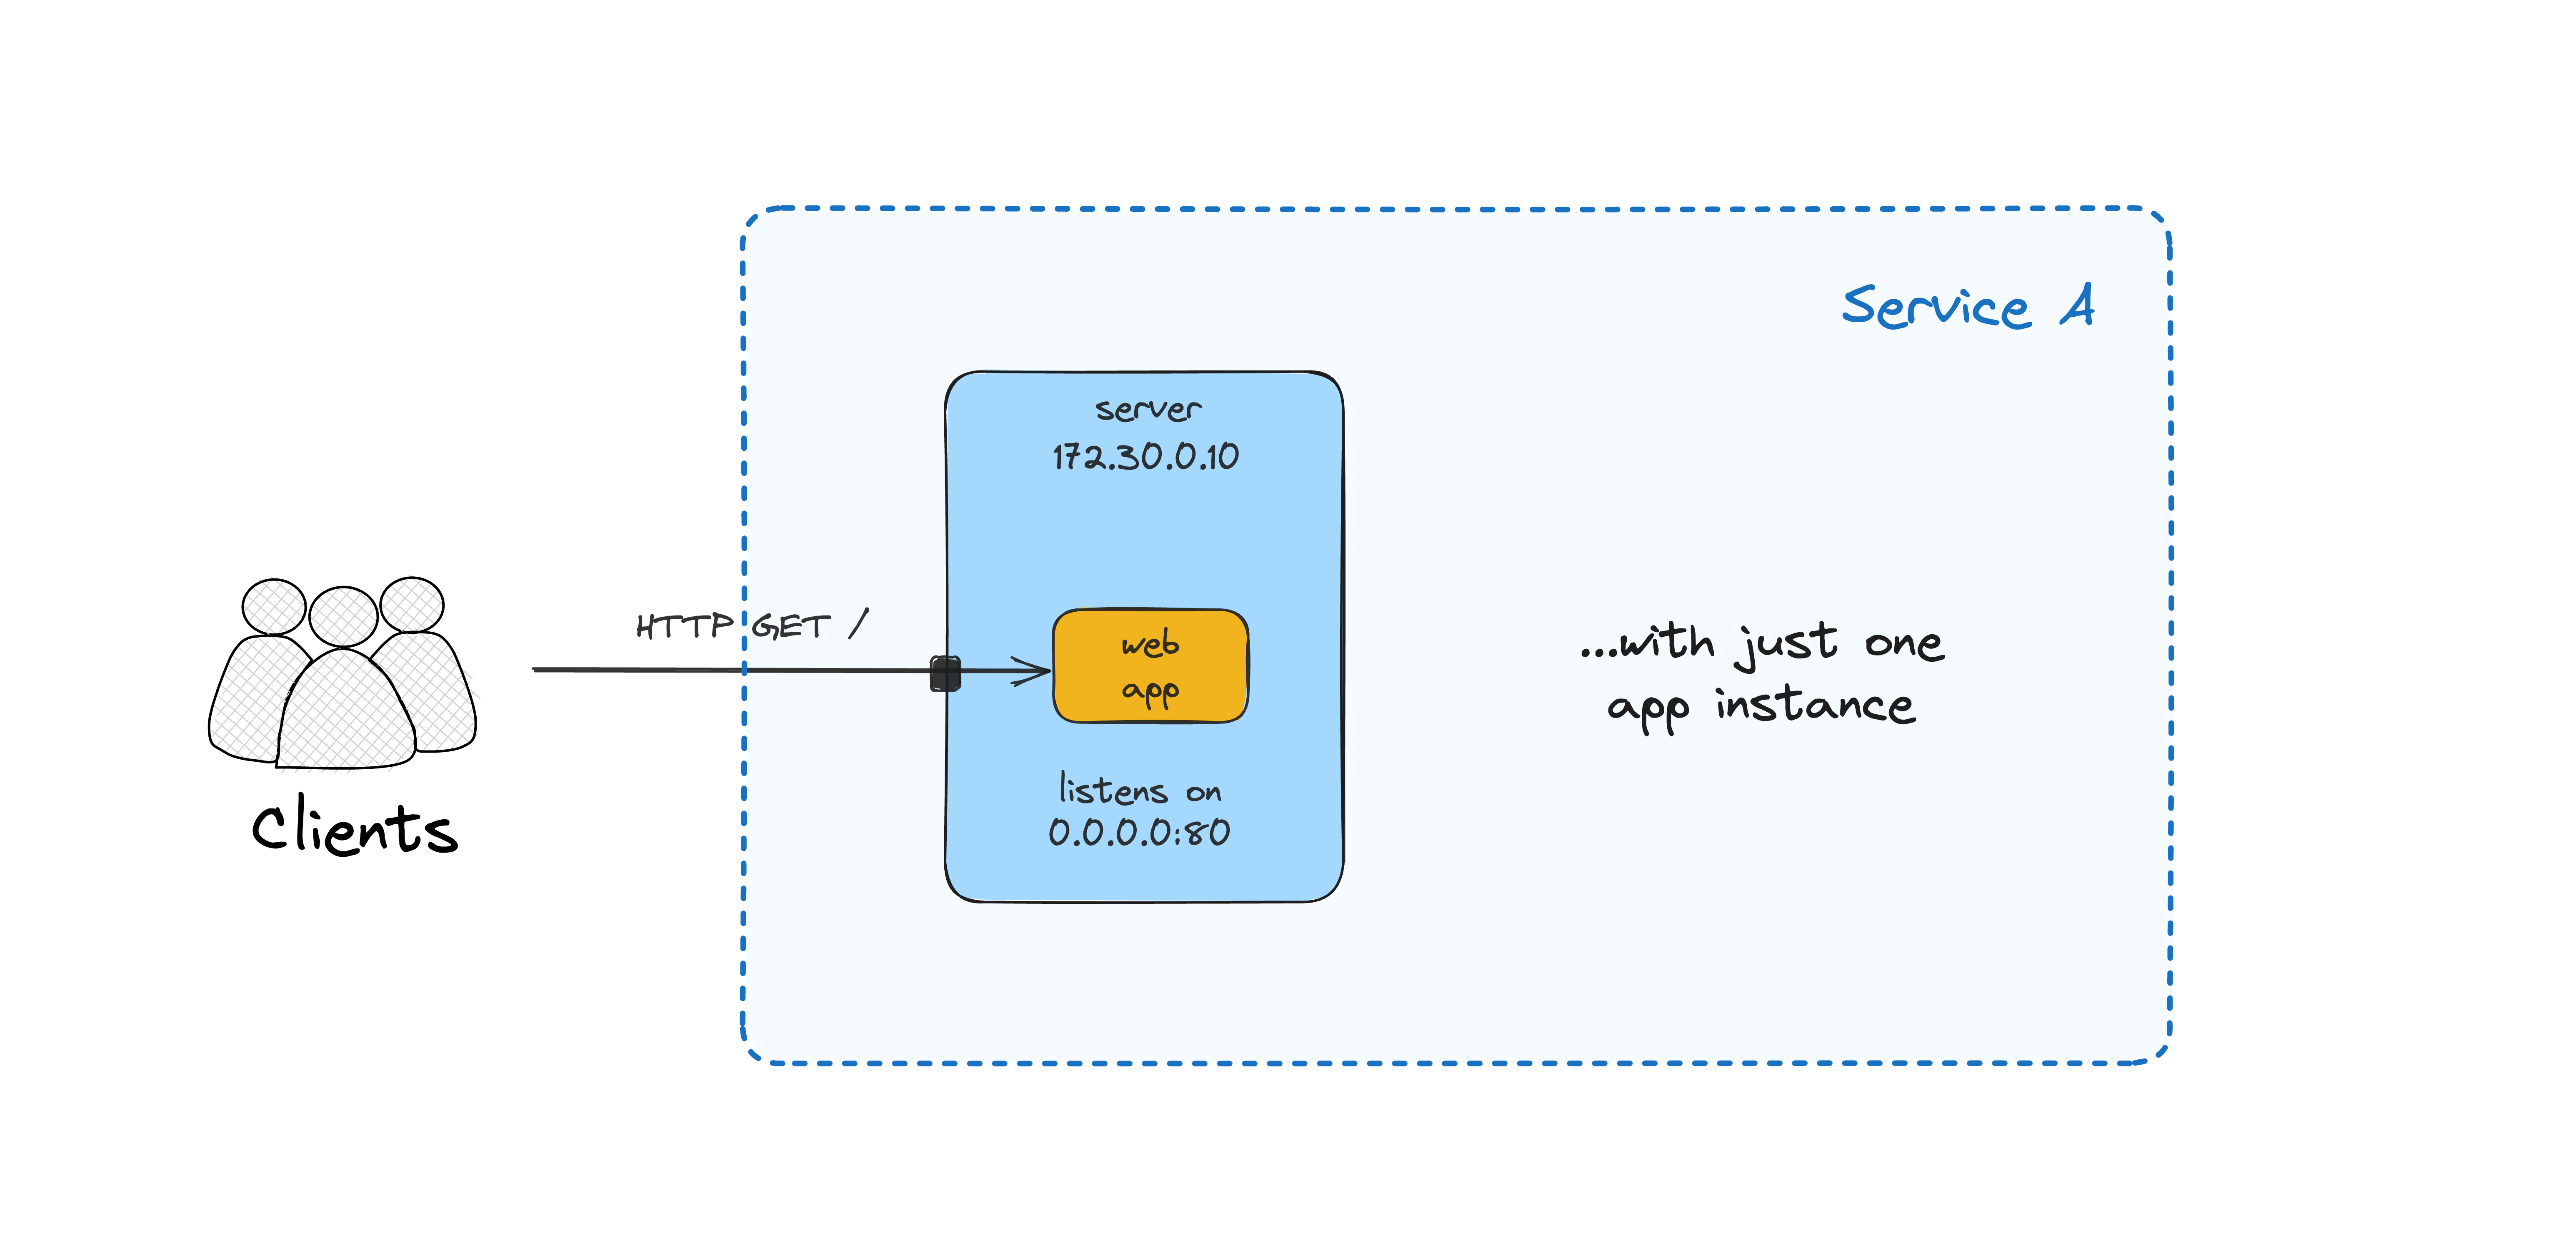
Single app instance
Let's start really simple and run a single instance of our web application. I'll use Docker to run the application process, but it could have been a regular process controlled by something like supervisord or even a systemd-controlled daemon:
# syntax=docker/dockerfile:1
FROM python:3.9-slim

RUN pip install fastapi "uvicorn[standard]"

WORKDIR /code

COPY <<EOF main.py
import socket
import time
from fastapi import FastAPI

app = FastAPI()

@app.get("/")
async def root():
  time.sleep(1)
  return {"message": f"Hello from {socket.gethostname()}"}
EOF

CMD ["uvicorn", "main:app", "--host", "0.0.0.0", "--port", "3000", "--proxy-headers"]
On a VM, run the following command:
docker run --name app --rm -p 3000:3000 \
  ghcr.io/iximiuz/labs/kubernetes-101/app:v1.0.0
Now you should be able to access the app at <VM_IP:3000>.
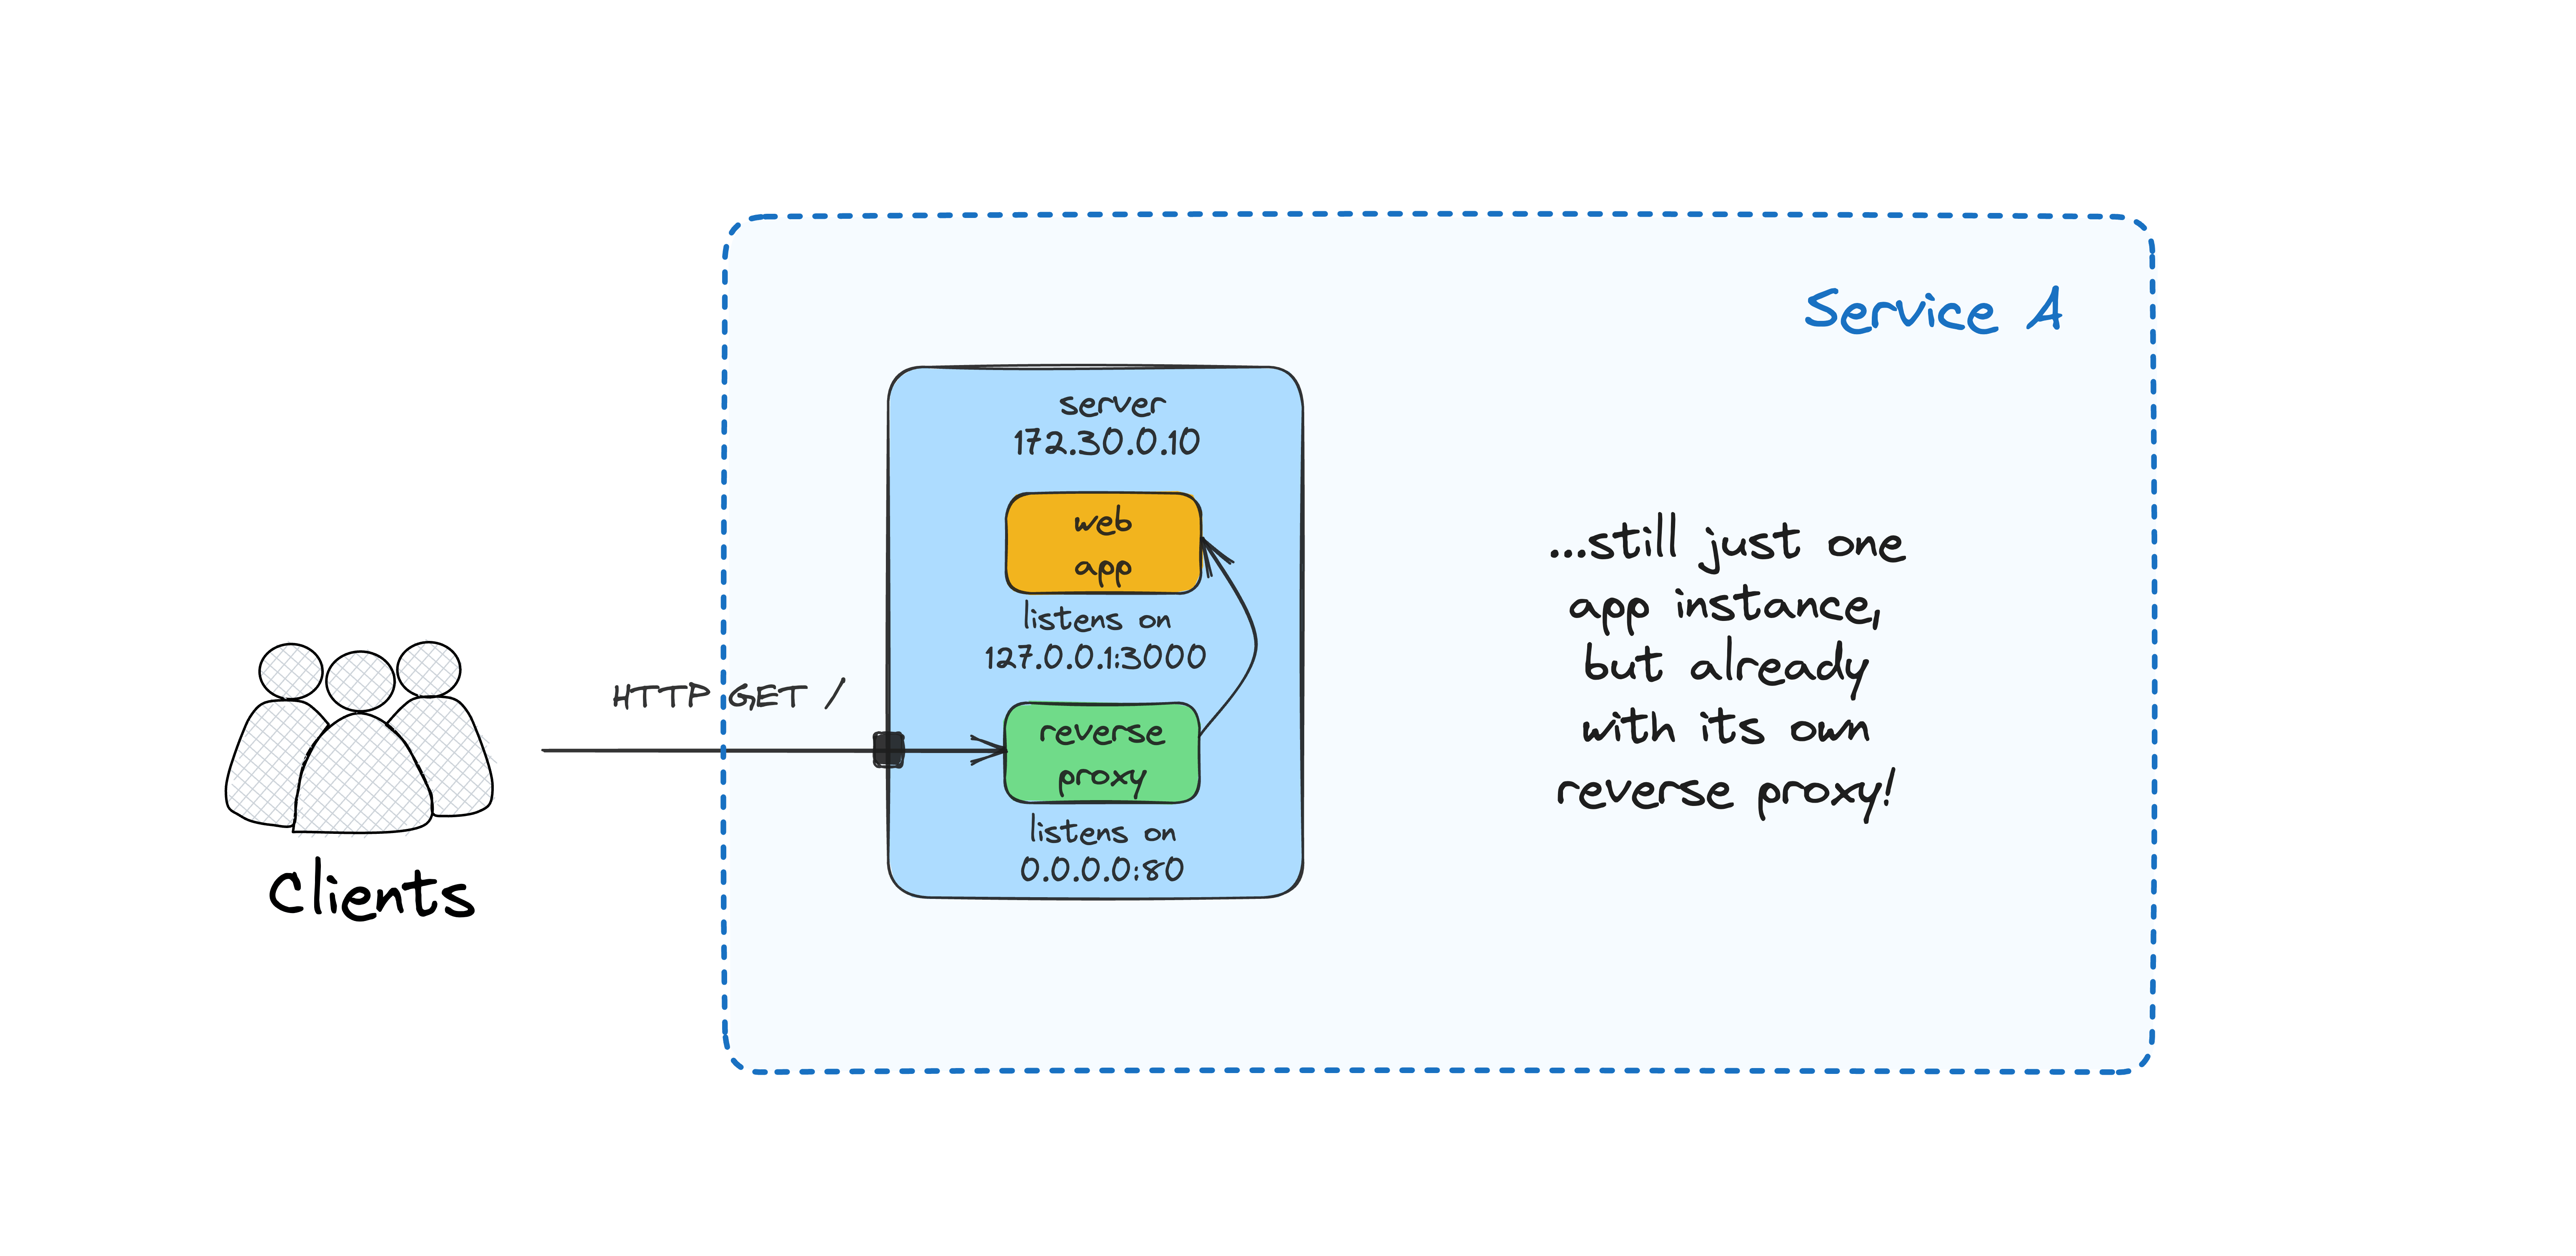
Single app instance with a reverse proxy
It's quite typical to put a web server in front of the application server to terminate TLS and deal with other security and performance concerns. For instance, both Flask and FastAPI recommend using a dedicated reverse proxy like Nginx or Traefik in front of the ASGI/WSGI server.
Let's try running our reverse proxy as a sidecar container:
# syntax=docker/dockerfile:1
FROM nginx:1-alpine

RUN rm /etc/nginx/conf.d/default.conf

COPY <<EOF /etc/nginx/conf.d/app.conf
upstream app_server {
  server app:3000 fail_timeout=0;
}

server {
  listen 80 default_server;

  keepalive_timeout 5;
  client_max_body_size 128M;

  location / {
    try_files $uri $uri/ @app_server_proxy;
  }

  location @app_server_proxy {
    proxy_set_header X-Forwarded-For \$proxy_add_x_forwarded_for;
    proxy_set_header X-Forwarded-Proto \$scheme;
    proxy_set_header Host \$http_host;
    proxy_redirect off;

    proxy_pass http://app_server;
  }
}
EOF
To allow the reverse proxy container talk to the app container using its hostname (app), we'll need to use a non-default Docker network:
docker network create appanet
Show time:
docker run --name app --rm -d --network appanet \
  ghcr.io/iximiuz/labs/kubernetes-101/app:v1.0.0

docker run --name proxy --rm -p 80:80 --network appanet \
  ghcr.io/iximiuz/labs/kubernetes-101/proxy:v1.0.0
At this stage, you should be able to access the app at <VM_IP>:80, and it's slightly more "production" ready, thanks to Nginx.
NB: Alternatively, you can use a Docker compose service to run these two containers together on a single server.
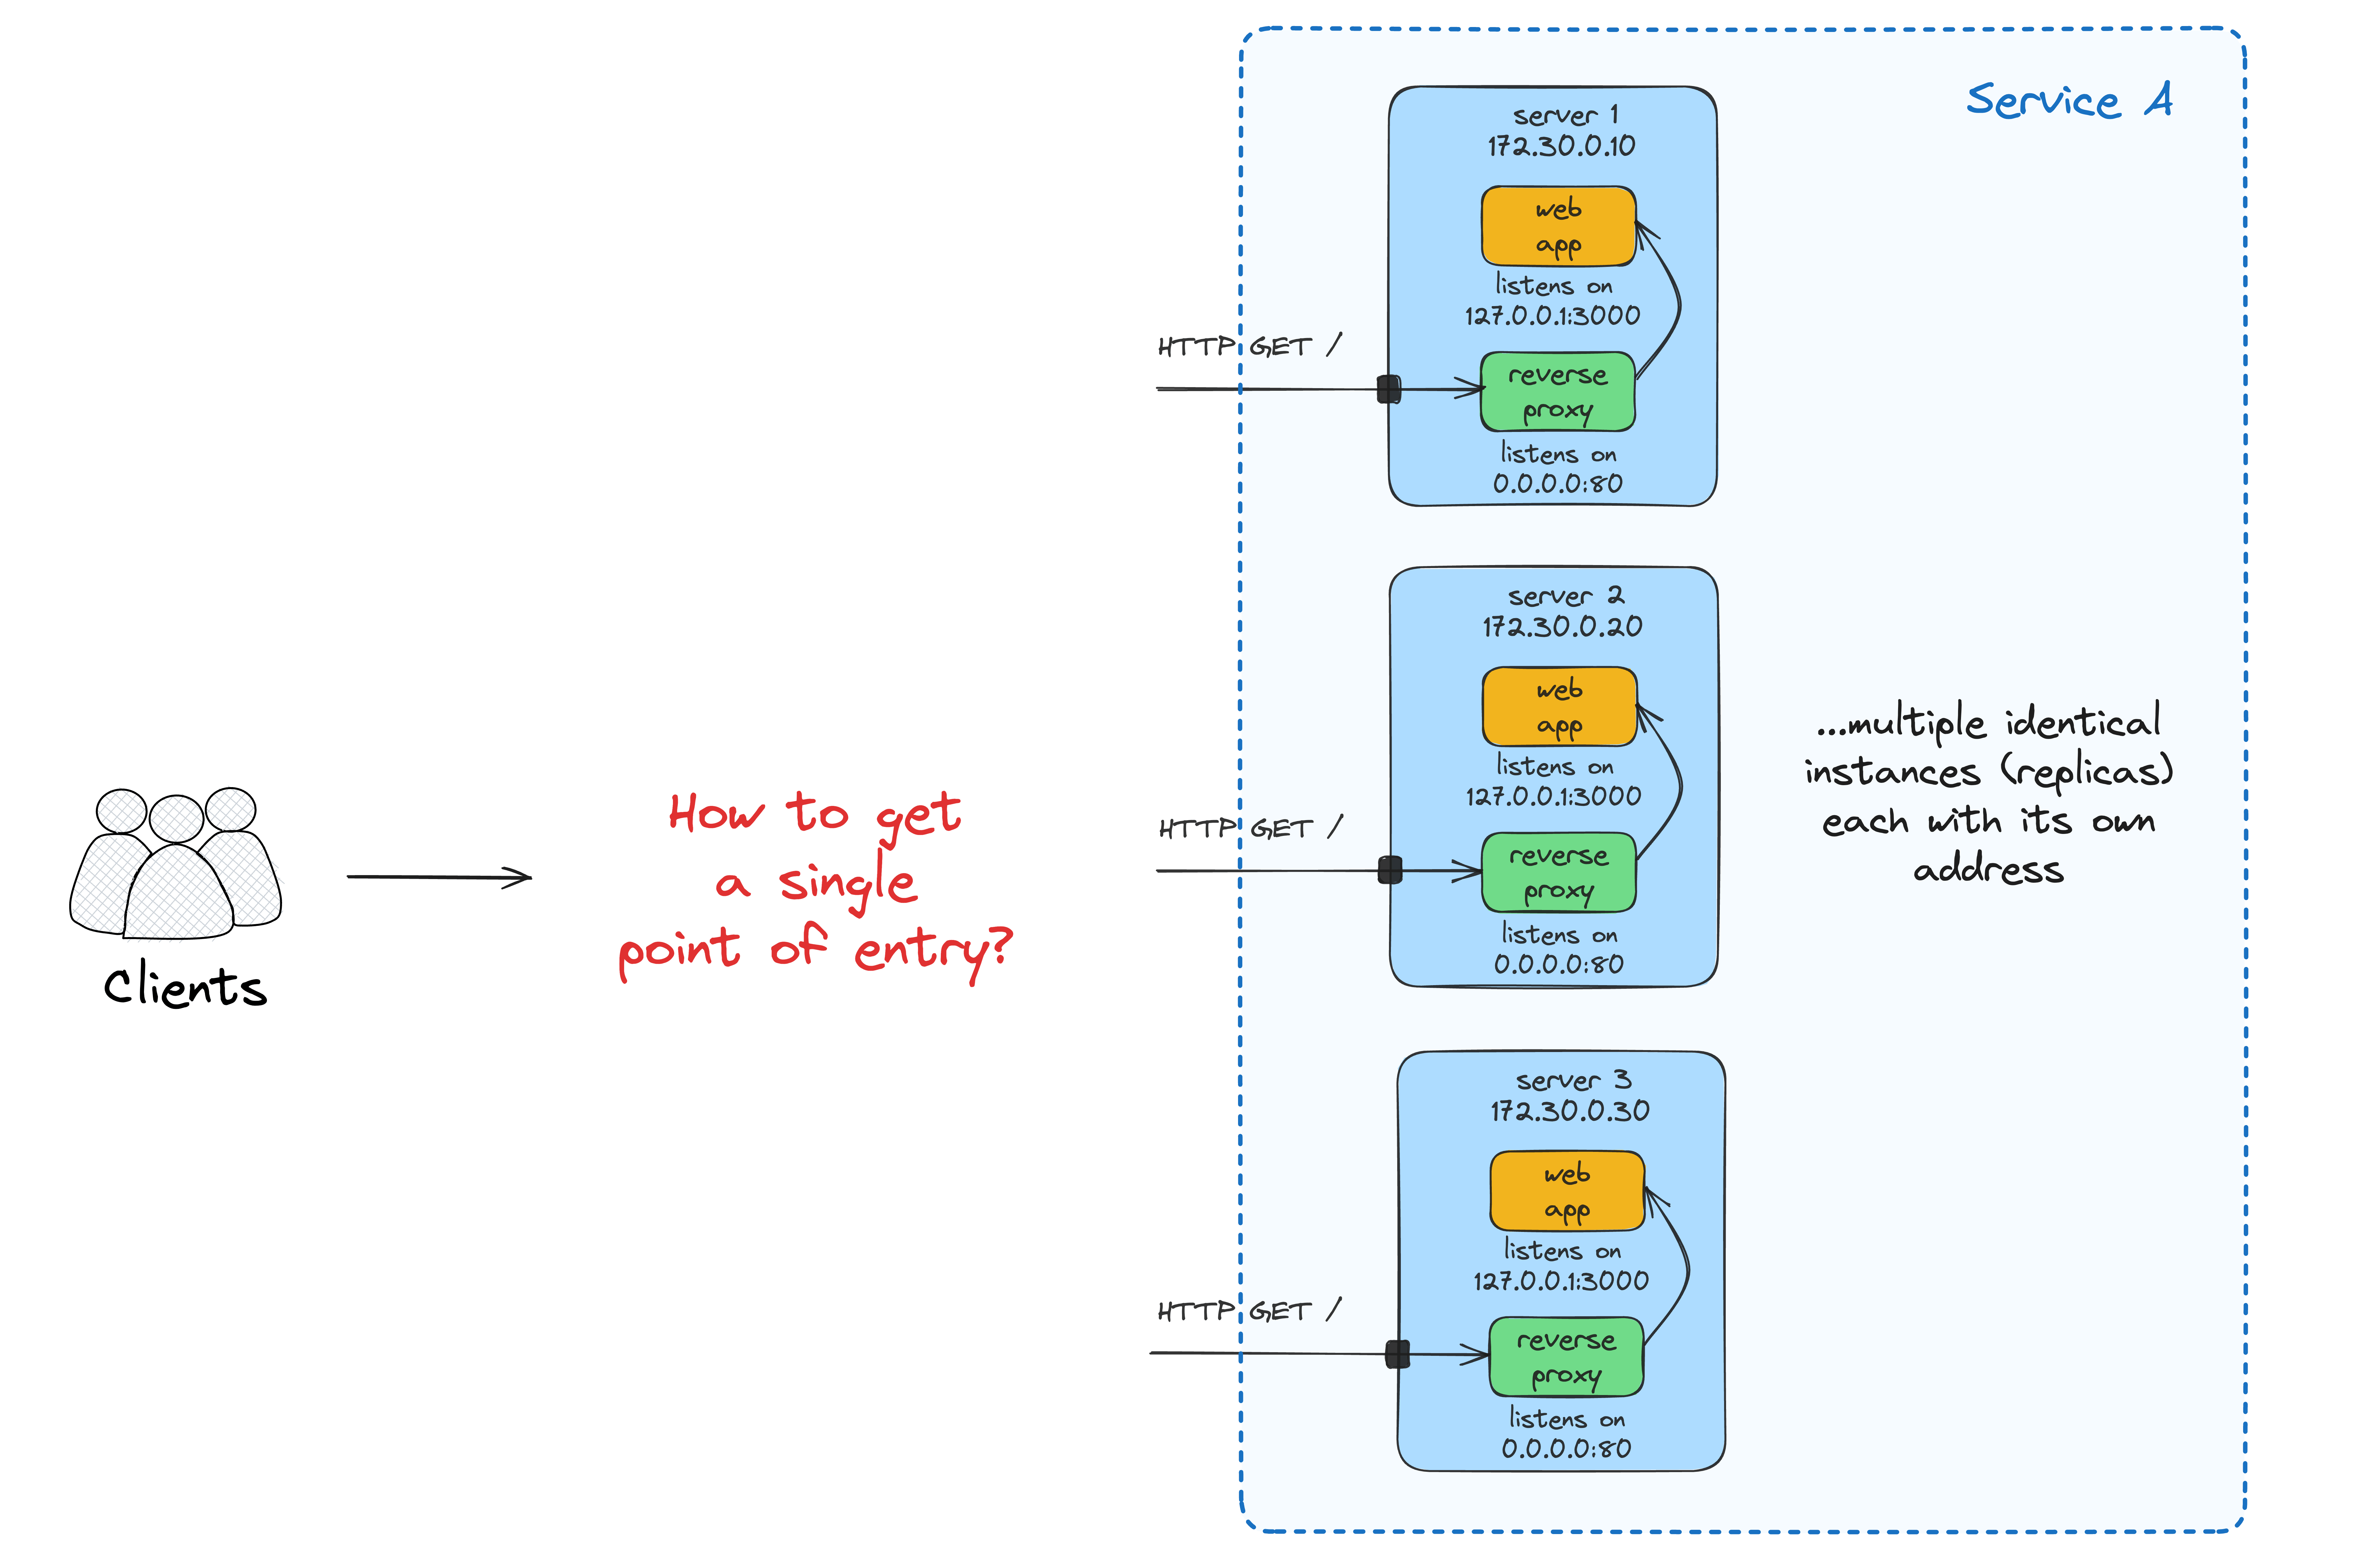
Replication and load balancing
Running a single instance of an app is rarely a good idea:
- Not reliable enough (a single point of failure).
- Hard to deploy a new version of the code without disrupting traffic.
- Potentially, may not be able to handle the load.
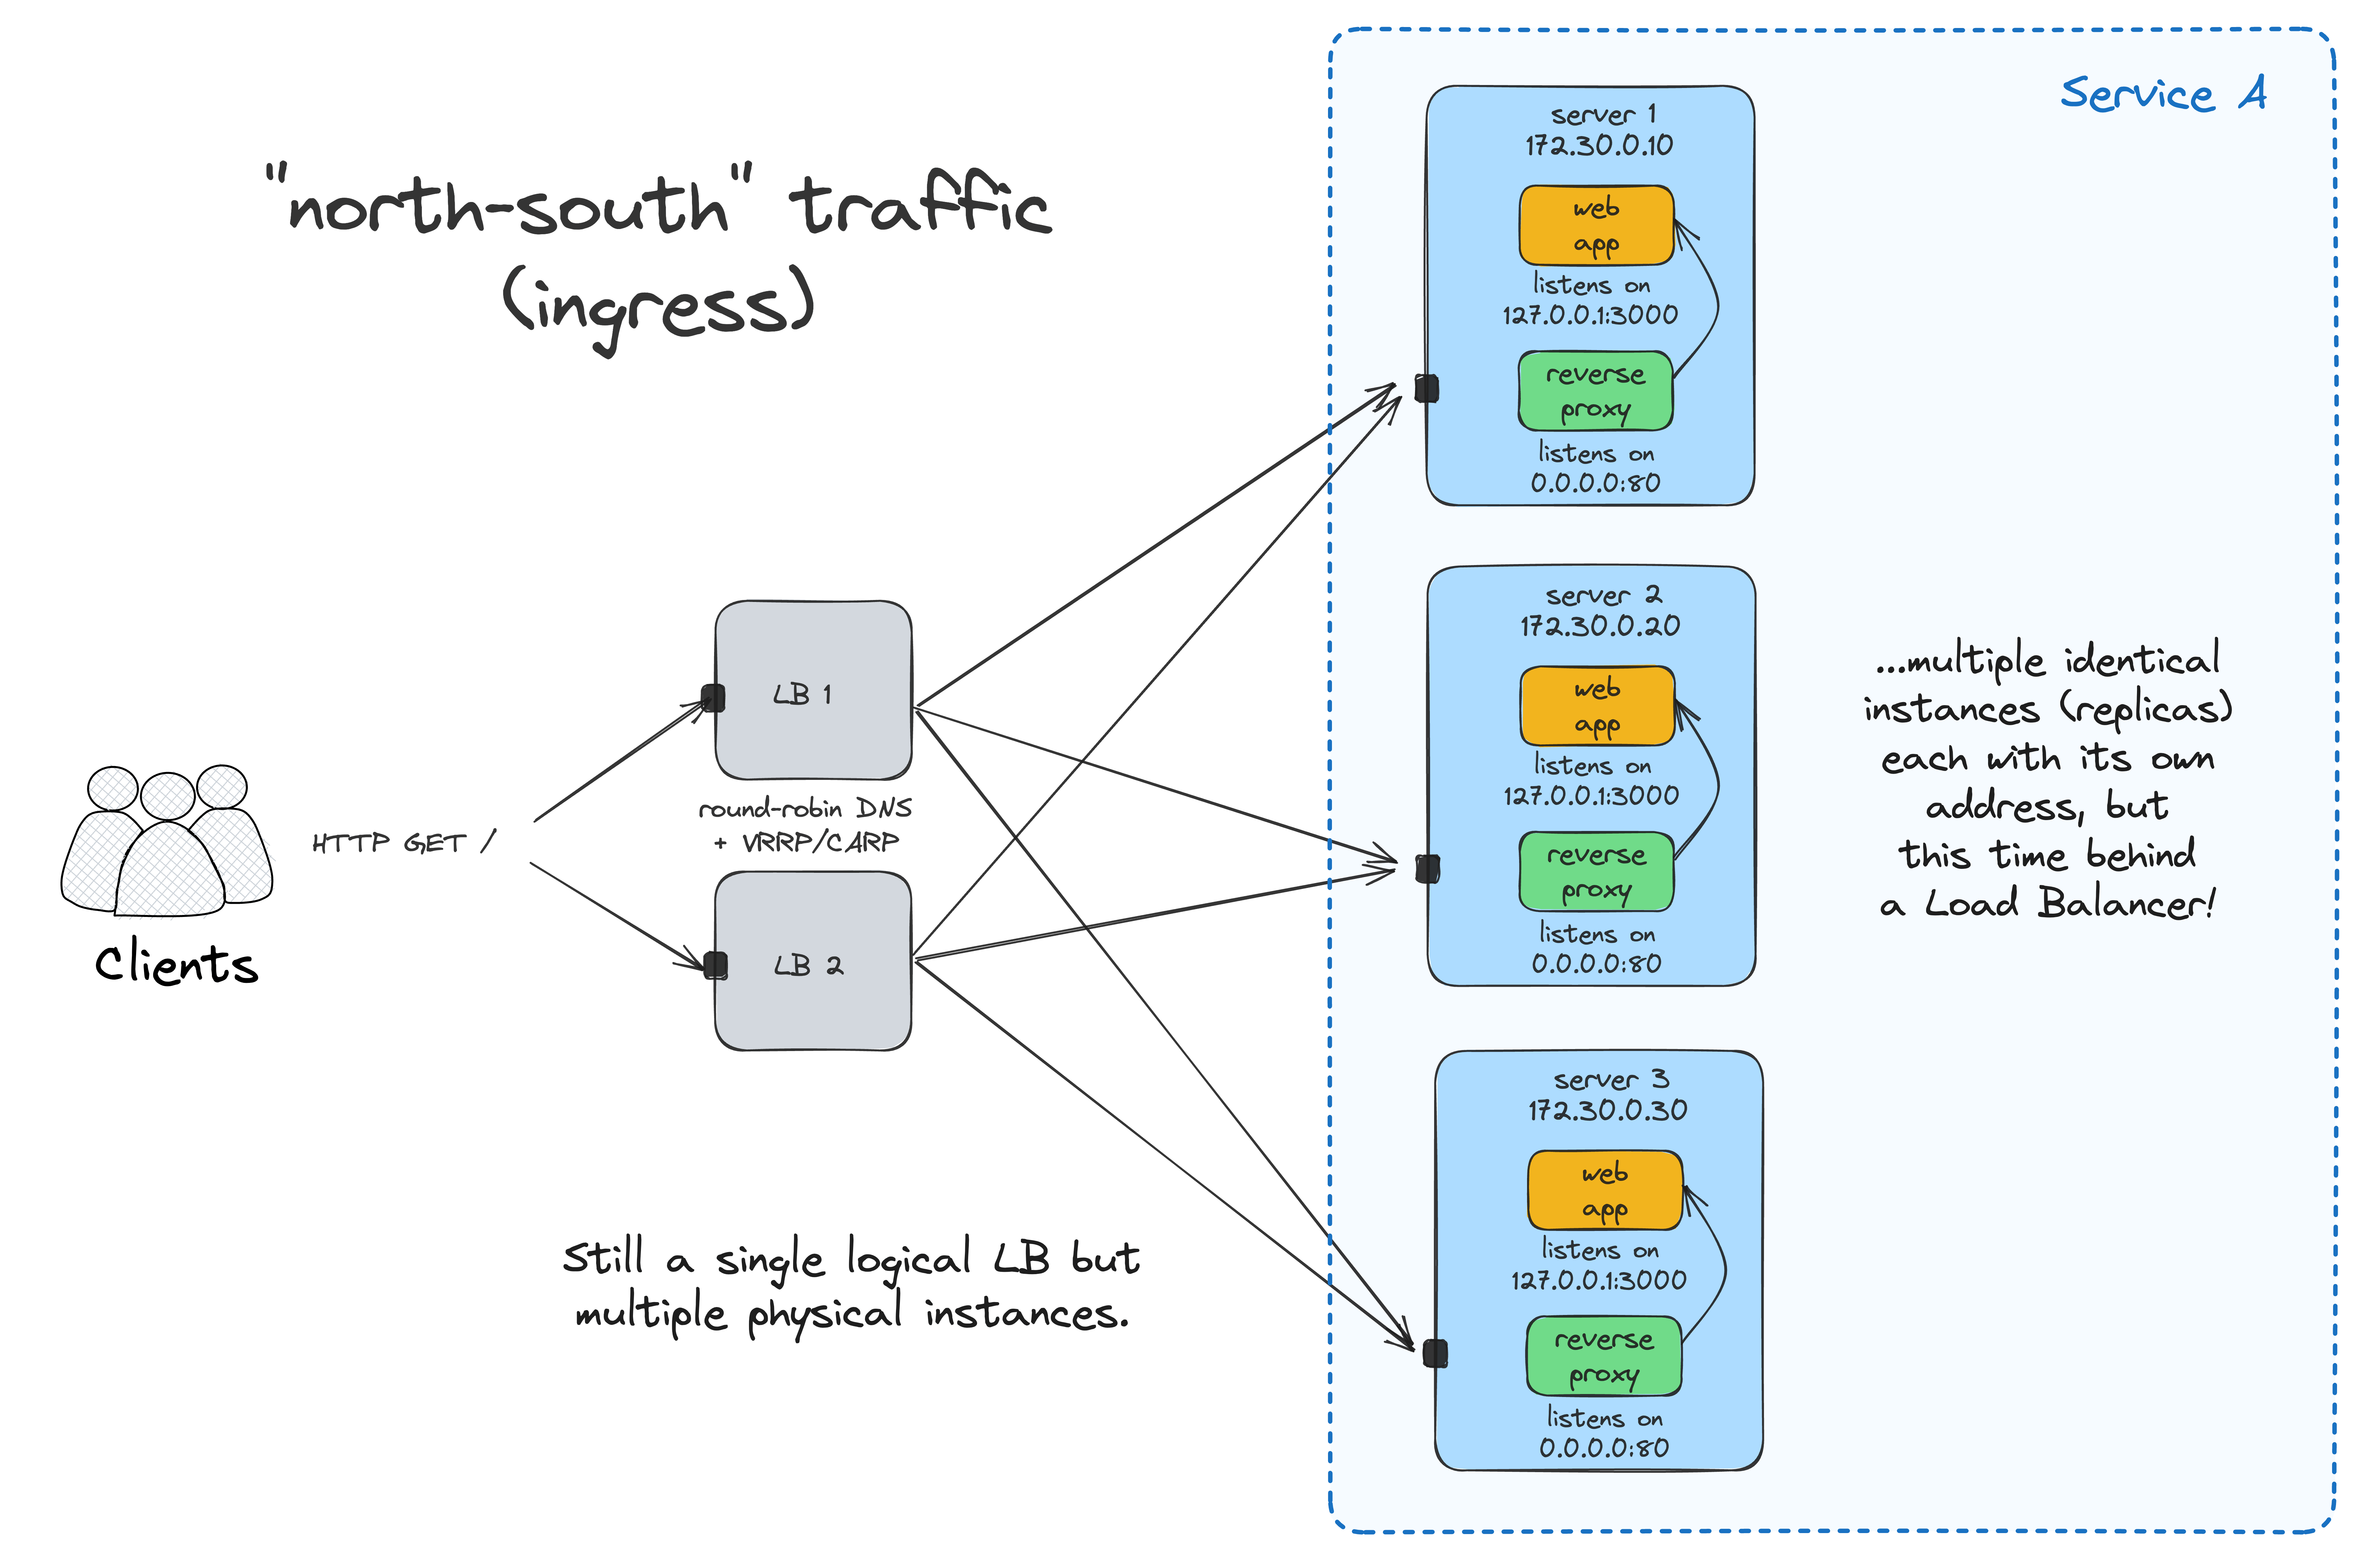
Starting a few copies of our app on several identical VMs is simple, but accessing such a service without a single point of entry will be inconvenient - (external) clients usually want to have just one name to call an API.
A load balancer/ingress gateway to the rescue:
# syntax=docker/dockerfile:1
FROM nginx:1-alpine

RUN rm /etc/nginx/conf.d/default.conf

COPY <<EOF /etc/nginx/conf.d/lb.conf
upstream services {
  server 172.16.0.3:80 fail_timeout=0;
  server 172.16.0.4:80 fail_timeout=0;
}

server {
  listen 80 default_server;

  keepalive_timeout 5;
  client_max_body_size 128M;

  location / {
    proxy_set_header X-Forwarded-For \$proxy_add_x_forwarded_for;
    proxy_set_header X-Forwarded-Proto \$scheme;
    proxy_set_header Host \$http_host;
    proxy_redirect off;

    proxy_pass http://services;
  }
}
EOF
I'll use a separate VM to run the load balancer:
docker run --name lb --rm -p 80:80 \
  ghcr.io/iximiuz/labs/kubernetes-101/lb:v1.0.0
Now, you can access the app at <LB_VM_IP>:80, and the requests will be evenly distributed between the two app instances running on <APP_VM_1:80> and <APP_VM_2:80>.
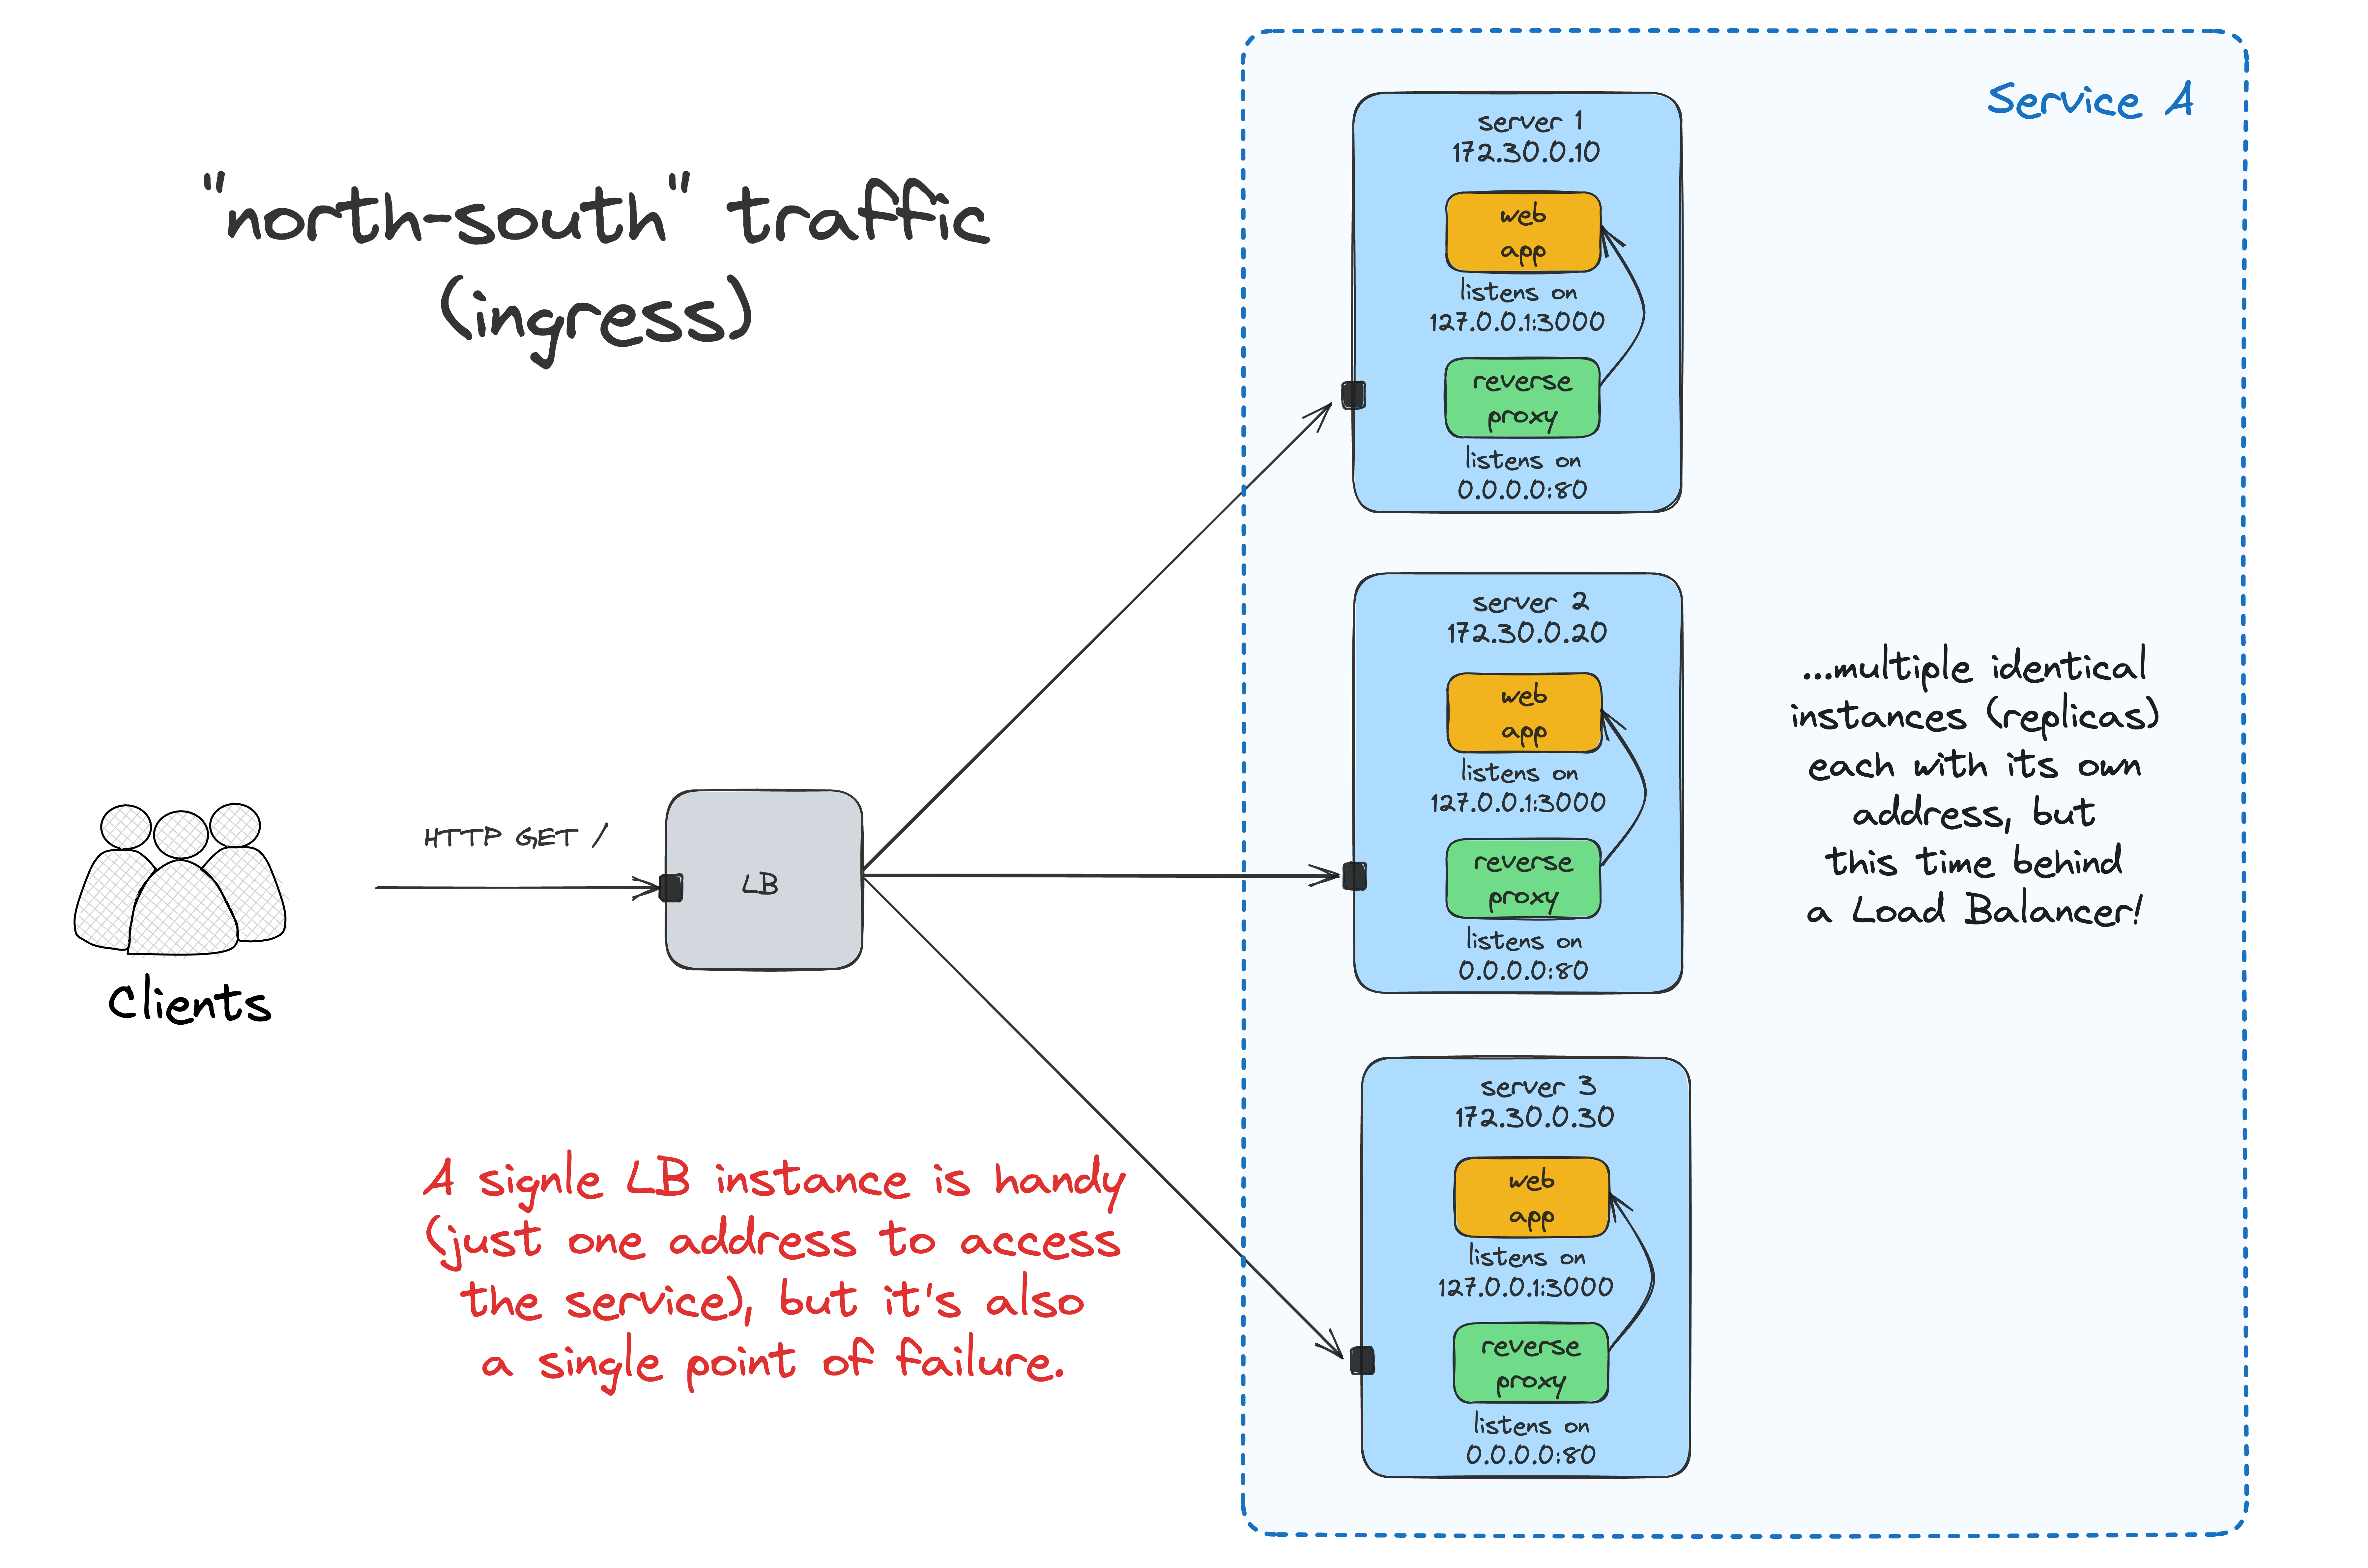
The problem is that having the load balancer deployed to just one VM reintroduces a single point of failure to the system. Luckily, it's not so hard to create a highly available LB using round-robin DNS and VRRP. Check out this nice tutorial by Traefik labs for a practical example.
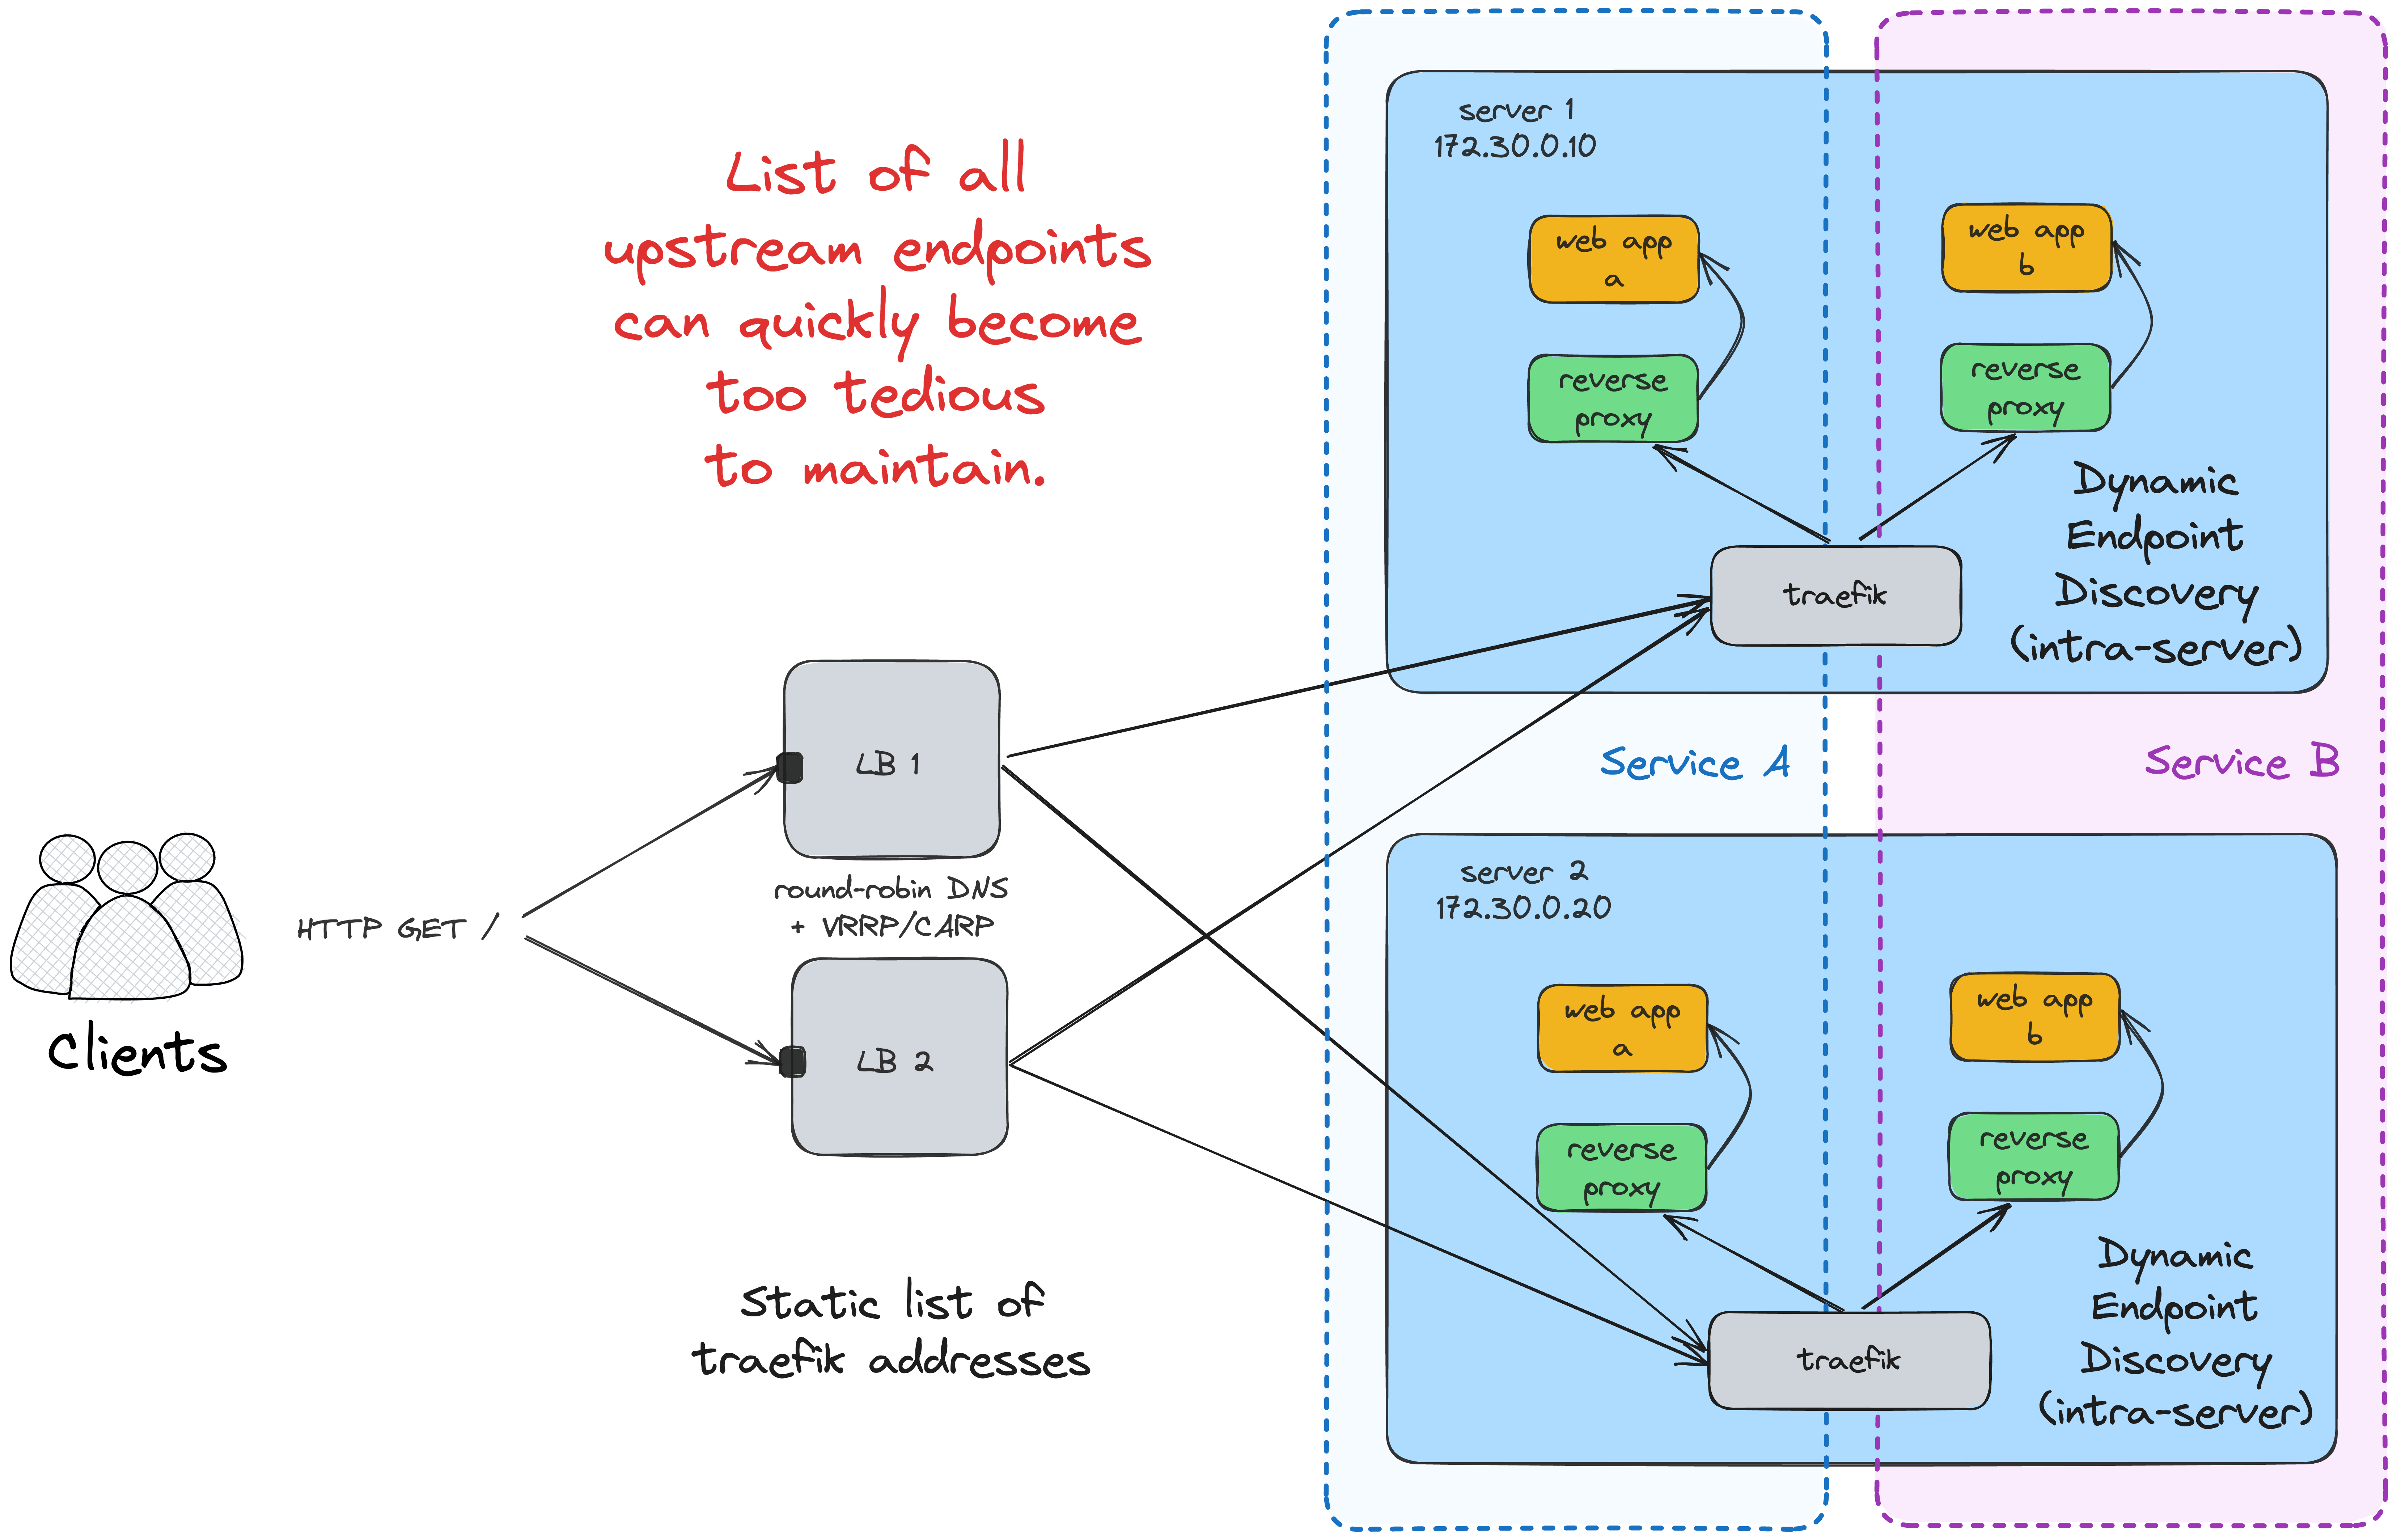
Another tricky problem to solve is maintaining an up-to-date list of upstream endpoints. With a single service running on a fixed number of nodes, a static list may do. However, with the number of services (and the load balancer instances) increasing, it can quickly become too cumbersome. Traefik can help again, thanks to its unique ability to discover (properly labeled) containers within one node:
Failure recovery
Fun time! Let's start shedding some traffic on our service:
docker run --net host -it --rm \
  ghcr.io/six-ddc/plow -c 2 -k <LB_VM_IP>:80
...and destroy one of the application nodes while it's serving requests:
ip link set eth0 down
Notice how the request rate goes down from ~2 req/s to just ~1 req/s. But also, our overly-simplistic system won't auto-recover.
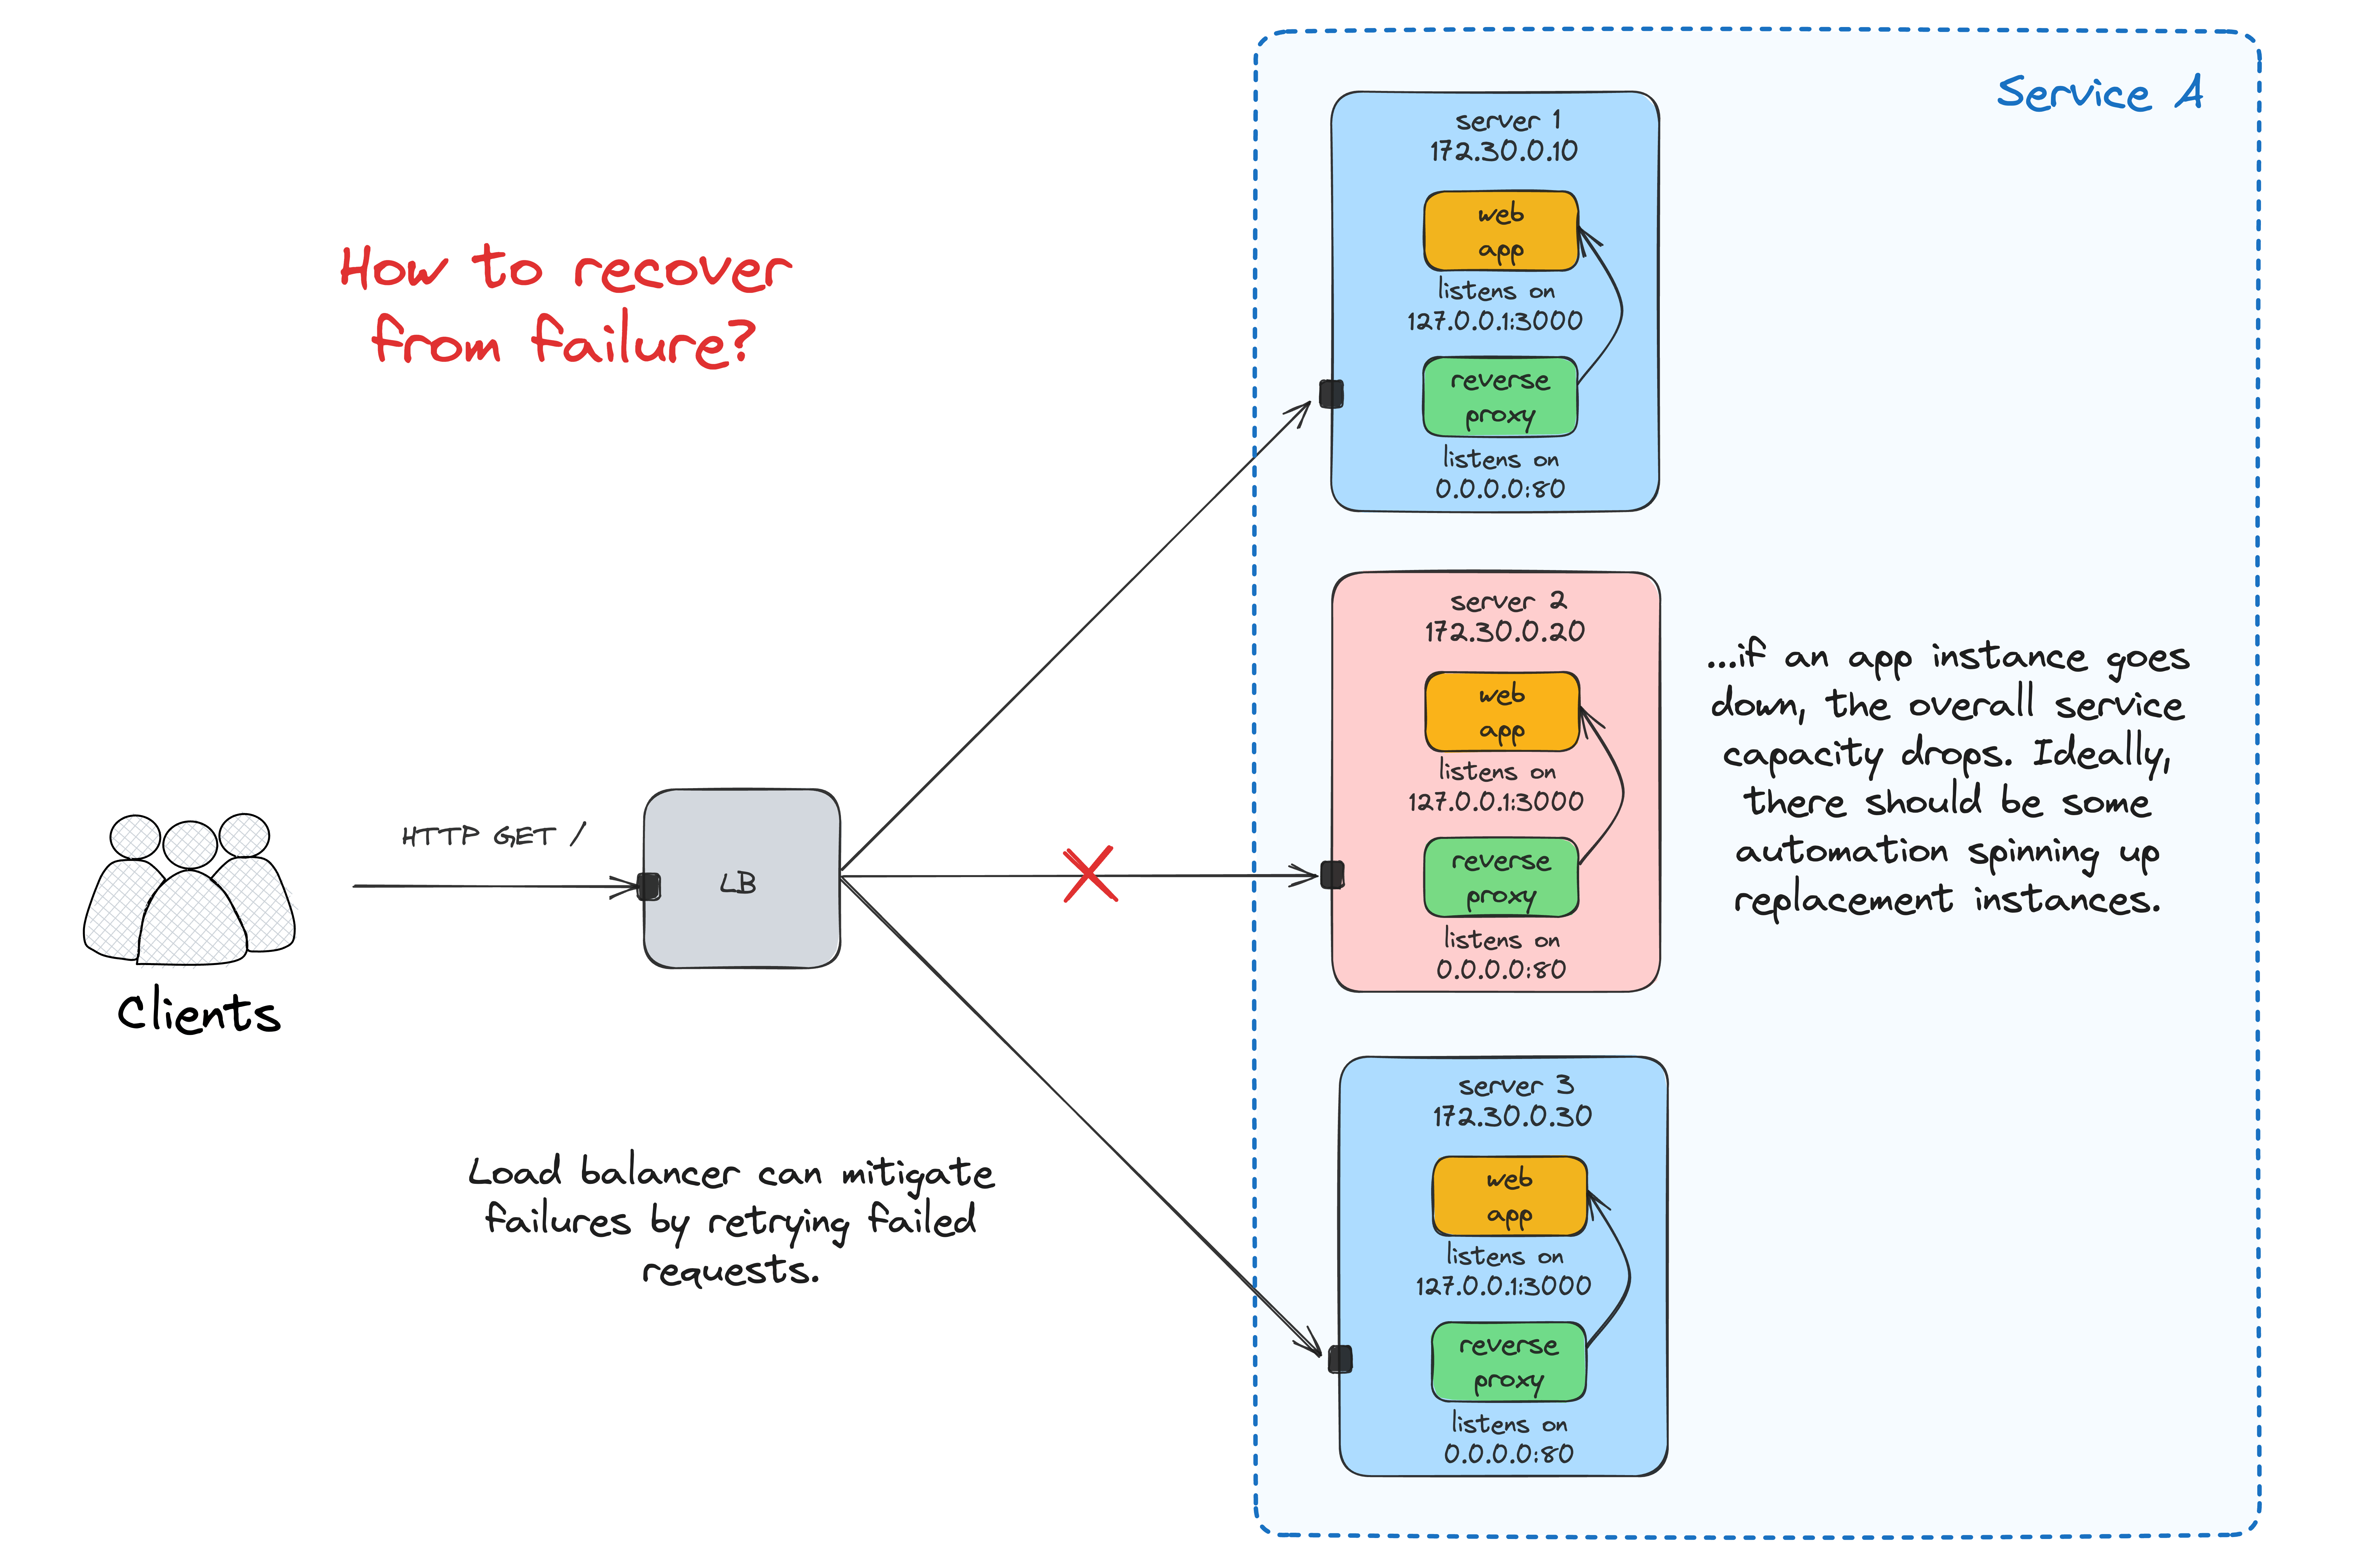
Maintaining a fixed number of replicas is challenging and requires a significant amount of automation!
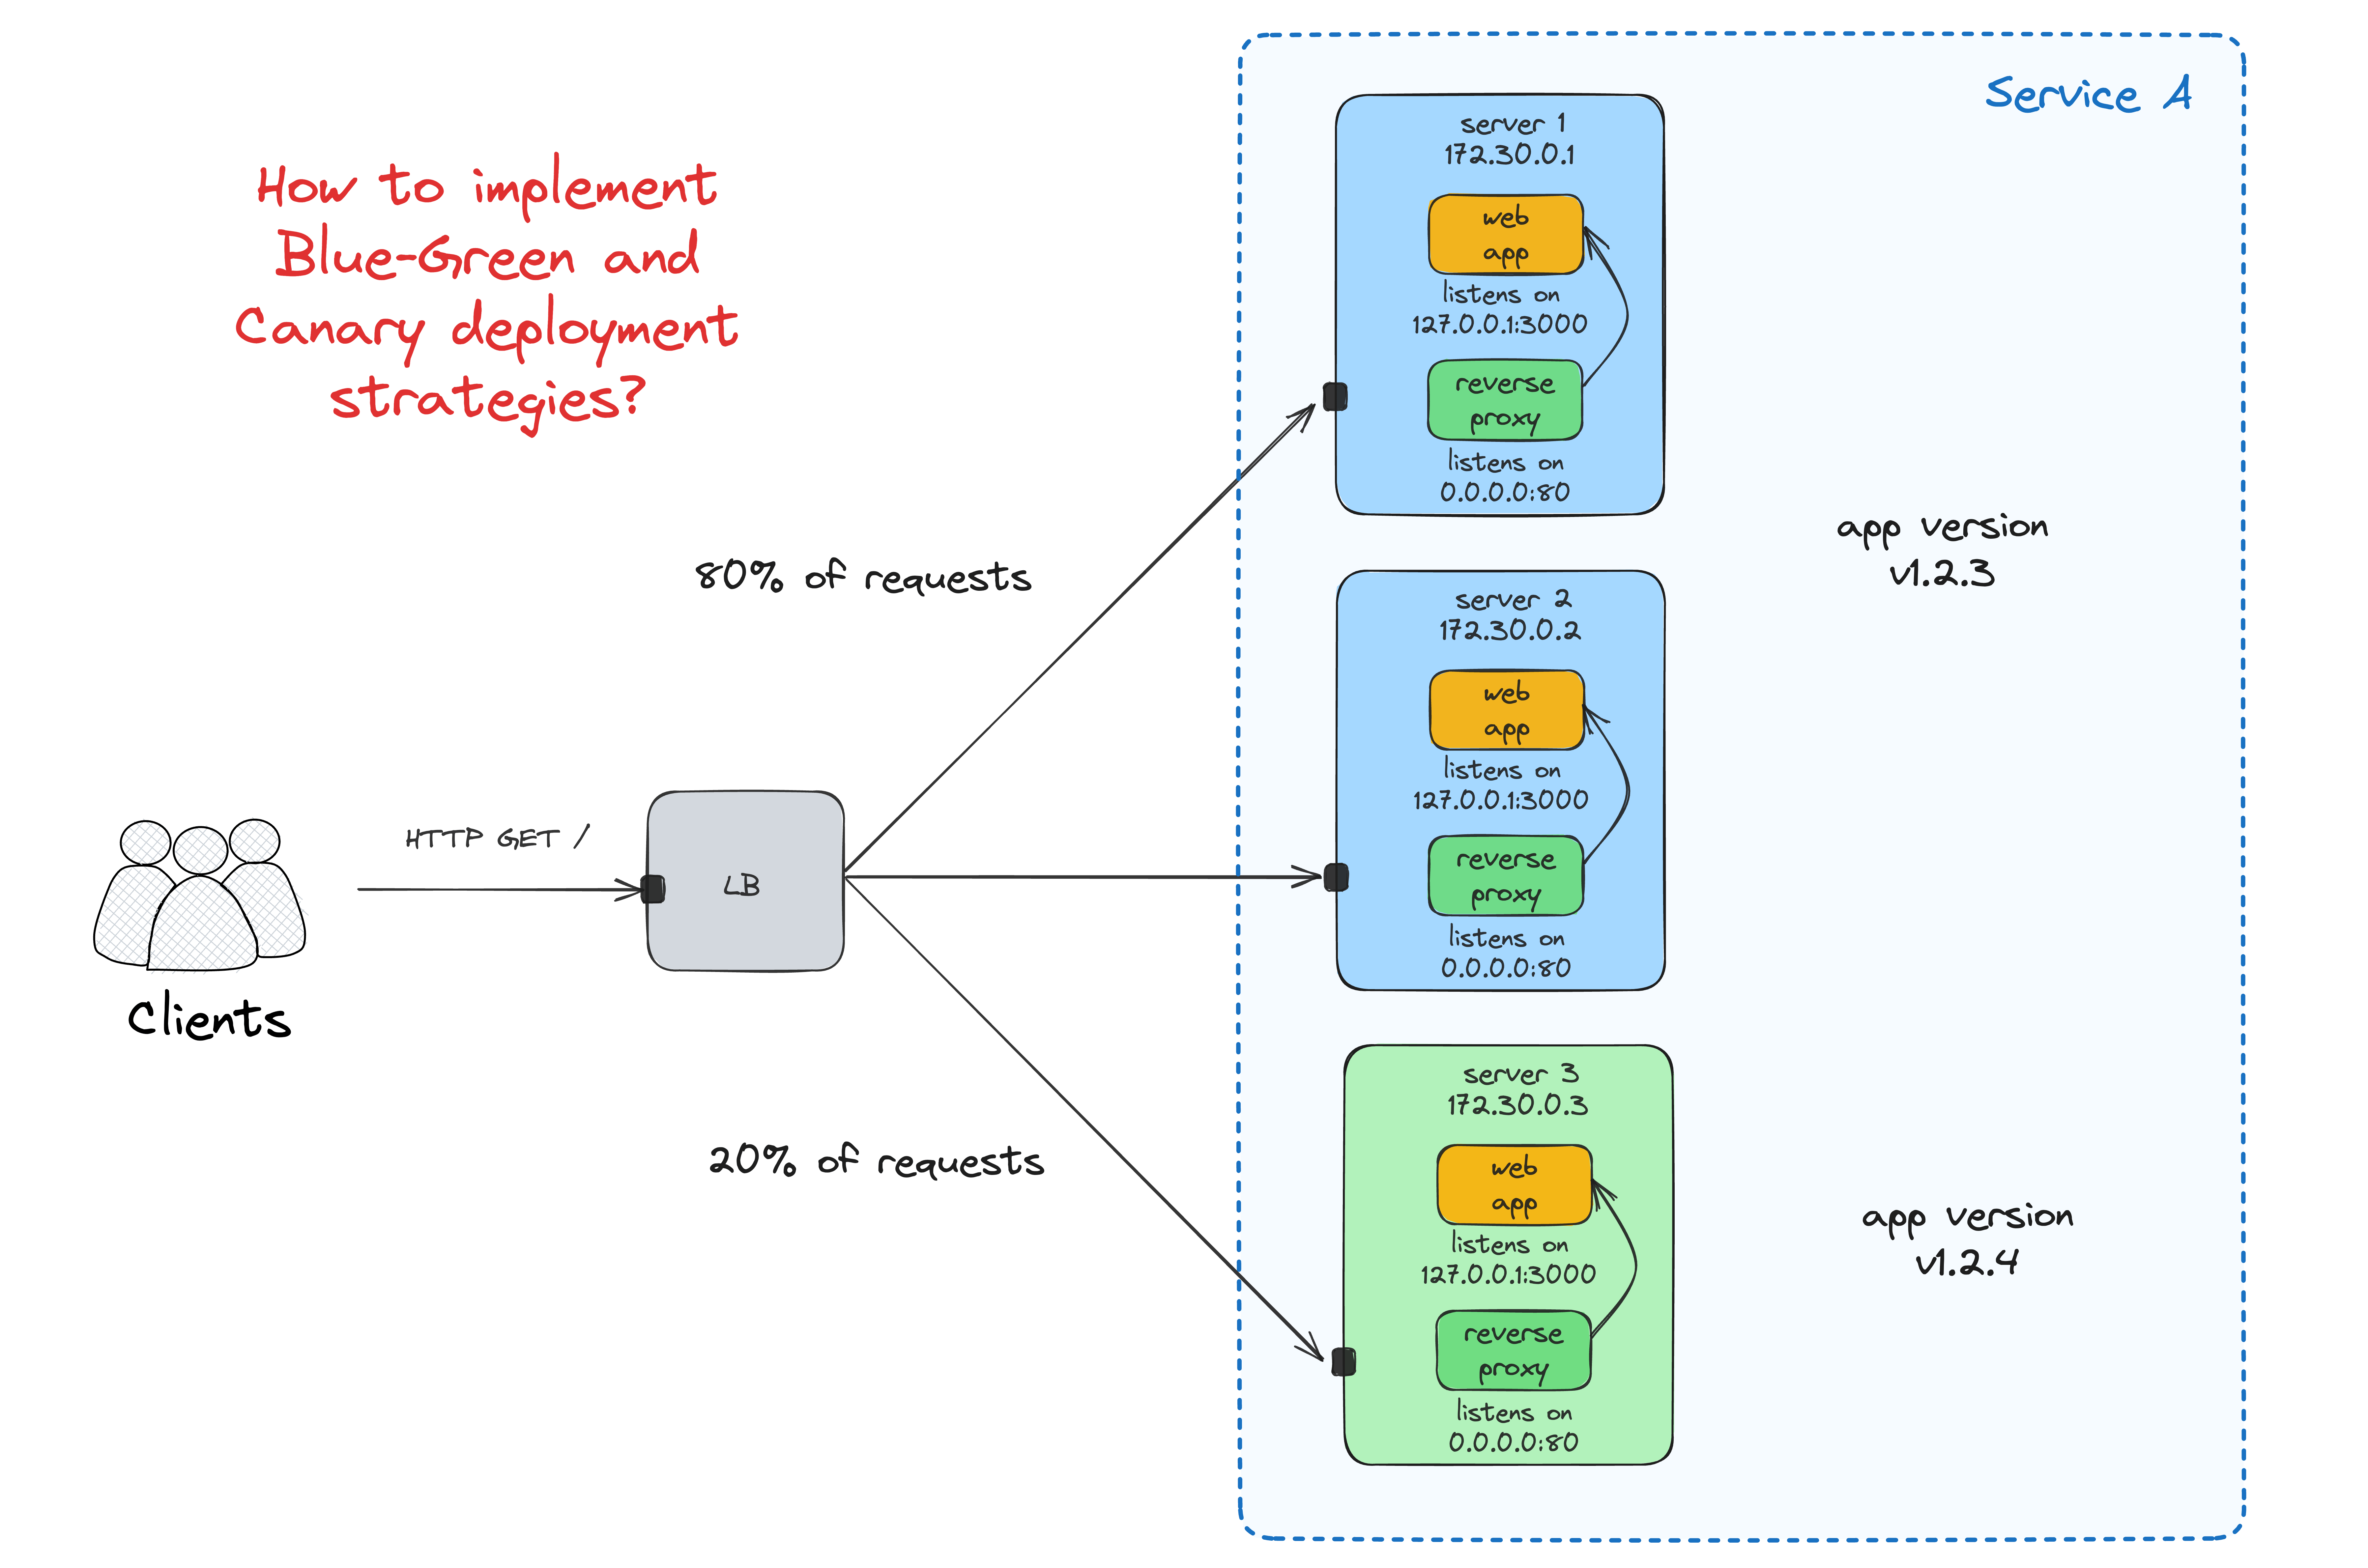
Zero-downtime, Blue-Green, and Canary deployments
...without an "orchestrator" (or any other fancy deployment automation) are hard. Maybe Basecamp's kamal made it easier recently (haven't tried using it yet), but back in the day, you'd need to come up with a bunch of scripts and/or Ansible/Chef roles to implement it. For instance, here is my last attempt to solve this problem, again using node-local Traefik's:
Part 2: Running apps in Kubernetes
Meanwhile, in an alternative universe...
Let's see how we can achieve the feature parity with the previous setup and hopefully even exceed it by migrating our simple app to Kubernetes, as-is!
Get your hands dirty with the examples below using this Multi-node Kubernetes Cluster Playground 👨🔬
Single app instance
Running a single instance of an app in Kubernetes is as simple as running that Docker container from Part 1:
kubectl run --image ghcr.io/iximiuz/labs/kubernetes-101/app:v1.0.0 app-01
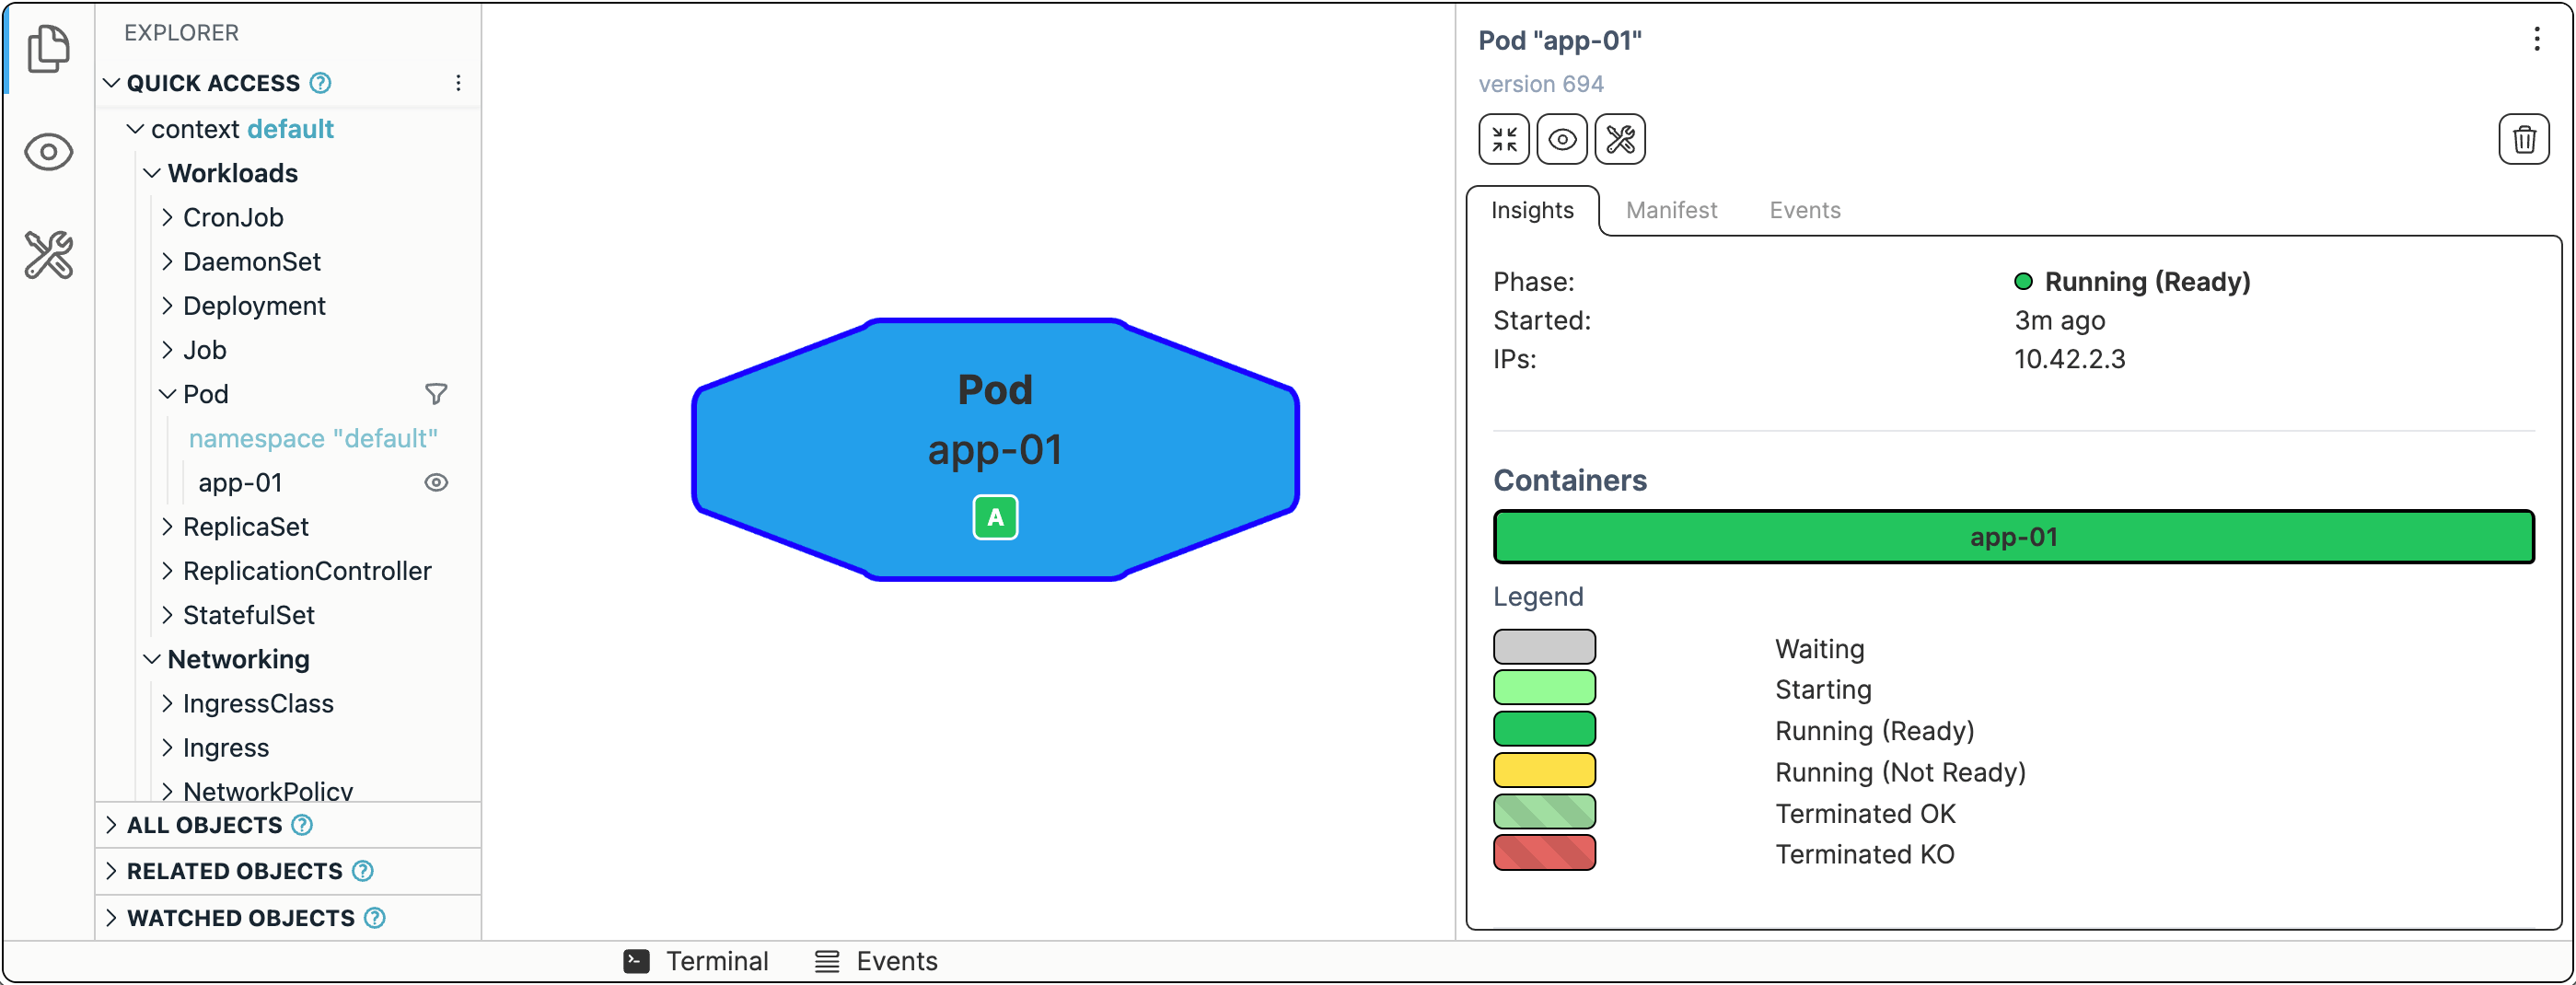
If you're curious about the Kubernetes visualization tool in use 👉 github.com/iximiuz/kexp.
Now, let's try accessing it. The Kubernetes way to do port publishing (like docker run -p 3000:3000 ...) is called port-forward:
kubectl port-forward app-01 --address 0.0.0.0 3000
The app should now be available at <CONTROL_PLANE_IP>:3000.
Single app instance with a reverse proxy
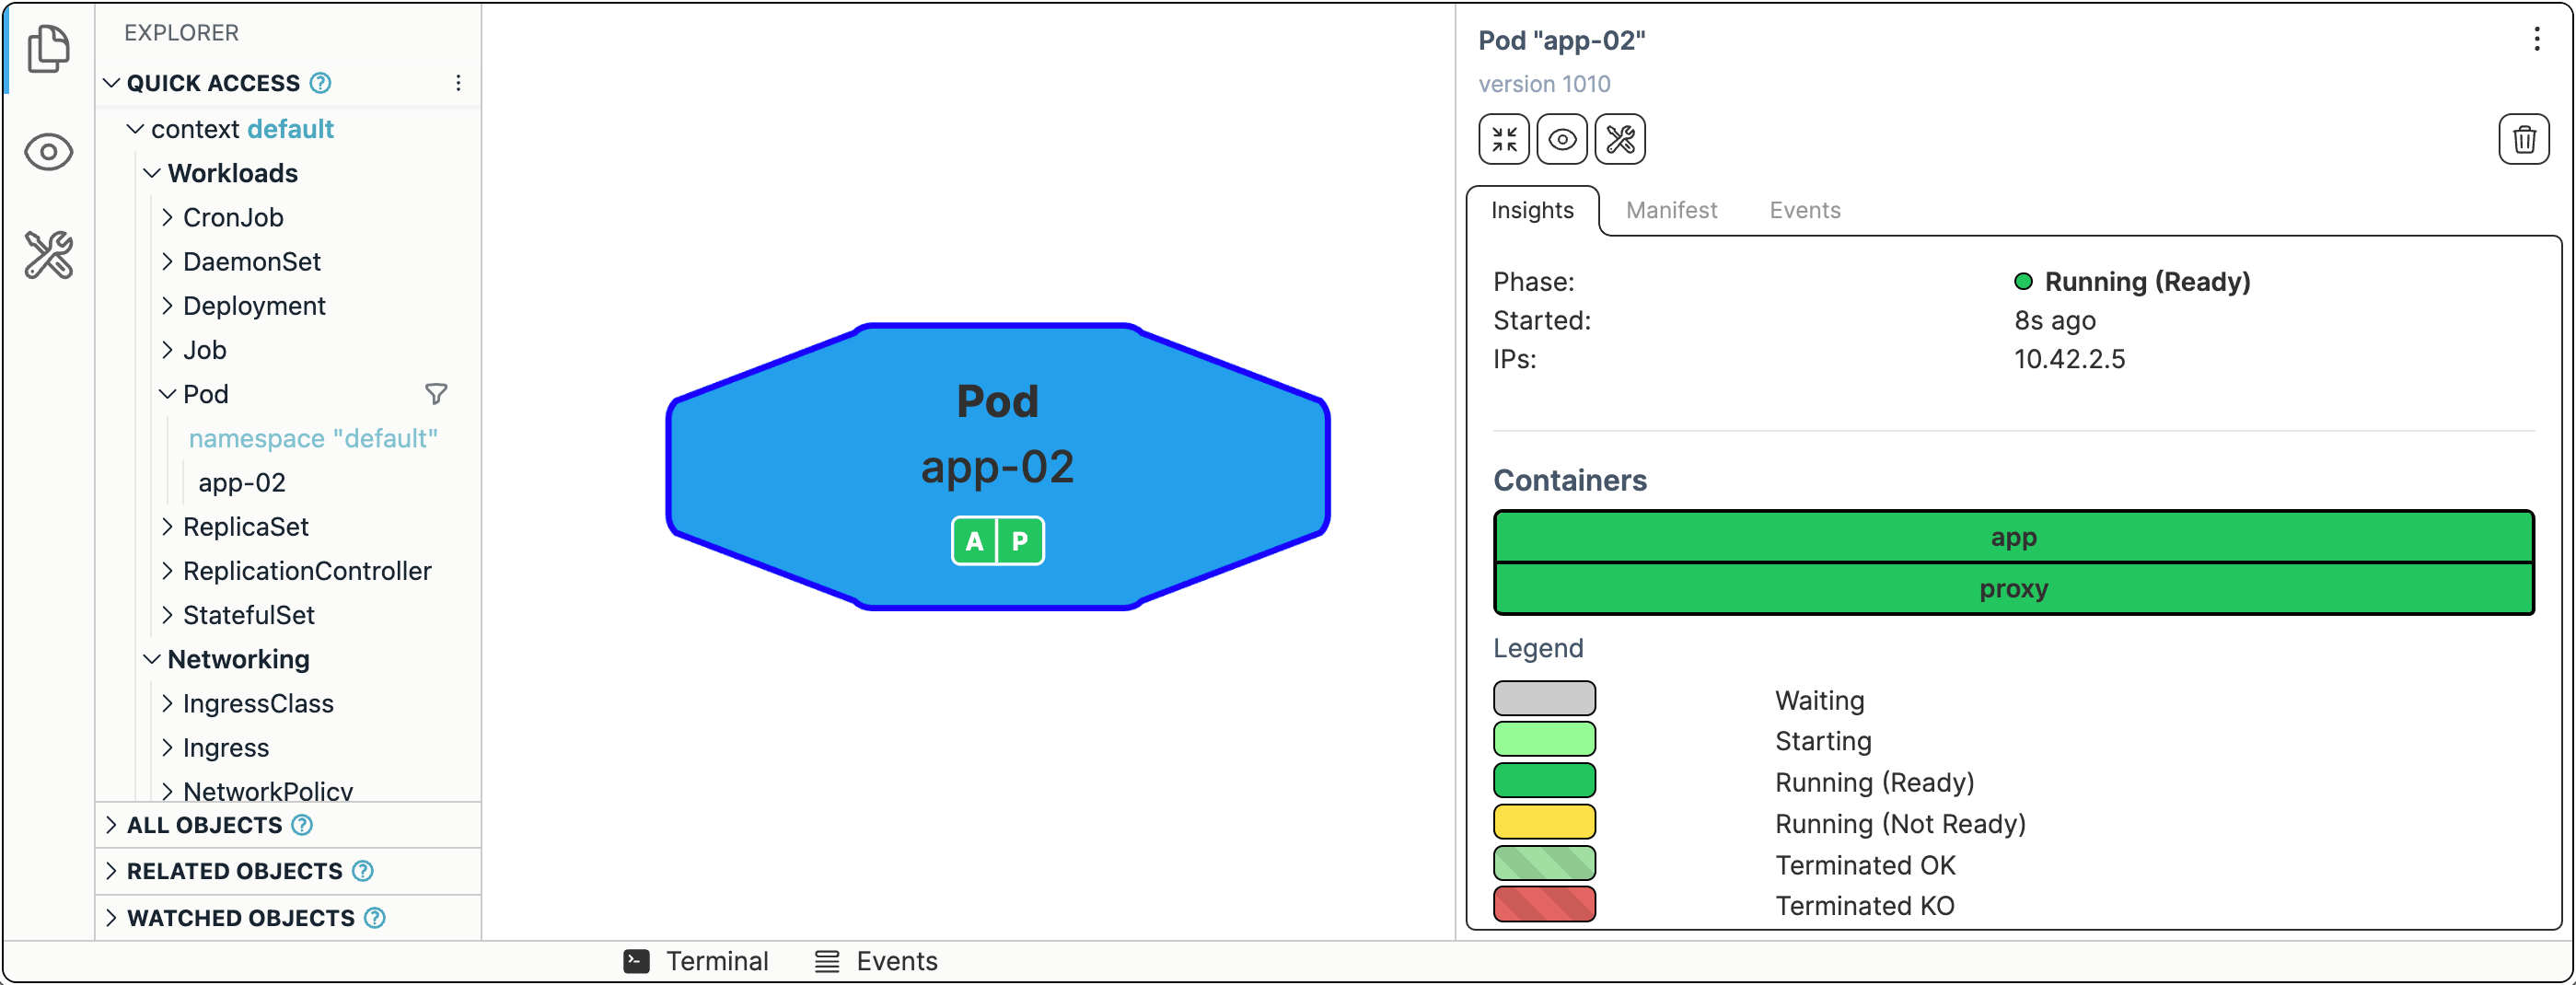
In Kubernetes, a Pod is the smallest execution unit. You can think of Pods as app instances. The Pod has the main container and maybe a few helper containers. Kubernetes Pod becomes a more lightweight (single-tenant) VM replacement. And much like a VM, every Pod in Kubernetes has its own IP address.
Running Pods with kubectl run is fun, but it's unlikely something you want to do for your production workloads. Instead, you'll need to define your Pods in a YAML file and then kubectl apply it. Let's try running the app container with the reverse proxy sidecar in front of it (a somewhat naive way):
apiVersion: v1
kind: Pod
metadata:
  name: app-02
spec:
  containers:
  - image: ghcr.io/iximiuz/labs/kubernetes-101/app:v1.0.0
    name: app
  - image: ghcr.io/iximiuz/labs/kubernetes-101/proxy:v1.0.0
    name: proxy
We're trying to migrate the application as-is, so it may not run from the first attempt. A little bit of troubleshooting:
kubectl logs app-02 -c proxy
And the fix:
apiVersion: v1
kind: Pod
metadata:
  name: app-02
spec:
  containers:
  - image: ghcr.io/iximiuz/labs/kubernetes-101/app:v1.0.0
    name: app
  - image: ghcr.io/iximiuz/labs/kubernetes-101/proxy:v1.0.0
    name: proxy
  hostAliases:  #  <--- To mitigate the lack of the docker networking magic
  - ip: "127.0.0.1"
    hostnames:
    - "app"
Replicating app instances
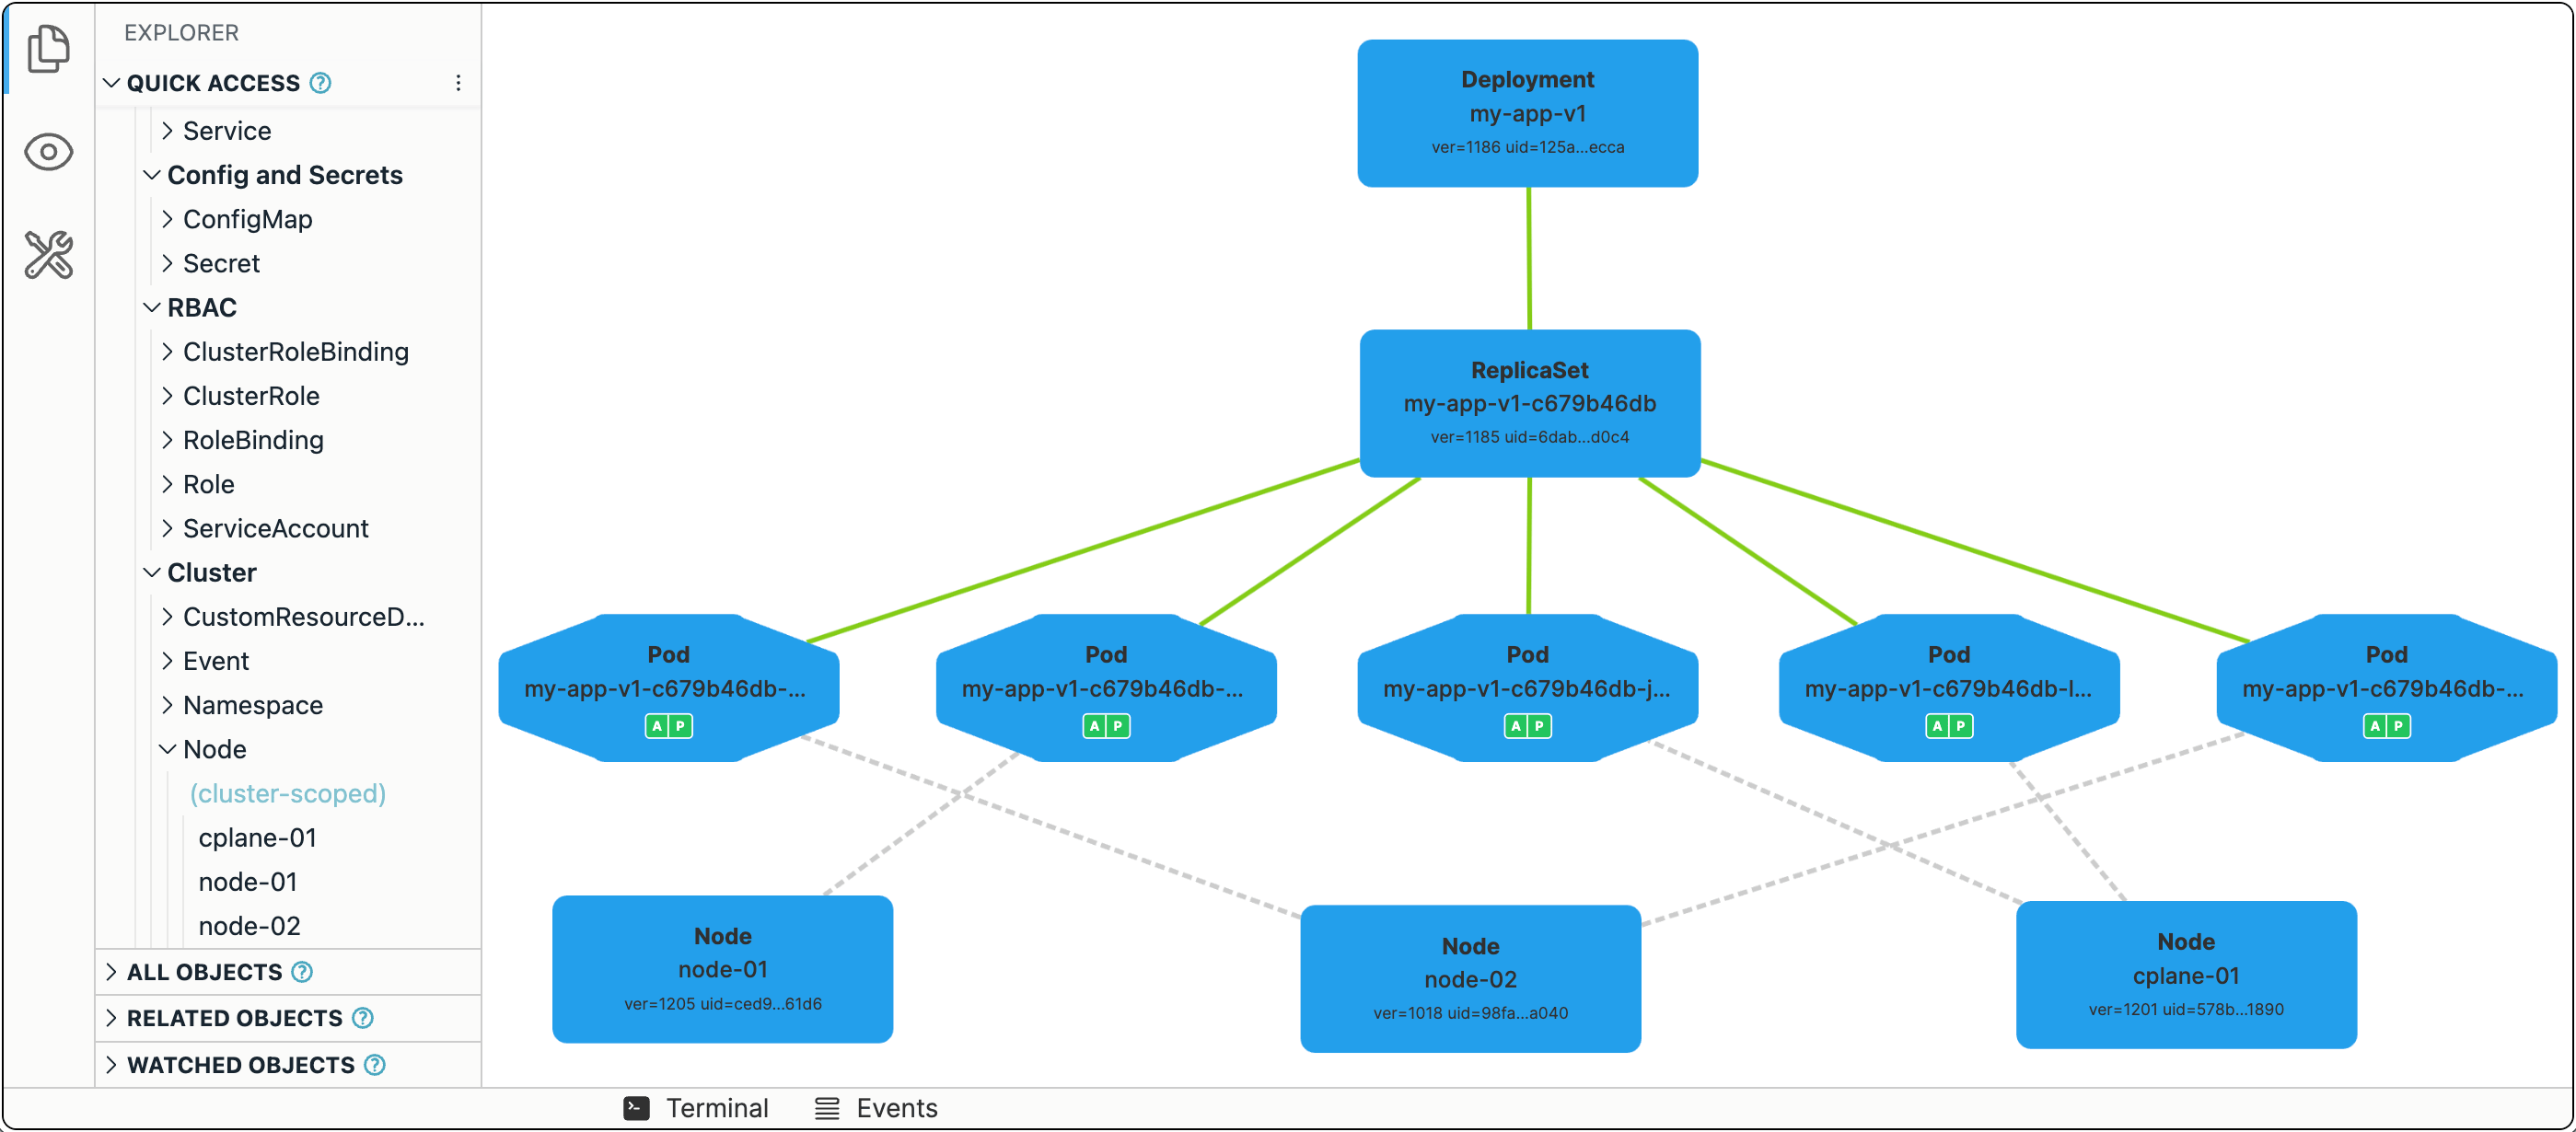
In Kubernetes, replicating and, more importantly, maintaining a fixed number of running replicas of a Pod is really easy.
The simplest way to run N identical copies of our Pod is to convert its spec into a template and wrap it into a Deployment object:
apiVersion: apps/v1
kind: Deployment
metadata:
  name: my-app-v1
  namespace: default
spec:
  selector:
    matchLabels:
      app: my-app-v1
  template:  # <---- Used to be our Pod
    metadata:
      labels:
        app: my-app-v1
    spec:
      containers:
      - image: ghcr.io/iximiuz/labs/kubernetes-101/app:v1.0.0
        name: app
      - image: ghcr.io/iximiuz/labs/kubernetes-101/proxy:v1.0.0
        name: proxy
      hostAliases:
      - ip: 127.0.0.1
        hostnames:
        - app
  replicas: 5  # <---- Important!
Ingress and load balancing
Pods and Deployments are fundamental Kubernetes constructs. With a Pod, you can run a single instance of an app and, with Deployments, you can create as many identical copies as needed. But every such copy will have its own IP address, while a single entrypoint is still desirable.
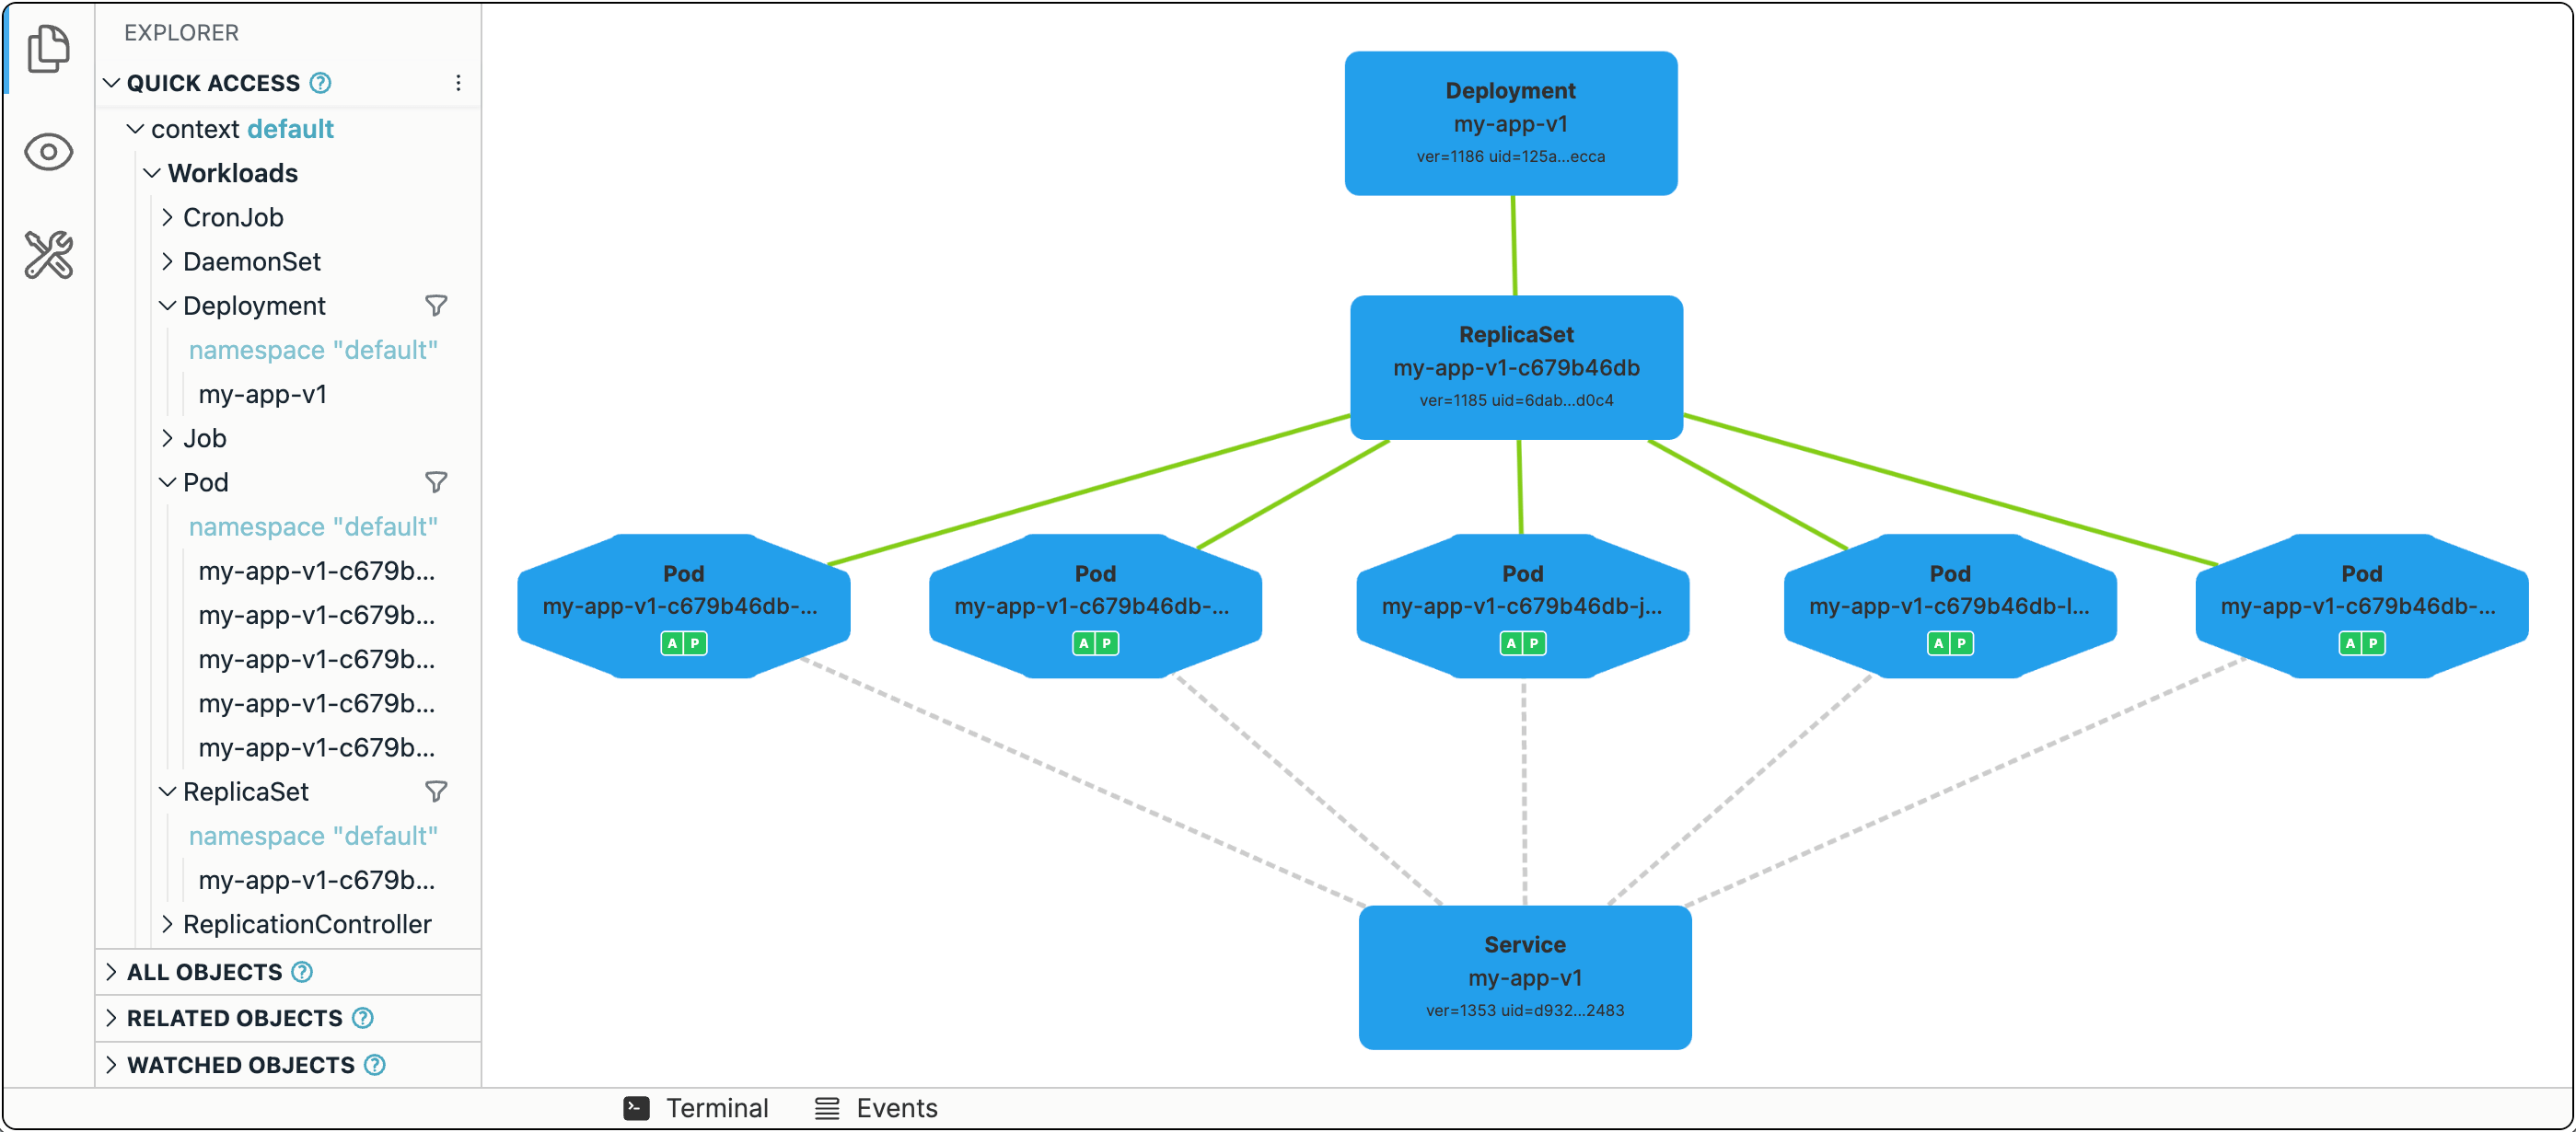
The third (and last) fundamental Kubernetes construct we'll discuss today is a Service.
To expose all Pods of a Deployment behind a single address, you can run the following command:
kubectl expose deployment my-app-v1 --port 80 --type NodePort
The app should now be available at <CONTROL_PLANE_IP>:$(kubectl get svc my-app-v1 -o=jsonpath='{.spec.ports[0].nodePort}').
Failure recovery
Fun time! Let's start shedding some traffic and terminate one of the Nodes to see if Kubernetes will be able to maintain the requested number of Pod replicas:
docker run --net host -it --rm ghcr.io/six-ddc/plow -c 5 -k
On node-02:
ip link set eth0 down
It may take a while for Kubernetes to notice that the Node is gone (40s by default), and the Pod eviction from the failed Node will take even longer (5m by default), but in about 6m, the system should have all five Pods up and running again. But this time, they are distributed over just two Nodes. You can facilitate the eviction process by manually removing the node-02 object from the Kubernetes API using:
kubectl delete node node-02
In such case, it'll take ~40s for the orphan Pods to be cleaned up and the replacement Pods created.
Zero-downtime deployment
...is the default behavior in Kubernetes!
Every Deployment has a .spec.strategy attribute, which out of the box is set to RollingUpdate. When you change the Deployment manifest (e.g., updates one or more of the image tags in the Pod spec template), the Deployment will start terminating its running Pods in groups by 25% (another default value), and new Pods using the updated spec template will start showing up.
kubectl set image deployment/my-app-v1 app=ghcr.io/iximiuz/labs/kubernetes-101/app:v1.0.1
The best way to illustrate this dynamic process is, of course, a video:
Thus, the rollout of the new app version (most of the time) will be graceful, and no(t much) traffic will be dropped.
Blue-Green and Canary deployments
Despite the command we used to create a Service was mentioning a specific Deployment in it, Services in Kubernetes aren't really bound to Deployments. Instead, they target Pods directly using label selectors. A rather ingenious design decision!
Thus, we can easily create two (or more) Deployments using partially intersecting sets of labels in the Pods spec templates:
apiVersion: apps/v1
kind: Deployment
metadata:
  name: my-app-v1
spec:
  template:
    metadata:
      labels:
        app: my-app  # common
        ver: v1      # unique
  replicas: 5
...
---
apiVersion: apps/v1
kind: Deployment
metadata:
  name: my-app-v2
spec:
  template:
    metadata:
      labels:
        app: my-app  # common
        ver: v2      # unique
  replicas: 1
...
And then create a Service that targets all Pods with the common app: my-app label:
apiVersion: v1
kind: Service
metadata:
  name: my-svc
spec:
  selector:
    matchLabels:
      app: my-app  # matches Pods from both Deployments
Now, by scaling the Deployments up and down, you can achieve the desired distribution of traffic.
Conclusion
We could continue drawing parallels for much longer - for instance, back in the day, setting up dynamic service discovery was a really fun exercise (looking at you, Consul and ZooKeeper), while in Kubernetes, you get service discovery out of the box. But the main point is it's still pretty much the same underlying idea - with Kubernetes, you just get more automation available for you. So, learning how and, more importantly, what for things were set up semi-manually with Consul and Ansible is crucial if you truly want to master your craft and become a Kubernetes expert and not just a power user. Good luck!
Related resources
- How Kubernetes Reinvented Virtual Machines (in a good sense)
- Service Discovery in Kubernetes: Combining the Best of Two Worlds
- Sidecar Proxy Pattern - The Basis Of Service Mesh
- Traefik: canary deployments with weighted load balancing
- Multi-node Kubernetes Cluster Playground
- Mini-LAN (Ubuntu, Docker) Playground
- github.com/iximiuz/kexp - (visual) Kubernetes Explorer
Appendix
A handy Makefile to bake the Docker images mentioned in the blog post:
APP_IMAGE=ghcr.io/iximiuz/labs/kubernetes-101/app:v1.0.0
PROXY_IMAGE=ghcr.io/iximiuz/labs/kubernetes-101/proxy:v1.0.0
LB_IMAGE=ghcr.io/iximiuz/labs/kubernetes-101/lb:v1.0.0

.PHONY: docker-build-app
docker-build-app:
    docker build -t ${APP_IMAGE} -f ./Dockerfile.app .

.PHONY: docker-push-app
docker-push-app: docker-build-app
    docker push ${APP_IMAGE}

.PHONY: docker-build-proxy
docker-build-proxy:
    docker build -t ${PROXY_IMAGE} -f ./Dockerfile.proxy .

.PHONY: docker-push-proxy
docker-push-proxy: docker-build-proxy
    docker push ${PROXY_IMAGE}

.PHONY: docker-build-lb
docker-build-lb:
    docker build -t ${LB_IMAGE} -f ./Dockerfile.lb .

.PHONY: docker-push-lb
docker-push-lb: docker-build-lb
    docker push ${LB_IMAGE}
Level up your server-side game — join 20,000 engineers getting insightful learning materials straight to their inbox:
