- conman - [the] Container Manager: Inception
- Implementing Container Runtime Shim: runc
- Implementing Container Runtime Shim: First Code
- Implementing Container Runtime Shim: Interactive Containers
Don't miss new posts in the series! Subscribe to the blog updates and get deep technical write-ups on Cloud Native topics direct into your inbox.
With this article, I want to start a series about the implementation of a container manager. What the heck is a container manager? Some prominent examples would be containerd, cri-o, dockerd, and podman. People here and there keep calling them container runtimes, but I would like to reserve the term runtime for a lower-level thingy - the OCI runtime (de facto runc), and a higher-level component controlling multiple such runtime instances I'd like to call a container manager. In general, by a container manager, I mean a piece of software doing a complete container lifecycle management on a single host. In the following series, I will try to guide you myself through the challenge of the creation of yet another container manager. By no means, the implementation is going to be feature-complete, correct or safe to use. The goal is rather to prove the already proven concept. So, mostly for the sake of fun, let the show begin!
Reasoning and motivation
Apart from having fun, I decided to start this project to gain a deeper understanding of the Docker and Kubernetes architectures. For instance, I knew from the previous experience that Docker has rather a layered structure:
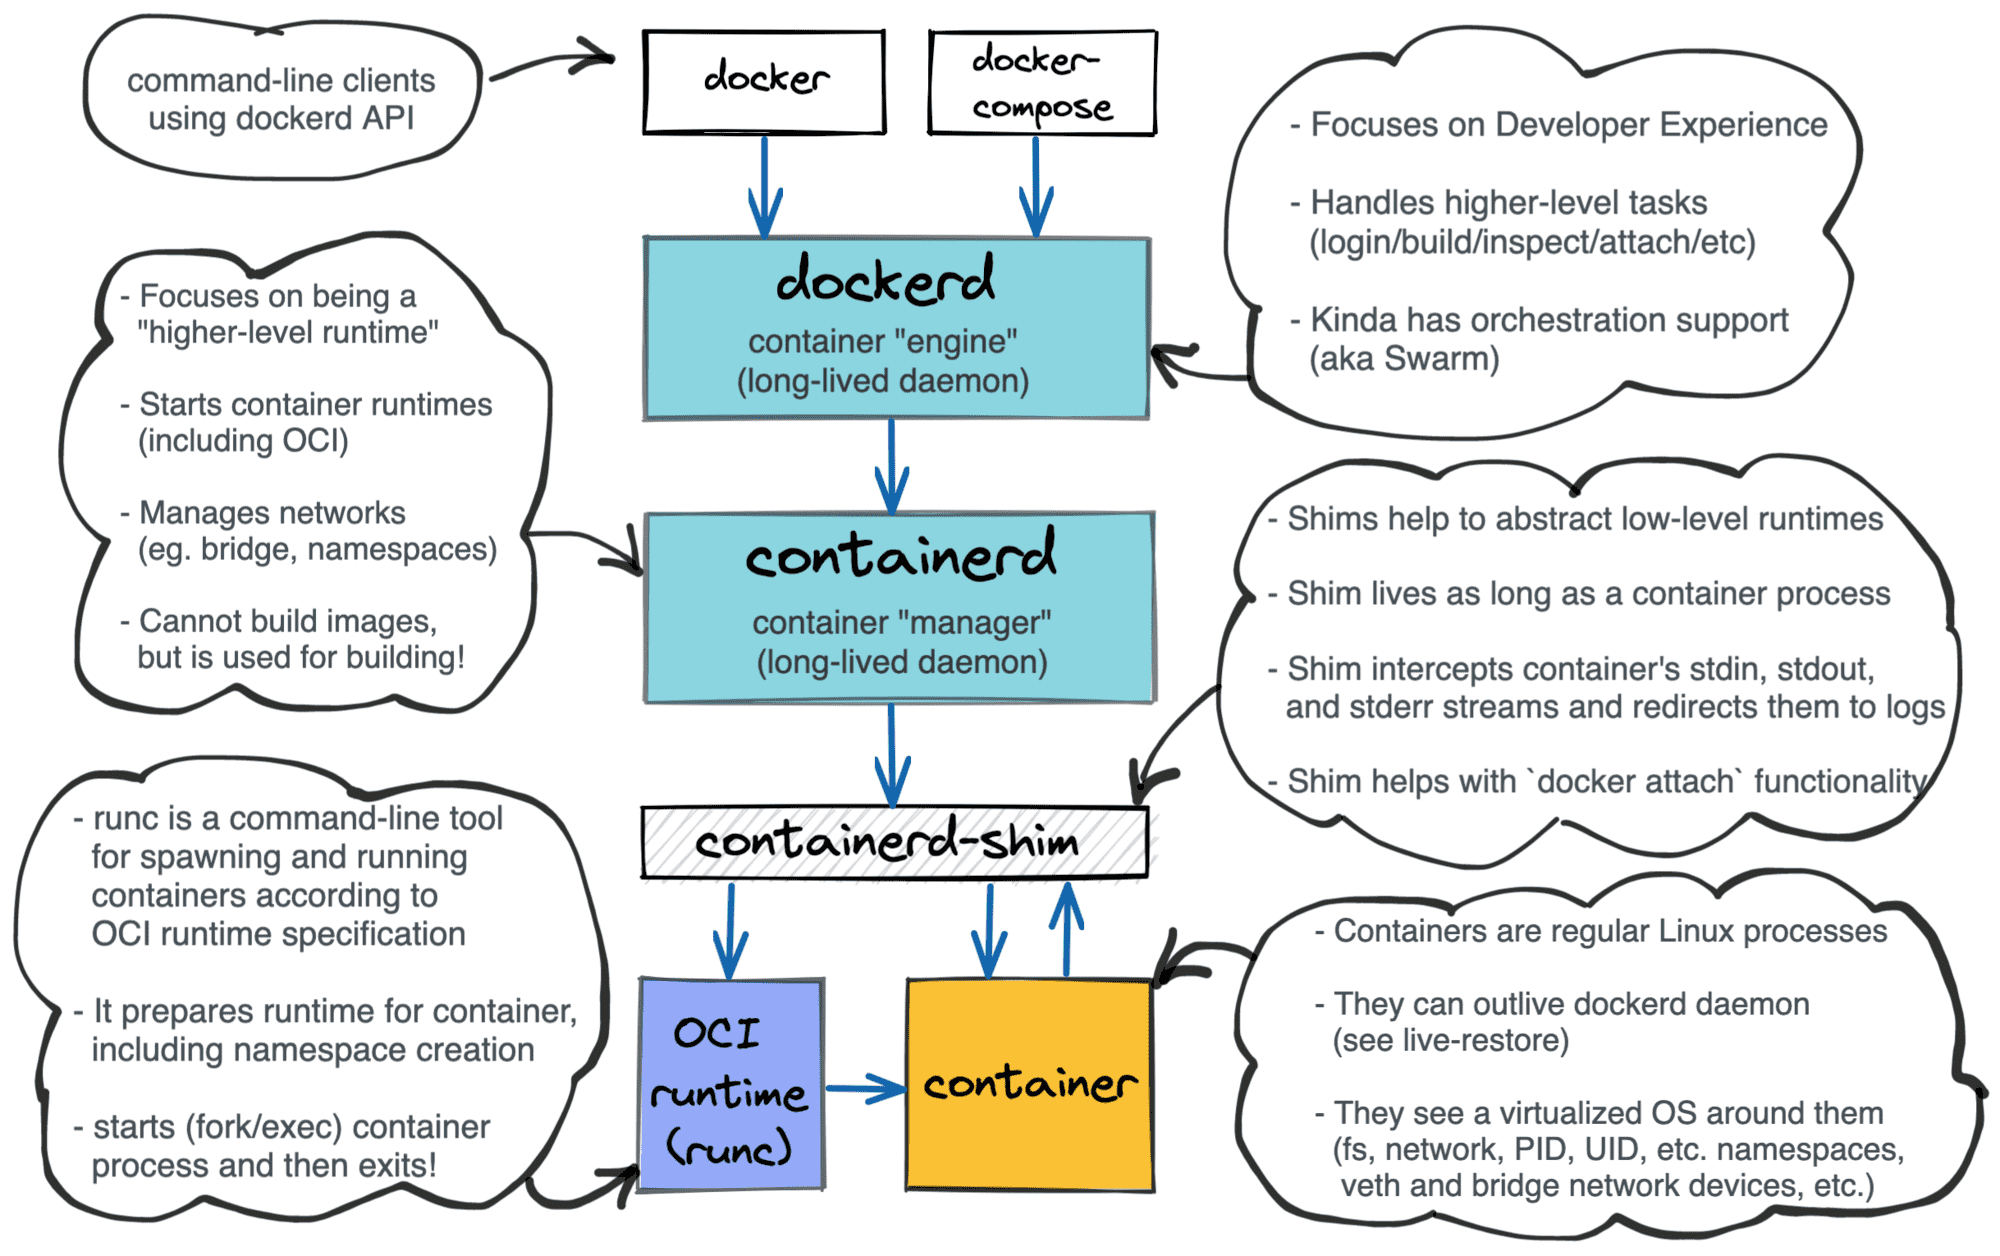
Layered Docker architecture.
Kubernetes as well can use different container runtimes, for example, docker (not anymore), containerd, or cri-o, interchangeably without the re-compilation (notice the ambiguous use of the term container runtime in the Kubernetes realm).
However, the responsibilities of the components and their interactions stayed pretty obscure to me. So, what do we usually do in such a situation? Right, implement our own operating system / programming language / web framework Kubernetes with blackjack and ...hackers!
A journey of a thousand miles begins with a single step, so I decided to start from the container manager piece. Real container managers out there tend to use lower-level container runtimes under the hood. So do I. We are not going to re-implement the functionality of OCI [container] runtime in this series. Instead, we will employ runc as a default runtime implementation in our container manager. runc is a pretty low-level component with the focus on single Linux container creation. It does all the heavy lifting with Linux namespaces and cgroups management and it's shipped in form of a command line tool, i.e. a single executable file.
What is runc and what can I do with it?
runc is a CLI tool for spawning and running containers according to the OCI runtime specification. To start a Linux container one needs to provide a so-called bundle, i.e. a directory with a [desired distribution of] Linux root file system and a configuration file aka OCI runtime specification. Runc will prepare all necessary Linux resources, most notably namespaces and cgroups and start the specified process in the containerized environment.
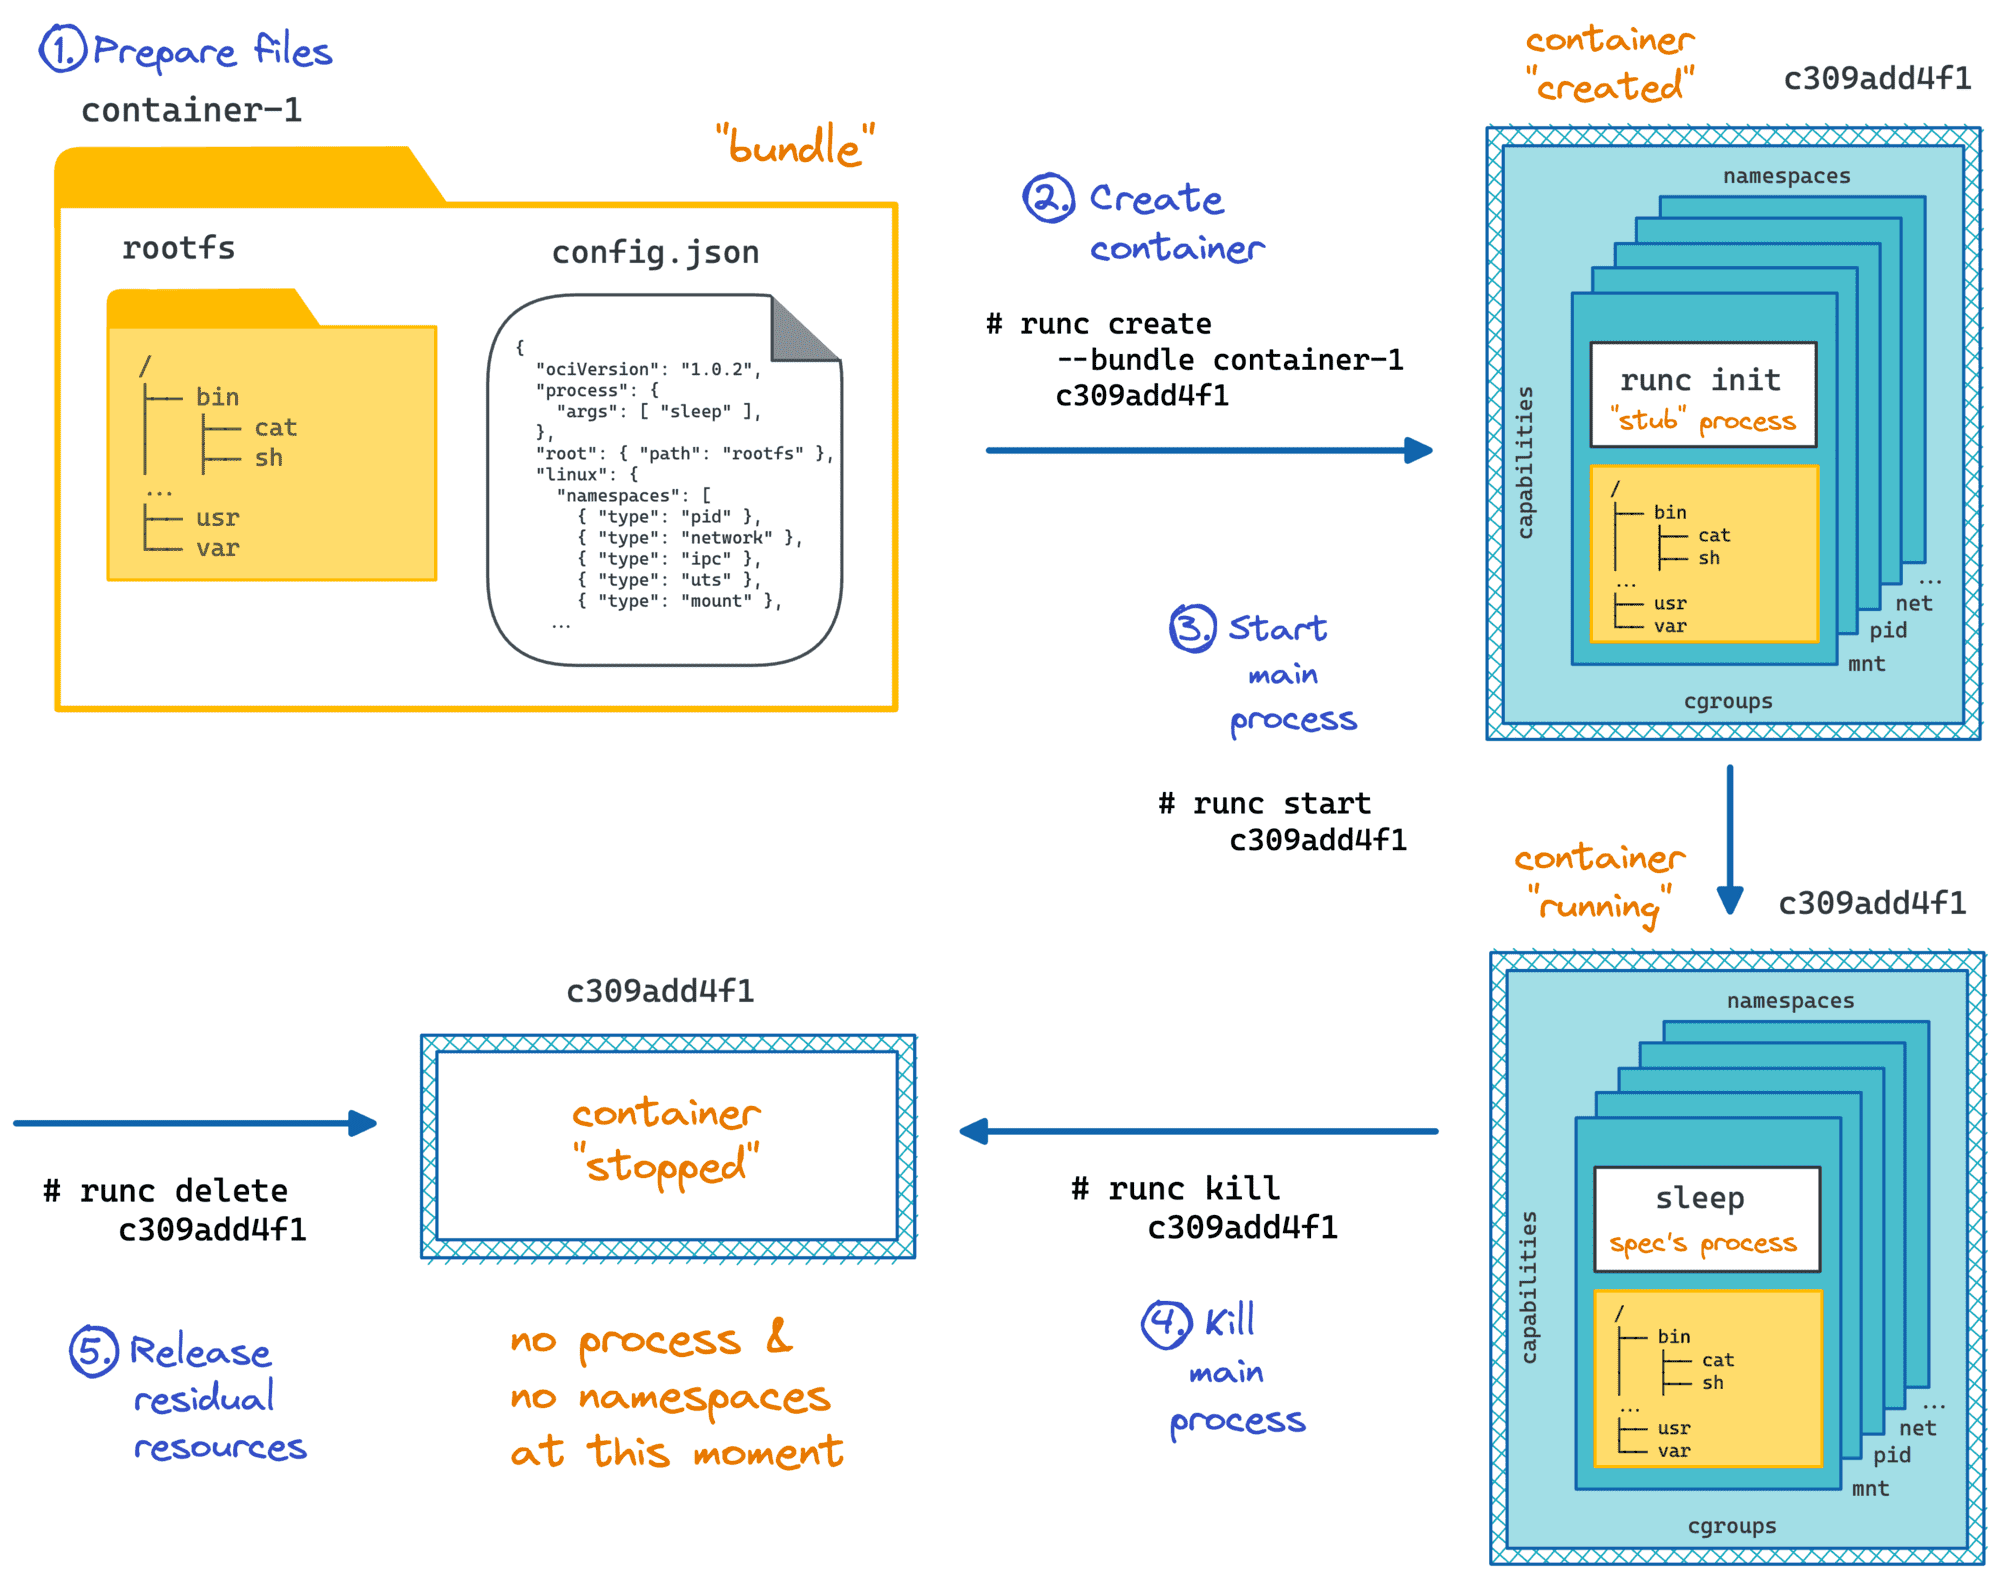
# create the bundle
$ mkdir -p /mycontainer/rootfs

# [ab]use Docker to copy a root fs into the bundle
$ docker export $(docker create busybox) | tar -C /mycontainer/rootfs -xvf -

# create the specification, by default sh will be the entrypoint of the container
$ cd /mycontainer
$ runc spec

# launch the container
$ sudo -i
$ cd /mycontainer
$ runc run mycontainerid

# list containers
$ runc list

# stop the container
$ runc kill mycontainerid

# cleanup
$ runc delete mycontainerid
Using runc in command line we can launch as many containers as we need. However, if we want to automate this process we need a container manager. Why so? Imagine we need to launch tens of containers keeping track of their statuses. Some of them need to be restarted on failure, resources need to be released on termination, images have to be pulled from registries, inter-containers networks need to be configured and so on. That's the perfect moment for a container manager to stand out.
So, behold conman - the container manager!
Scope and use cases
While a container manager not necessary need to be a daemon (podman is a nice example), the majority (containerd, dockerd, cri-o) has been implemented as daemons exposing [gRPC] APIs. As it will be clear a bit later, conman has to be a daemon as well. Our container manager should be able to:
- Pull an image from a container image registry (hub.docker.com, quay.io, etc).
- Create a bundle based on an image and a command.
- Prepare system resources (mount points, network namespaces, etc) for a new container.
- Create a container for a given bundle (by leveraging runc).
- Start a created container (by leveraging runc).
- Attach to a running container (by leveraging runc).
- Execute a command in a running container (by leveraging runc).
- Stop a running container (by leveraging runc).
- Delete a running container and cleanup used resources.
- List known containers and their states.
- Keep track of the states of the containers even in case of daemon restarts or crashes.
- ...and many more minor things.
Since conman is going to be a daemon, all the methods listed above should be exposed over some IPC mechanism and gRPC API sounds like a reasonable choice. Even though the list resembles the well-known Docker functionality we have some important things out of the scope - most notably image building (a dedicated tool like buildah can be used instead), compose and swarm (very specific features covering multi-host containers management).
Based on the definition from above, the simplest use case I can imagine would be an implementation of a thin command line client communicating with our container manager over gRPC API and providing commands like conmanctl container create --image busybox or conmanctl container (start|state|stop|delete) <container_id>. The couple (conmanctl, conmand) from the usage standpoint closely resembles (docker client, dockerd) gang.
A bit more advanced use case would be to make conman CRI-compatible and use it as an alternative container runtime in a custom Kubernetes cluster setup. The Kubernetes Container Runtime Interface (CRI) is a formal specification of a gRPC service (i.e. a daemon!) providing functionality for container management. For this, we need to extend the list of conman's features to cover pods and sandboxes. However, a pod is just a group of containers with shared Linux cgroups and namespaces. And a sandbox is just a fancy name for these shared resources.
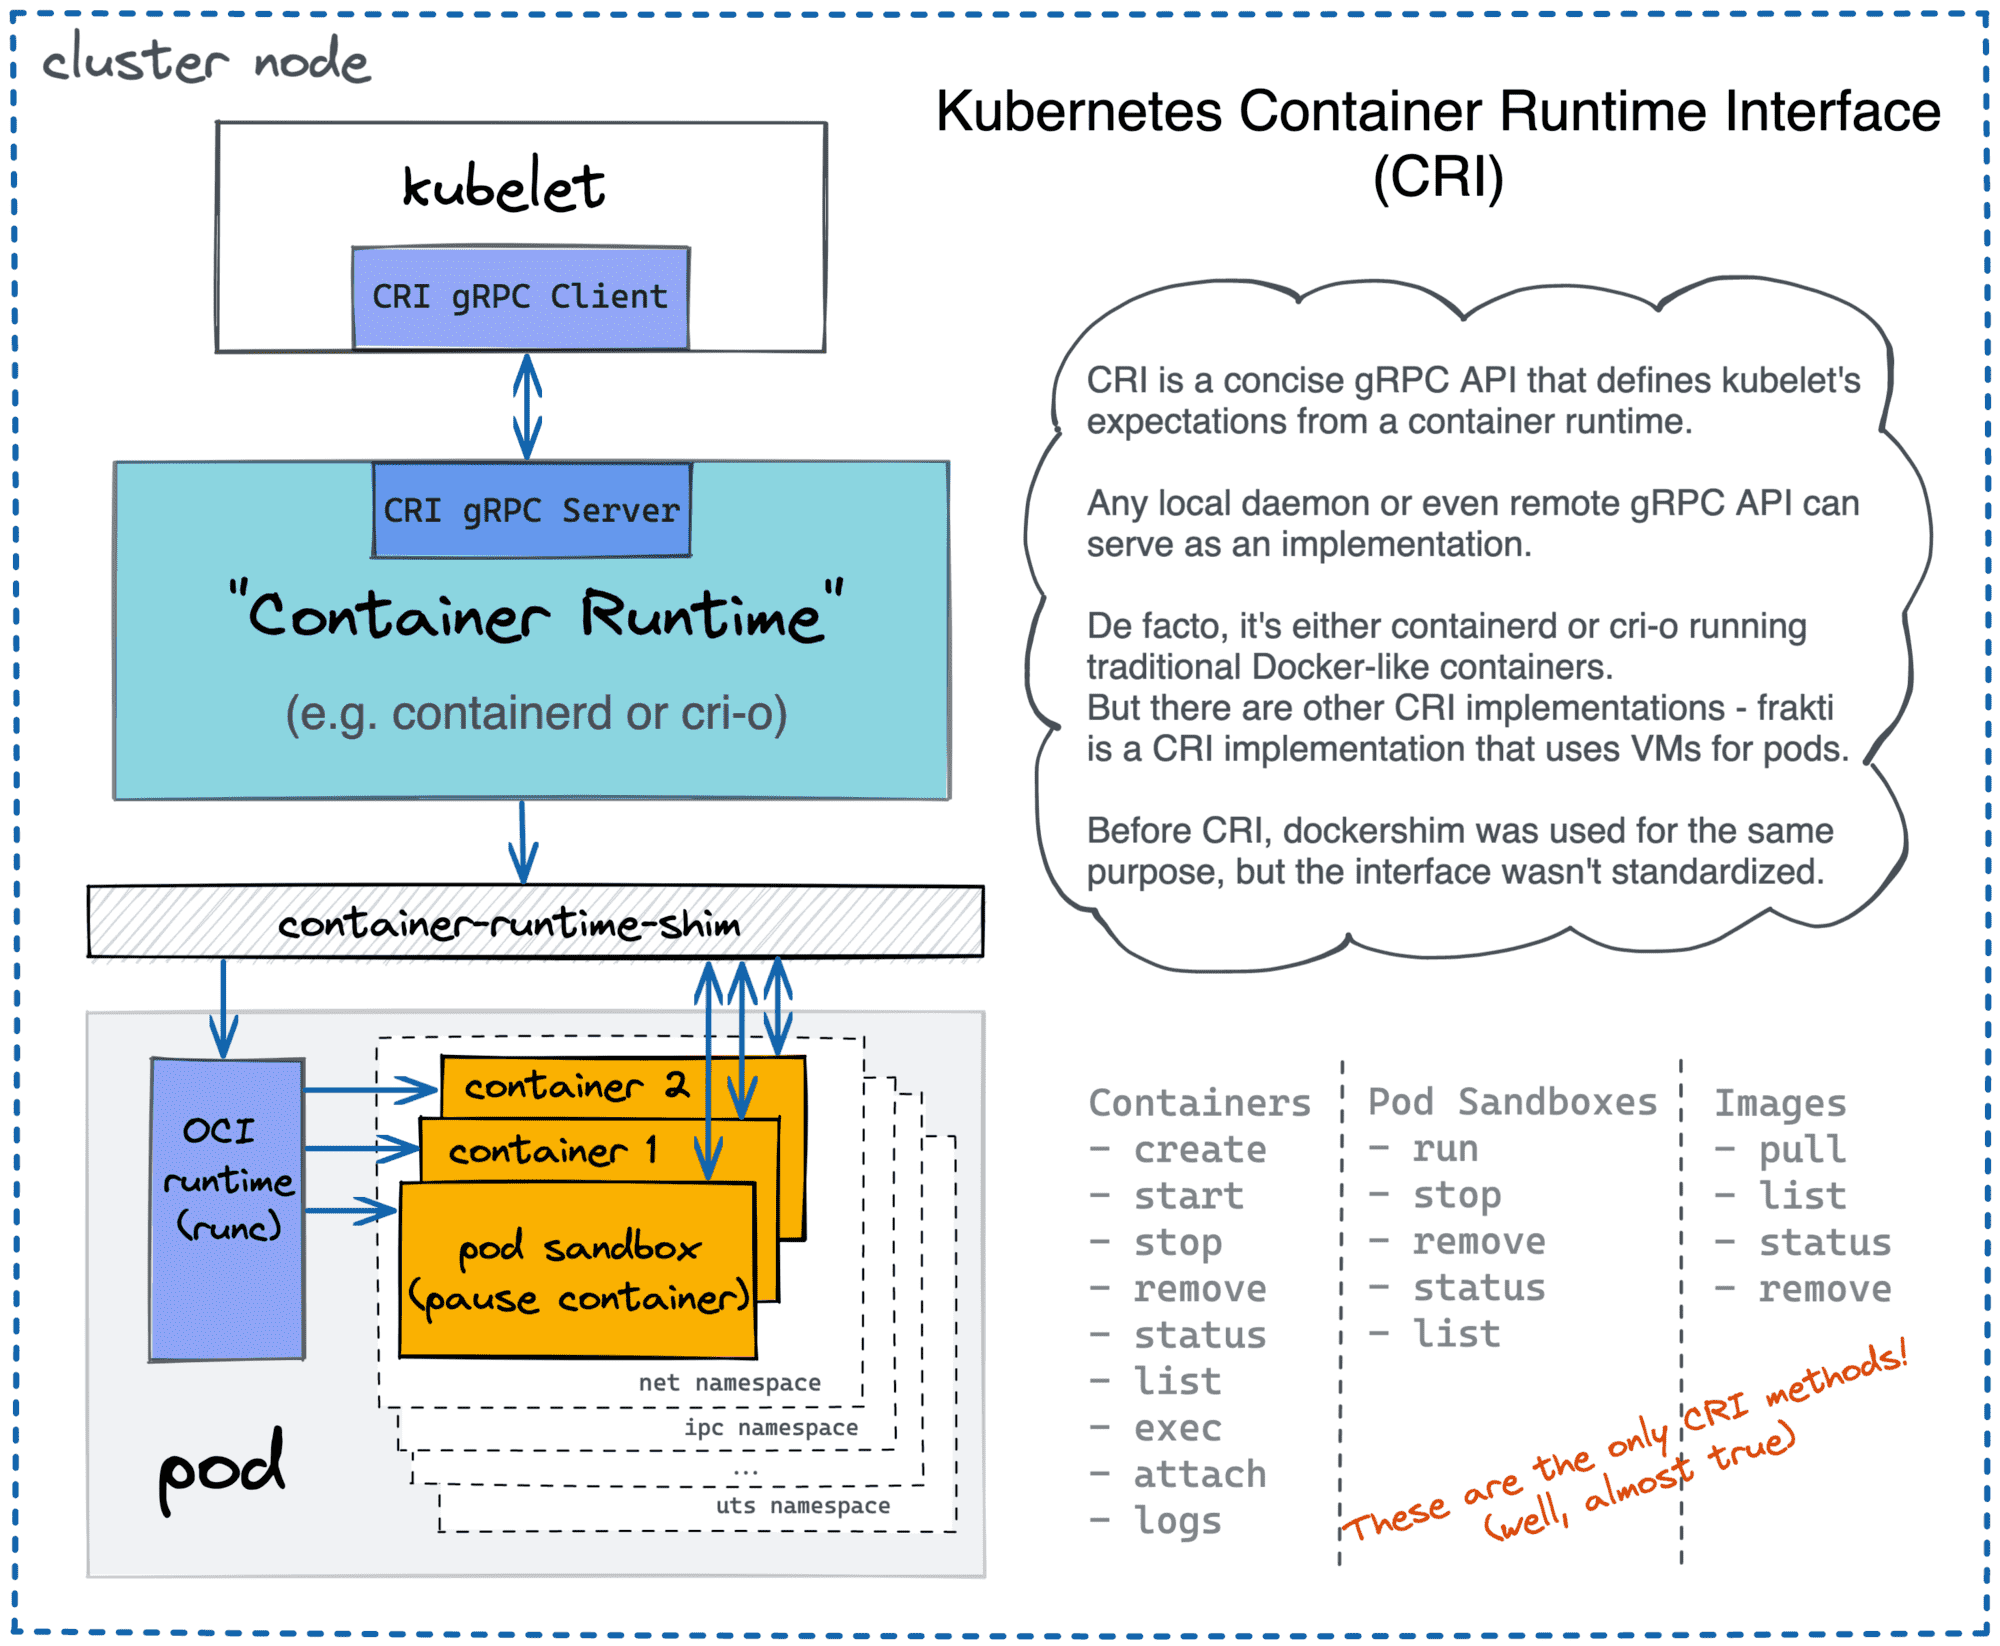
Kubernetes uses different container runtimes via CRI API.
Design and implementation
The application's functionality should be driven by use cases. The application's design should be driven by tests. (K. Marx)
Since it's the very first version of our container manager, its design is rather simplistic. But I tried to keep it layered.
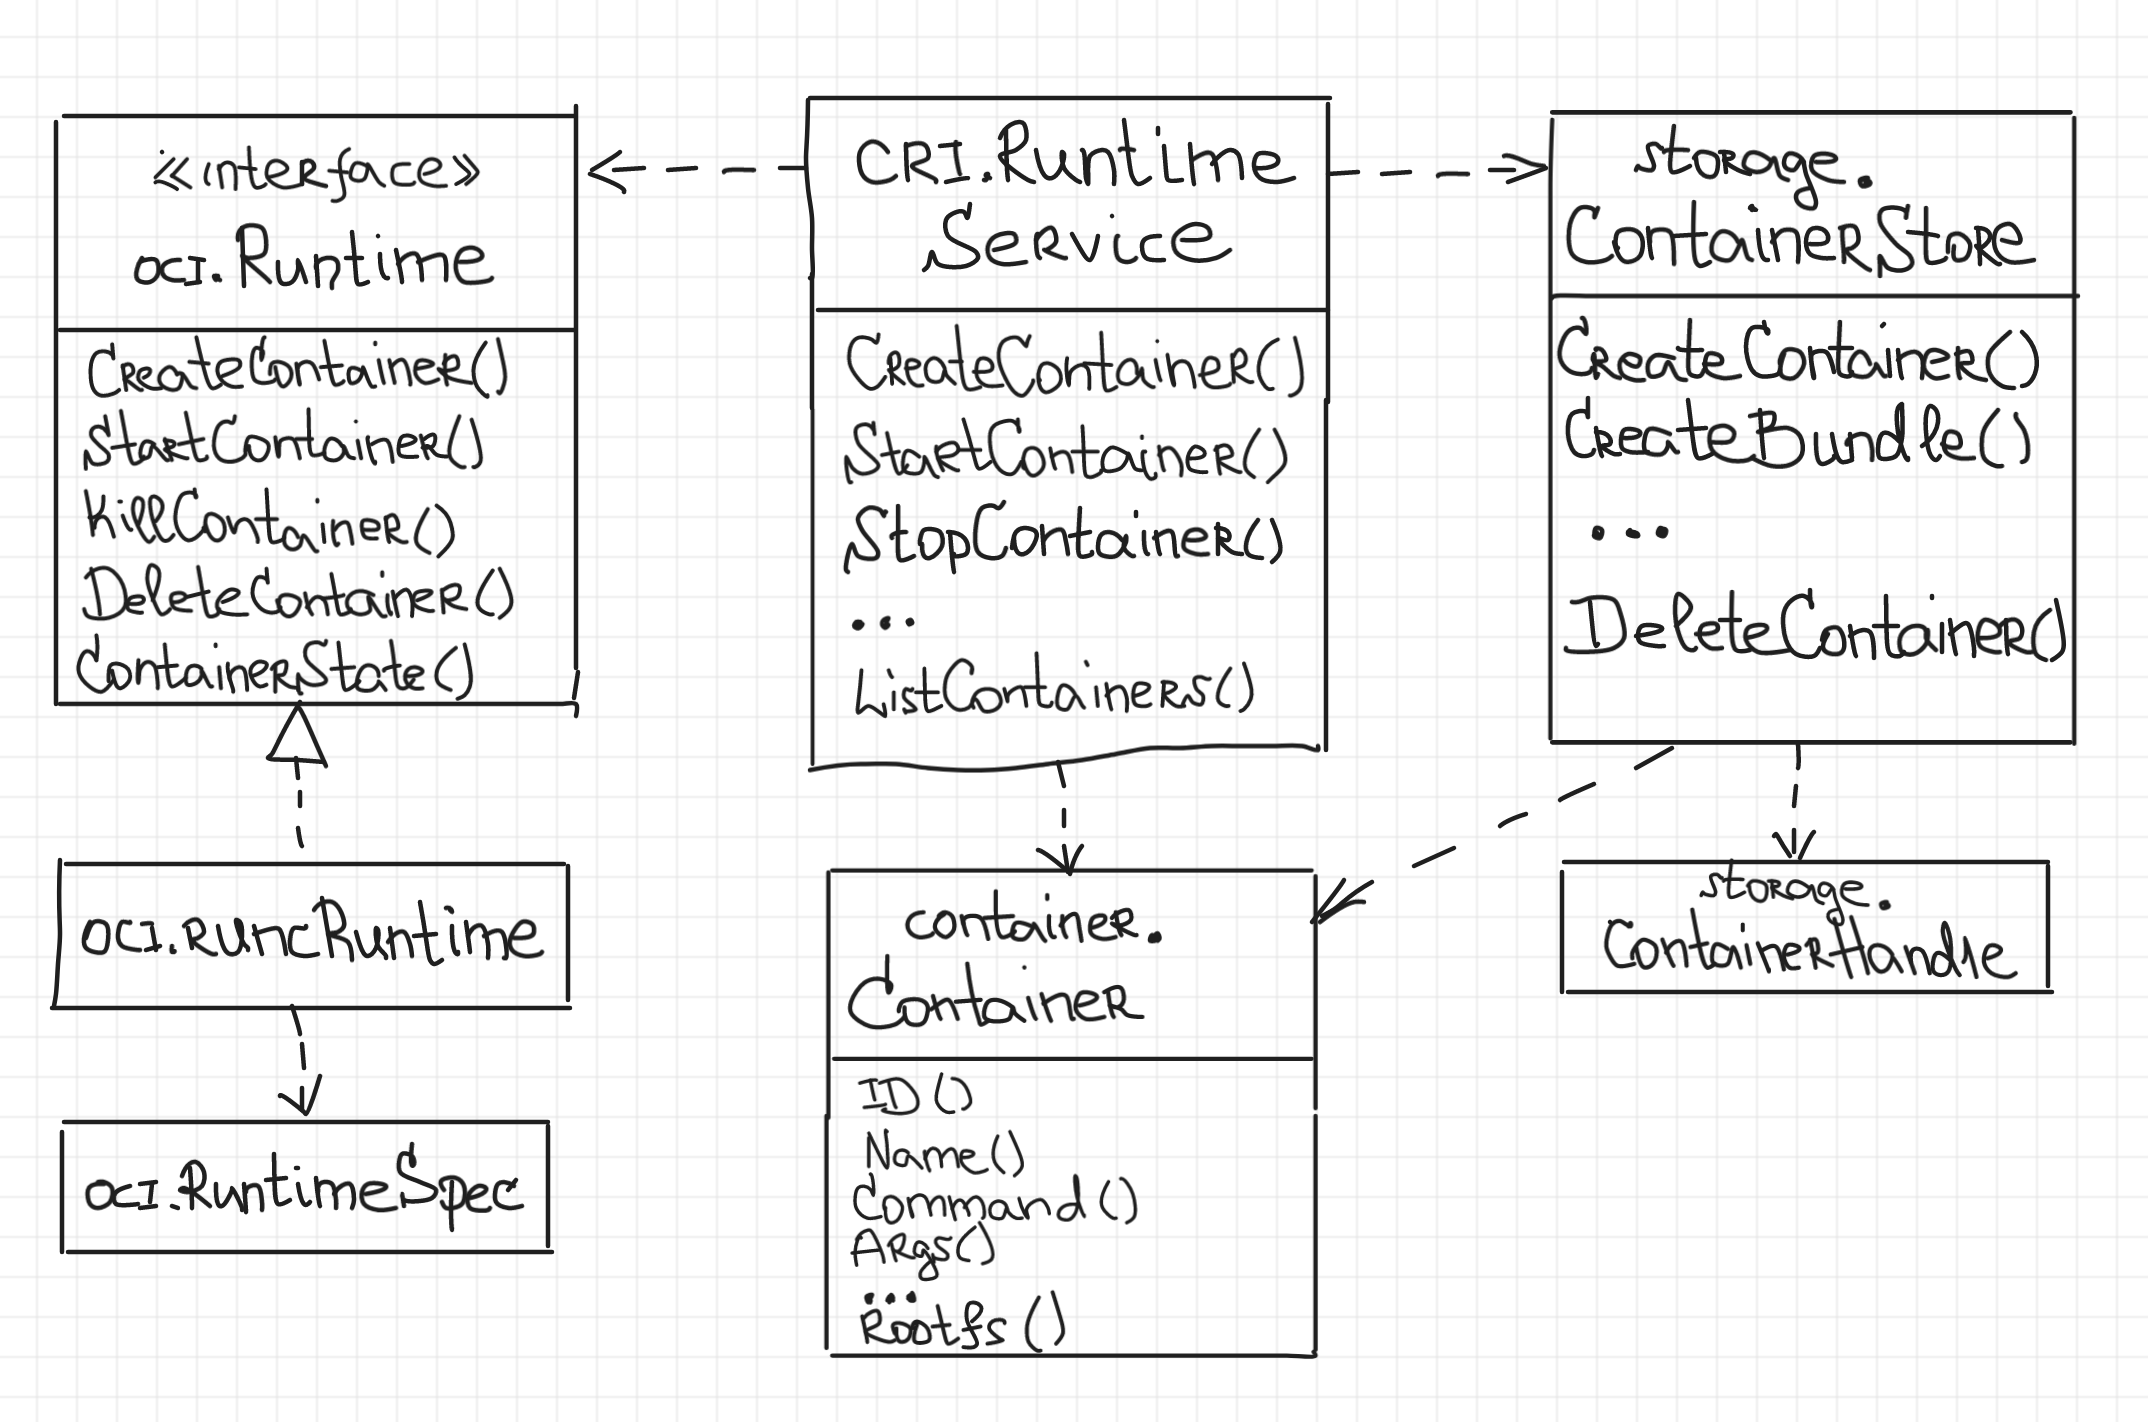
The central component of the container manager is the cri.RuntimeService providing the public API of conman. I was striving to make the list of methods close to the CRI API specification but it's not CRI-compatible yet.
cri.RuntimeService is a top-level component wiring together lower-level pieces of conman and orchestrating them. Also, it’s responsible for the access synchronization since conman may receive concurrent modification requests for the same part of the manager's state. For example, two clients can simultaneously request a container creation with the same name and since the name is a unique identifier of a container, only one of these requests should be processed, while the second one should be rejected with an error.
The two main dependencies of the cri.RuntimeService are oci.Runtime and storage.ContainerStore.
oci.Runtime is a concise interface providing OCI container runtime functionality, i.e. methods to create, start, kill, and delete containers, as well as a method to request a container state. The only implementation of this interface in the current version of conman is oci.runcRuntime. From the first glance, it may seem like a simple wrapper exec-uting runc with the right parameters. However, in reality, programmatically launching runc is a pretty complicated task. Things like tracking of the container exit code, [re-]attaching to a running container's stdin/stdout streams, picking up a running container after the conman daemon restart, etc have to be carefully implemented. If we take a look at cri-o or containerd, we can notice that similar functionality tend to reside in a dedicated component called a runtime shim. Correct implementation of such a shim is a nice programming exercise and I will try to cover it in a separate article.
Last but not least is storage.ContainerStore. Its primary responsibility is storing container bundles and states on-disk. Even though the first version of our container manager does not support image pulling (rootfs directory should be explicitly provided to start a container), we still need to make a bundle for the given rootfs and put it to a dedicated place (eg. /var/lib/conman/containers/<container_id>/bundle). OCI runtime bundle consists of a copy of rootfs directory and a config.json file with the container specification. However, the bundle is not the only thing we need to keep track on-disk. Since the container manager has to tolerate its [potentially sudden] restarts and provide a mechanism to restore its state, [atomically] saving container states on disk makes a lot of sense. That way conman will be able to recover after an unexpected restart by picking up the full state from disk and actualizing it with the actual runc state.
Our container manager has to serve its functionality over an [gRPC] API. For that, we need to introduce a server.Server component with a [close to] one-to-one mapping of the cri.RuntimeService interface to gRPC methods:
import (
    // ...
    "google.golang.org/grpc"
)

type conmanServer struct {
    runtimeSrv cri.RuntimeService
}

func (s *conmanServer) CreateContainer(
    ctx context.Context,
    req *CreateContainerRequest,
) (resp *CreateContainerResponse, err error) {
    traceRequest("CreateContainer", req)
    defer func() { traceResponse("CreateContainer", resp, err) }()

    cont, err := s.runtimeSrv.CreateContainer(
        cri.ContainerOptions{
            Name:           req.Name,
            Command:        req.Command,
            Args:           req.Args,
            RootfsPath:     req.RootfsPath,
            RootfsReadonly: req.RootfsReadonly,
        },
    )
    if err == nil {
        resp = &CreateContainerResponse{
            ContainerId: string(cont.ID()),
        }
    }
    return
}

// ...

func (s *conmanServer) Serve(network, addr string) error {
    lis, err := listen(network, addr)
    if err != nil {
        return err
    }

    gsrv := grpc.NewServer()
    RegisterConmanServer(gsrv, s)
    return gsrv.Serve(lis)
}
When a new request comes in, server.conmanServer just delegates the call to the underlying cri.RuntimeService object. The runtime service acquires a lock on the conman's state, makes all the required checks and in turn delegates the call to the oci.Runtime object. Some optimistic strategies (i.e. claiming the change before actually applying it with a potential rollback of the change on failure) to maintain the state has been used to make the container manager fault-tolerant.
The project also contains a thin client (conmanctl) implementation and provides some basic testing functionality utilizing Go testing package and bats framework.
Show time
I use vagrant centos/7 virtual machine to develop conman and I strongly advise to run projects like this only in an isolated environment due to the main system corruption threat.
First of all, we need to clone the repository and build the daemon and the client:
$ git clone https://github.com/iximiuz/conman.git
$ cd conman
$ git checkout v0.0.1

$ make bin/conmand
$ make bin/conmanctl
Next, we need to launch the daemon (unfortunately root permissions are required):
$ sudo bin/conmand
> INFO[0000] Conman's here!
And in a separate terminal we can play with it by creating and modifying containers via conmanctl client:
# prepare test rootfs
$ make test/data/rootfs_alpine

# prepare an Alpine Linux bundle to run /bin/sleep
$ sudo bin/conmanctl container create \
  --image test/data/rootfs_alpine/ cont1 -- /bin/sleep 100
> {"containerId":"78f5f5f88847465c90c7124b8c7e3ea6"}

$ sudo bin/conmanctl container status 78f5f5f88847465c90c7124b8c7e3ea6
> {"status":{"containerId":"78f5f5f88847465c90c7124b8c7e3ea6","state":"CREATED","createdAt":"1570358641000000000","startedAt":"0","finishedAt":"0"}}

# actually run /bin/sleep for 100 seconds in the container
$ sudo bin/conmanctl container start 78f5f5f88847465c90c7124b8c7e3ea6
> {}

$ sudo bin/conmanctl container status 78f5f5f88847465c90c7124b8c7e3ea6
> {"status":{"containerId":"78f5f5f88847465c90c7124b8c7e3ea6","state":"RUNNING","createdAt":"1570358641000000000","startedAt":"0","finishedAt":"0"}}
Now, in the first terminal kill the daemon and start it again:
$ sudo bin/conmand
> INFO[0000] Conman's here!
> ...
^C

$ sudo bin/conmand
> INFO[0000] Conman's here!
> ...
And try to list the known containers using conmanctl:
$ sudo bin/conmanctl container list
> {"containers":[{"id":"78f5f5f88847465c90c7124b8c7e3ea6","createdAt":"1570358641000000000","state":"RUNNING"}]}
Magic! Our container survived the manager restart!

Do not forget to clean some system folders when you're done:
$ sudo make clean
Instead of conclusion
Yeah, that was a long piece of text for an introductory article. In the next articles I'm going to focus on more specific technical aspects, such as runtime shims implementation, [re-]attaching to running containers and exec-uting commands inside of running containers, image pulling and of course [pod] sandboxes creation and network management.
Stay tuned!
Related articles
- conman - [the] Container Manager: Inception
- Implementing Container Runtime Shim: runc
- Implementing Container Runtime Shim: First Code
- Implementing Container Runtime Shim: Interactive Containers
Don't miss new posts in the series! Subscribe to the blog updates and get deep technical write-ups on Cloud Native topics direct into your inbox.