After a long break from posting on this blog, I'm happy to share the continuation of the iximiuz Labs story. This time, I'm going to cover the recent overhaul of the playground engine, which I like to call Playgrounds 2.0:
- Quick recap: iximiuz Labs playgrounds - what are they, really?
- How VMs are constructed by mixing the rootfs and the kernel
- How to run custom playgrounds with simple YAML manifests
- How to bake and use custom VM rootfs images
- How to create multi-network playgrounds
- Why you should start creating Linux playgrounds today
Level up your server-side game — join 10,000 engineers getting insightful learning materials straight to their inbox.
What is an iximiuz Labs Playground?
First things first. You likely already have an intuitive understanding of what a playground is, but if you don't, here is a quick recap.
Each iximiuz Labs playground is:
- One or more virtual machines
- Running on a bare-metal host
- Connected to a bridge network
- Exposed to the user via good old SSH (either via a web terminal or the labctl CLI)
Two important implications of this design are:
- Playgrounds give you VM-level access. Even though iximiuz Labs uses not full-fledged but microVMs, the end result is much closer to a real server experience than if I were giving iximiuz Labs users Docker-style containers or Kubernetes Pods as sandboxes.
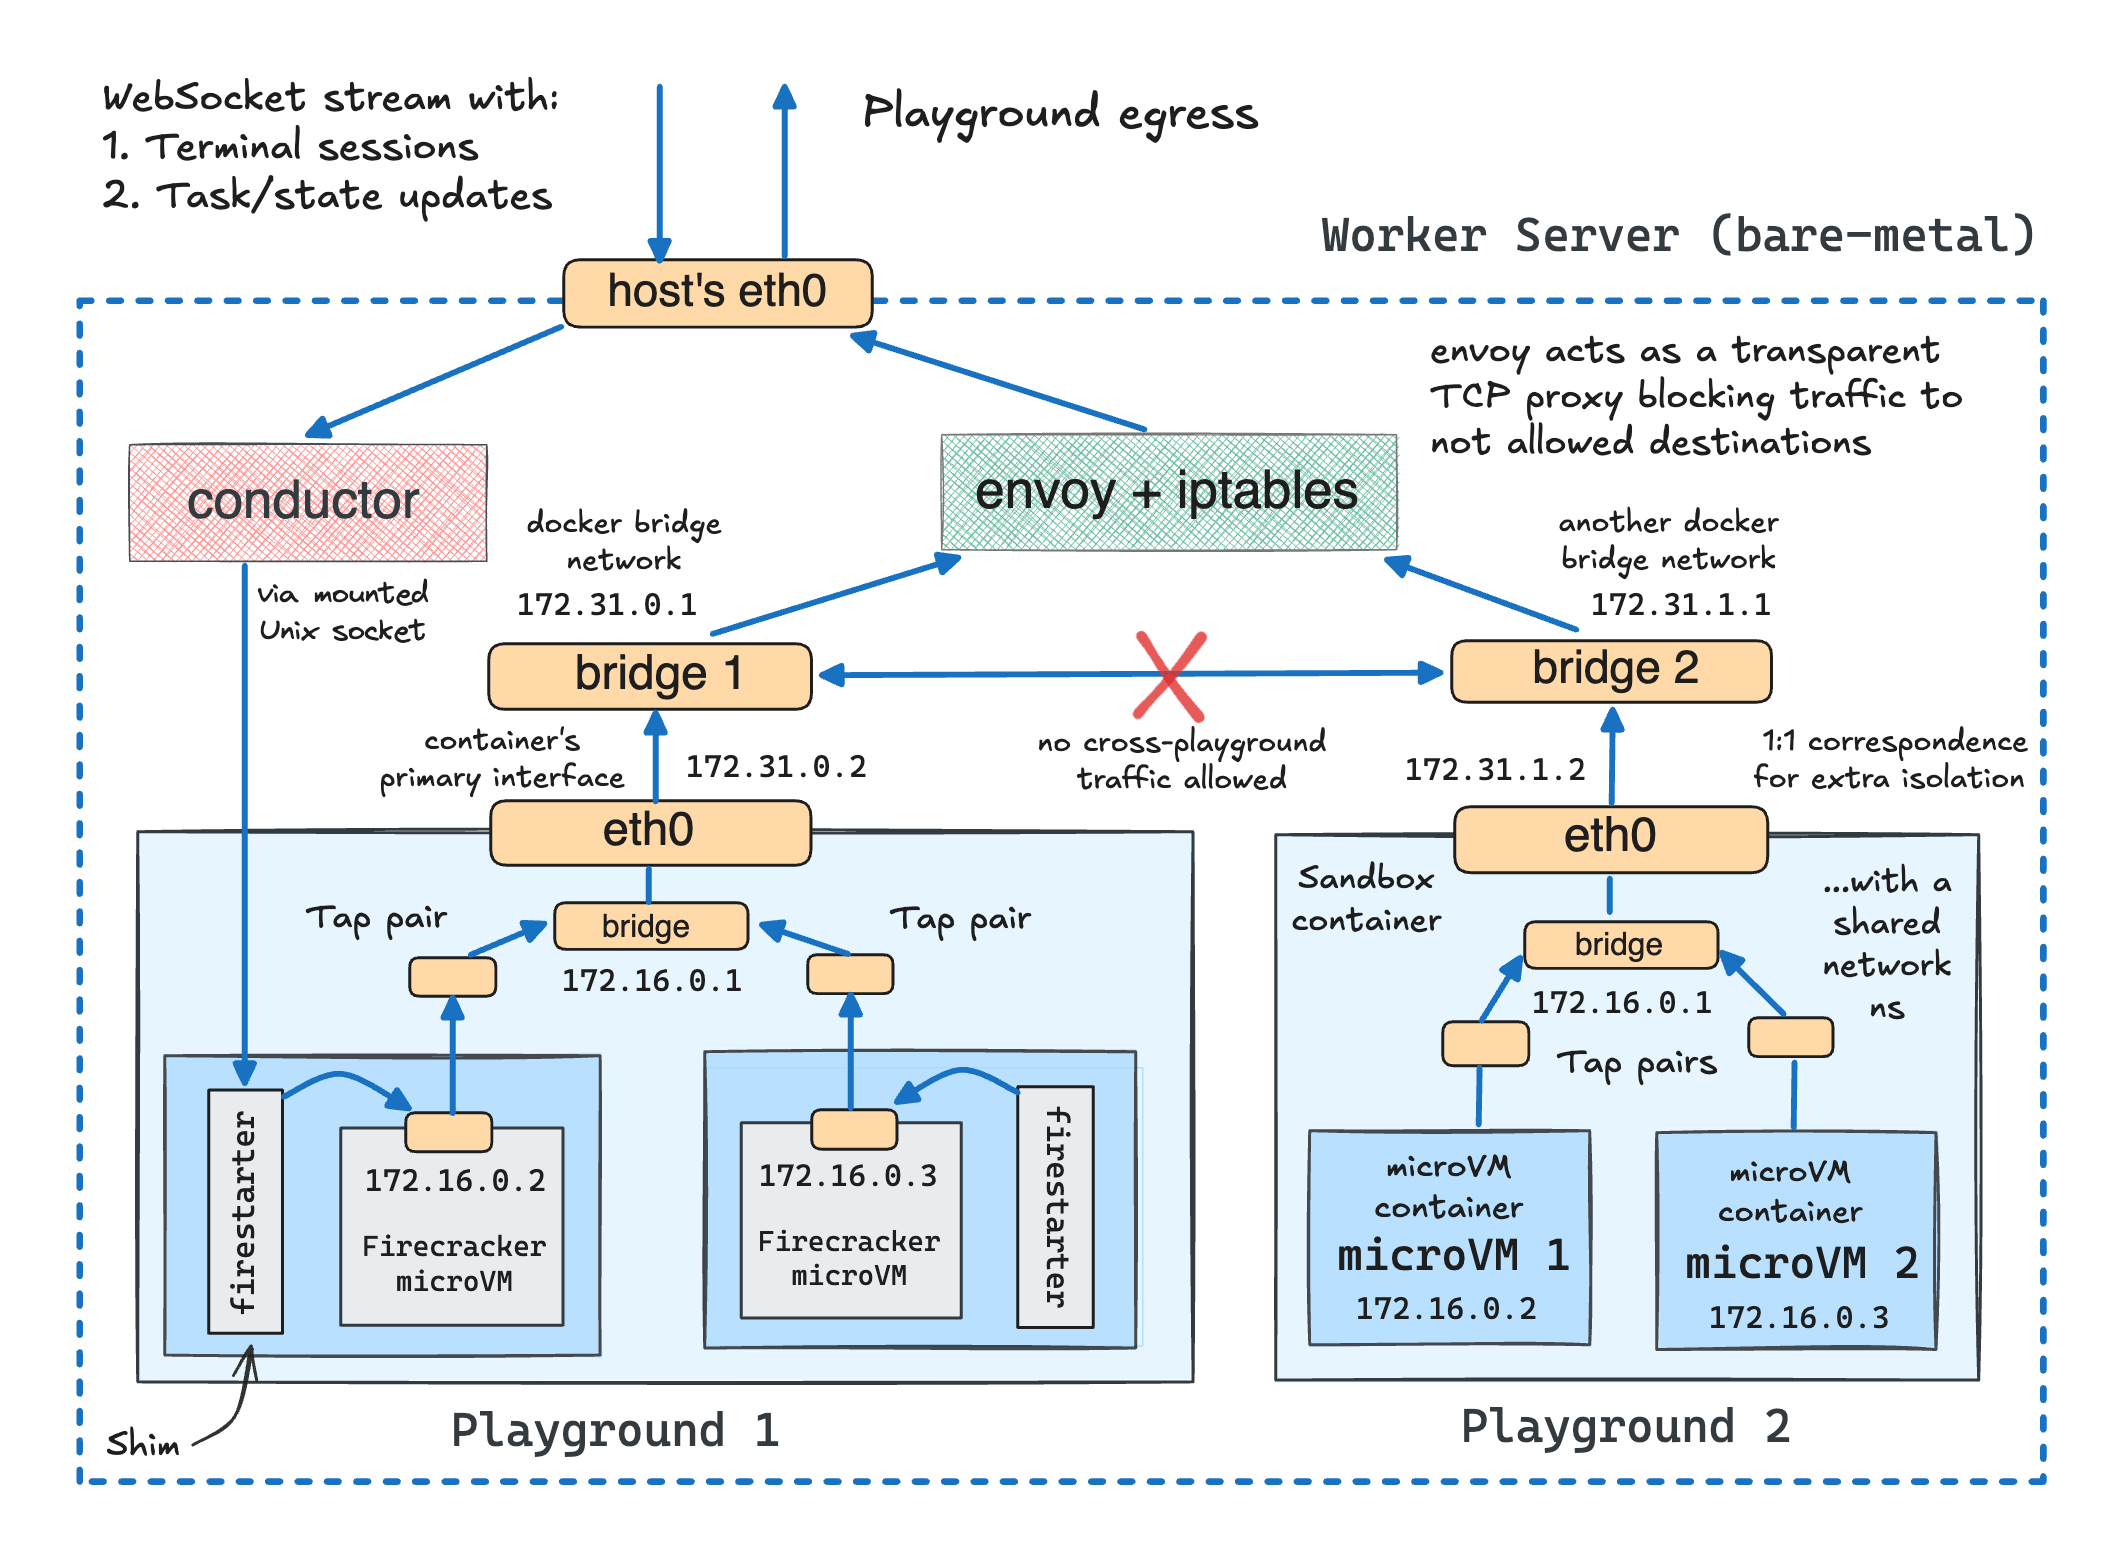
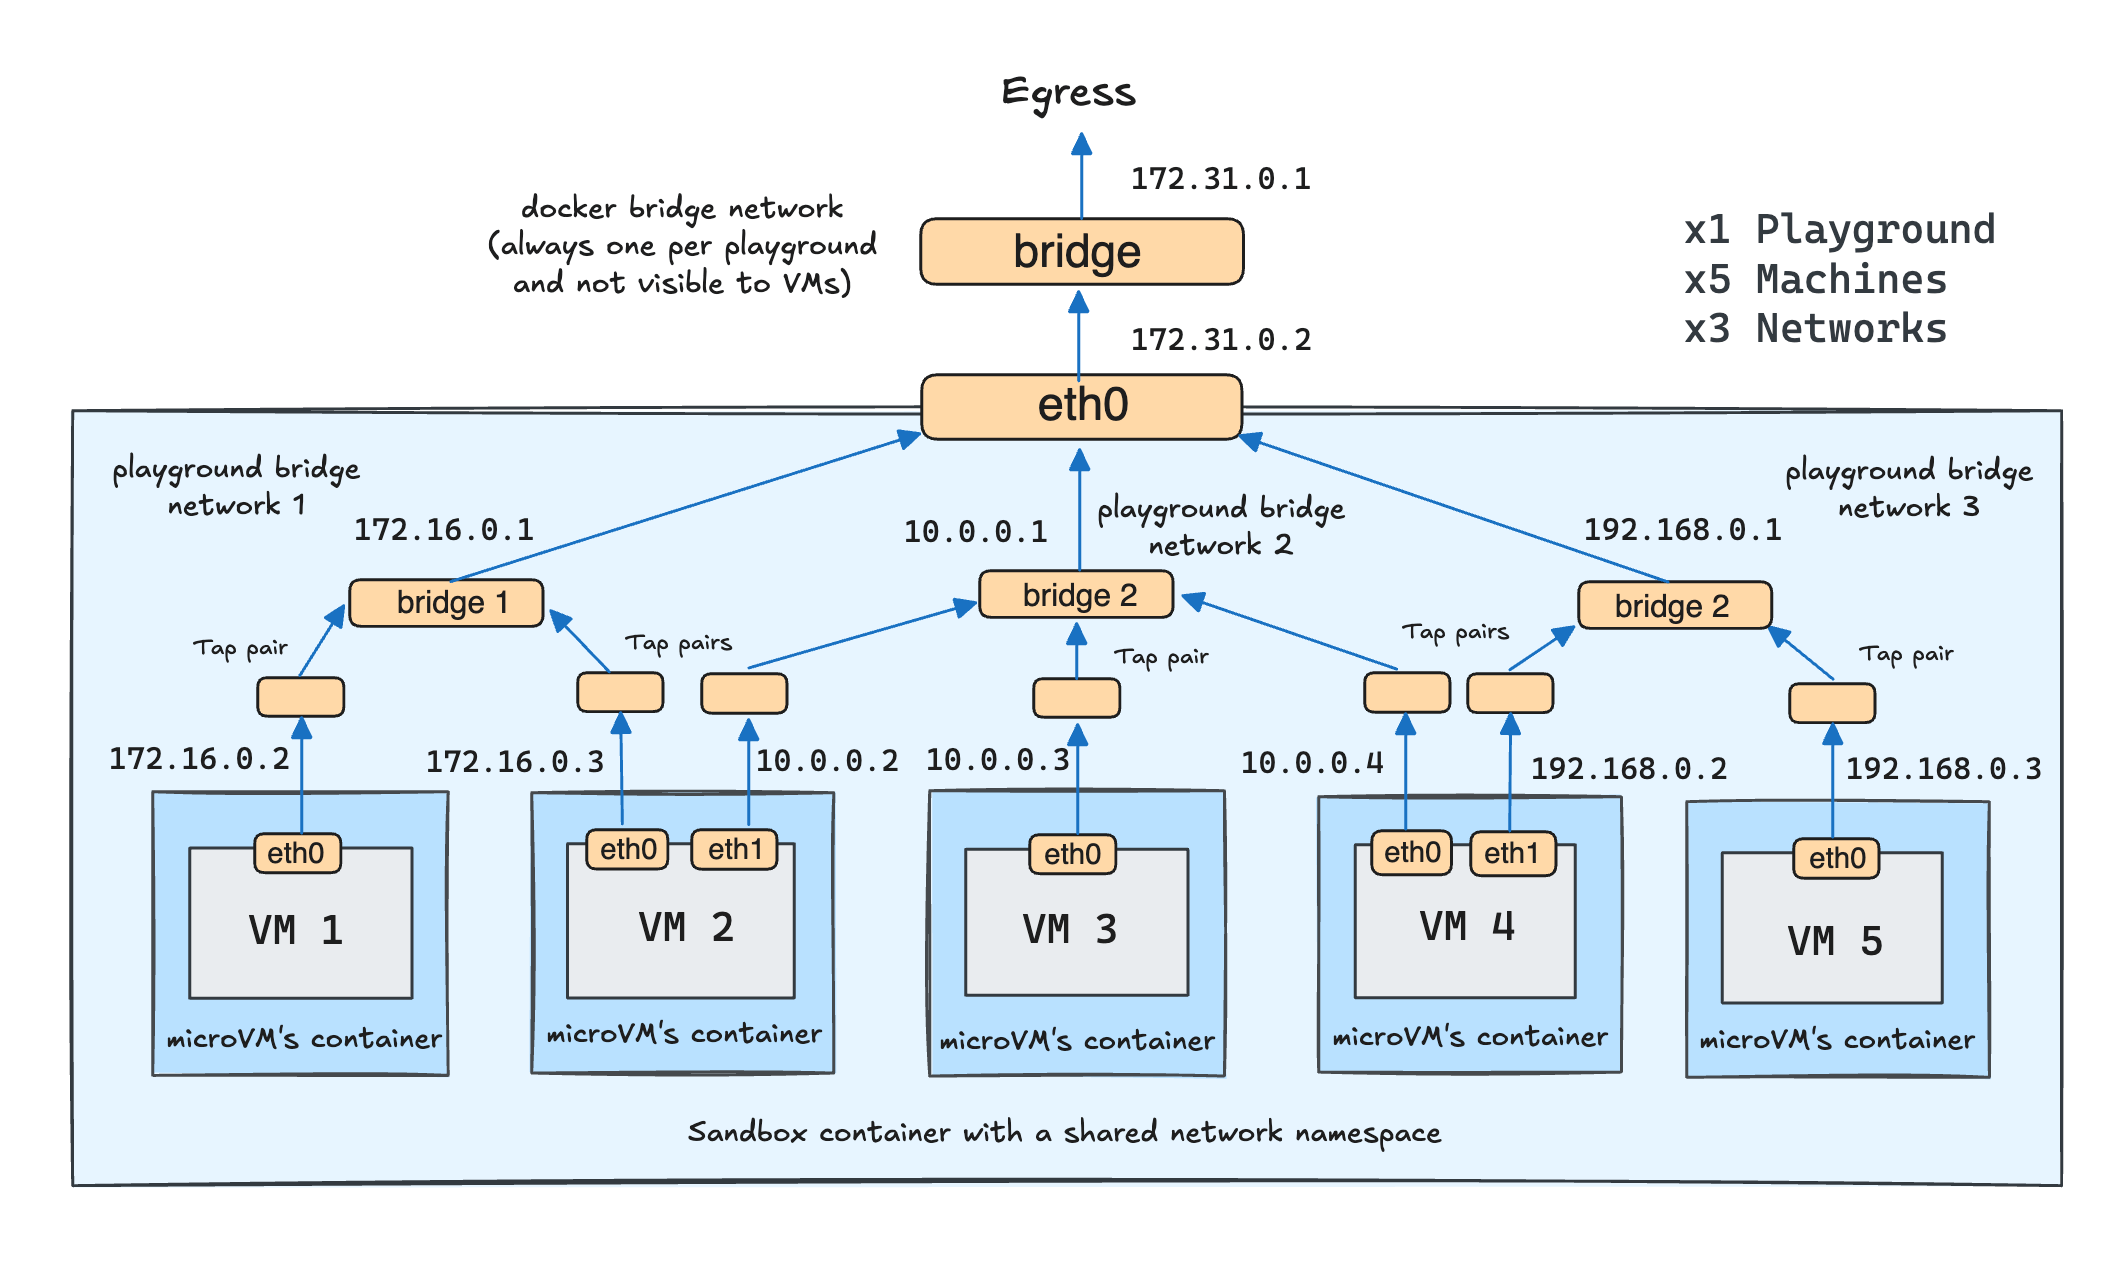
- Playgrounds are "natively" multi-VM constructs. Instead of slicing the bare-metal host into individual disjoint VMs, I slice it into groups of VMs and connect them to a shared bridge on the host (while bridges of different playgrounds are hidden from each other with network namespaces).
What is an iximiuz Labs (micro)VM?
From the virtualization standpoint, when it comes to running traditional server-side workloads such as Docker or Kubernetes applications, you can think of iximiuz Labs microVMs as a close enough analog of more conventional virtual machines (implemented with KVM or any other type of hypervisor). As long as you don't need a GPU or any other "advanced" hardware support, and are fine with not rebooting the VM during the entire session (because it wouldn't boot up again), you probably won't even spot the difference.
Since iximiuz Labs playgrounds are designed for learning and experimentation workloads, Firecracker's virtualization capabilities are (more than) sufficient.
However, what is insufficient is the default kernels that the Firecracker project ships.
These kernels are stripped to the bones, likely to provide only the bare minimum needed to run Lambda or the like serverless runtimes.
If you try booting your own VM using one of these kernels, it won't be any good for running Docker or Kubernetes inside.
You'll quickly find that many kernel configs are missing, and a bunch of important tech (half of the networking stack, iptables/nf_tables, eBPF, etc.) won't actually be functional.
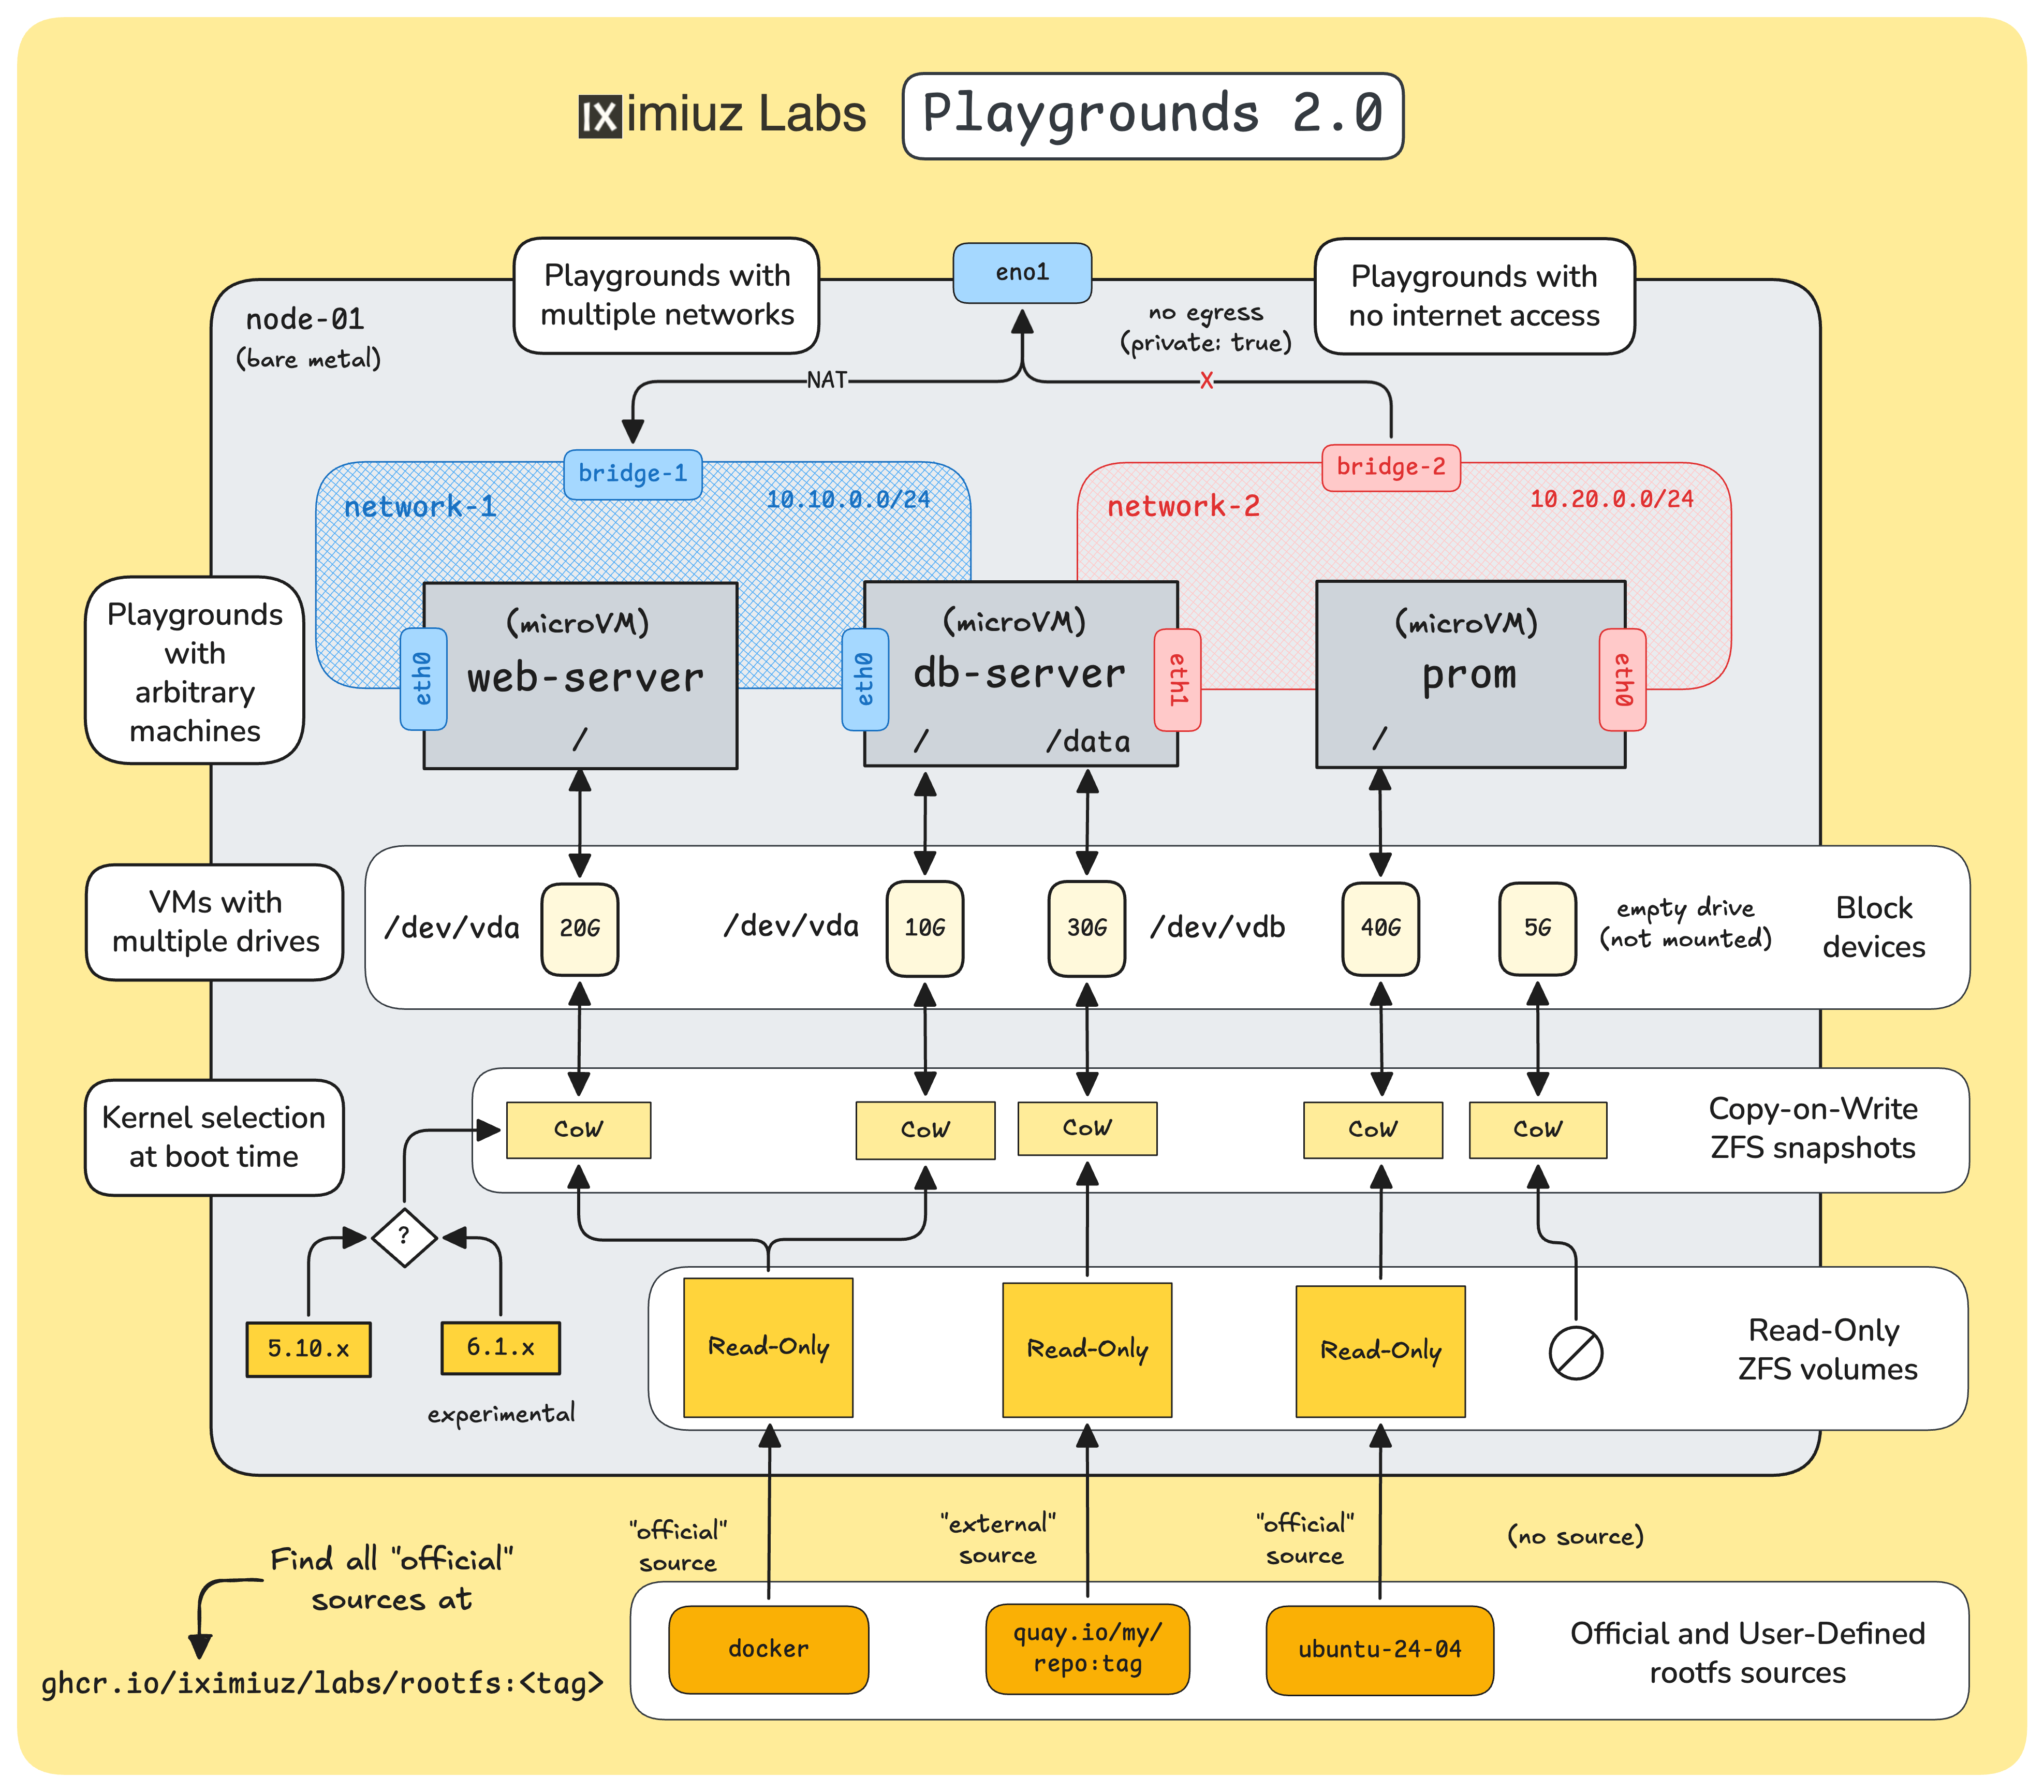
This is why iximiuz Labs playgrounds come with their own set of Linux kernels, optimized for running a much broader set of server-side workloads, while still being Firecracker-compatible: 5.10 and since this release, 6.1.
When it comes to the VM images (i.e., filesystem), the bar and the requirements rise even higher. That same focus on learning and experimentation scenarios that allowed us to use a more lightweight virtualization technology imposed the need to support a pretty wide range of diverse VM images:
- Different Linux flavors (Ubuntu, Debian, Fedora, Rocky, Alpine, etc.)
- Different containerization stacks (Docker, Podman, containerd/nerdctl, Incus, etc.)
- Different orchestration stacks (Kubernetes, Docker Swarm, and Kamal at the moment)
- Different development stacks (Python, Node.js, Go, and Zig playgrounds)
- ...and more.
To bake these VM images, I use an ancient trick:
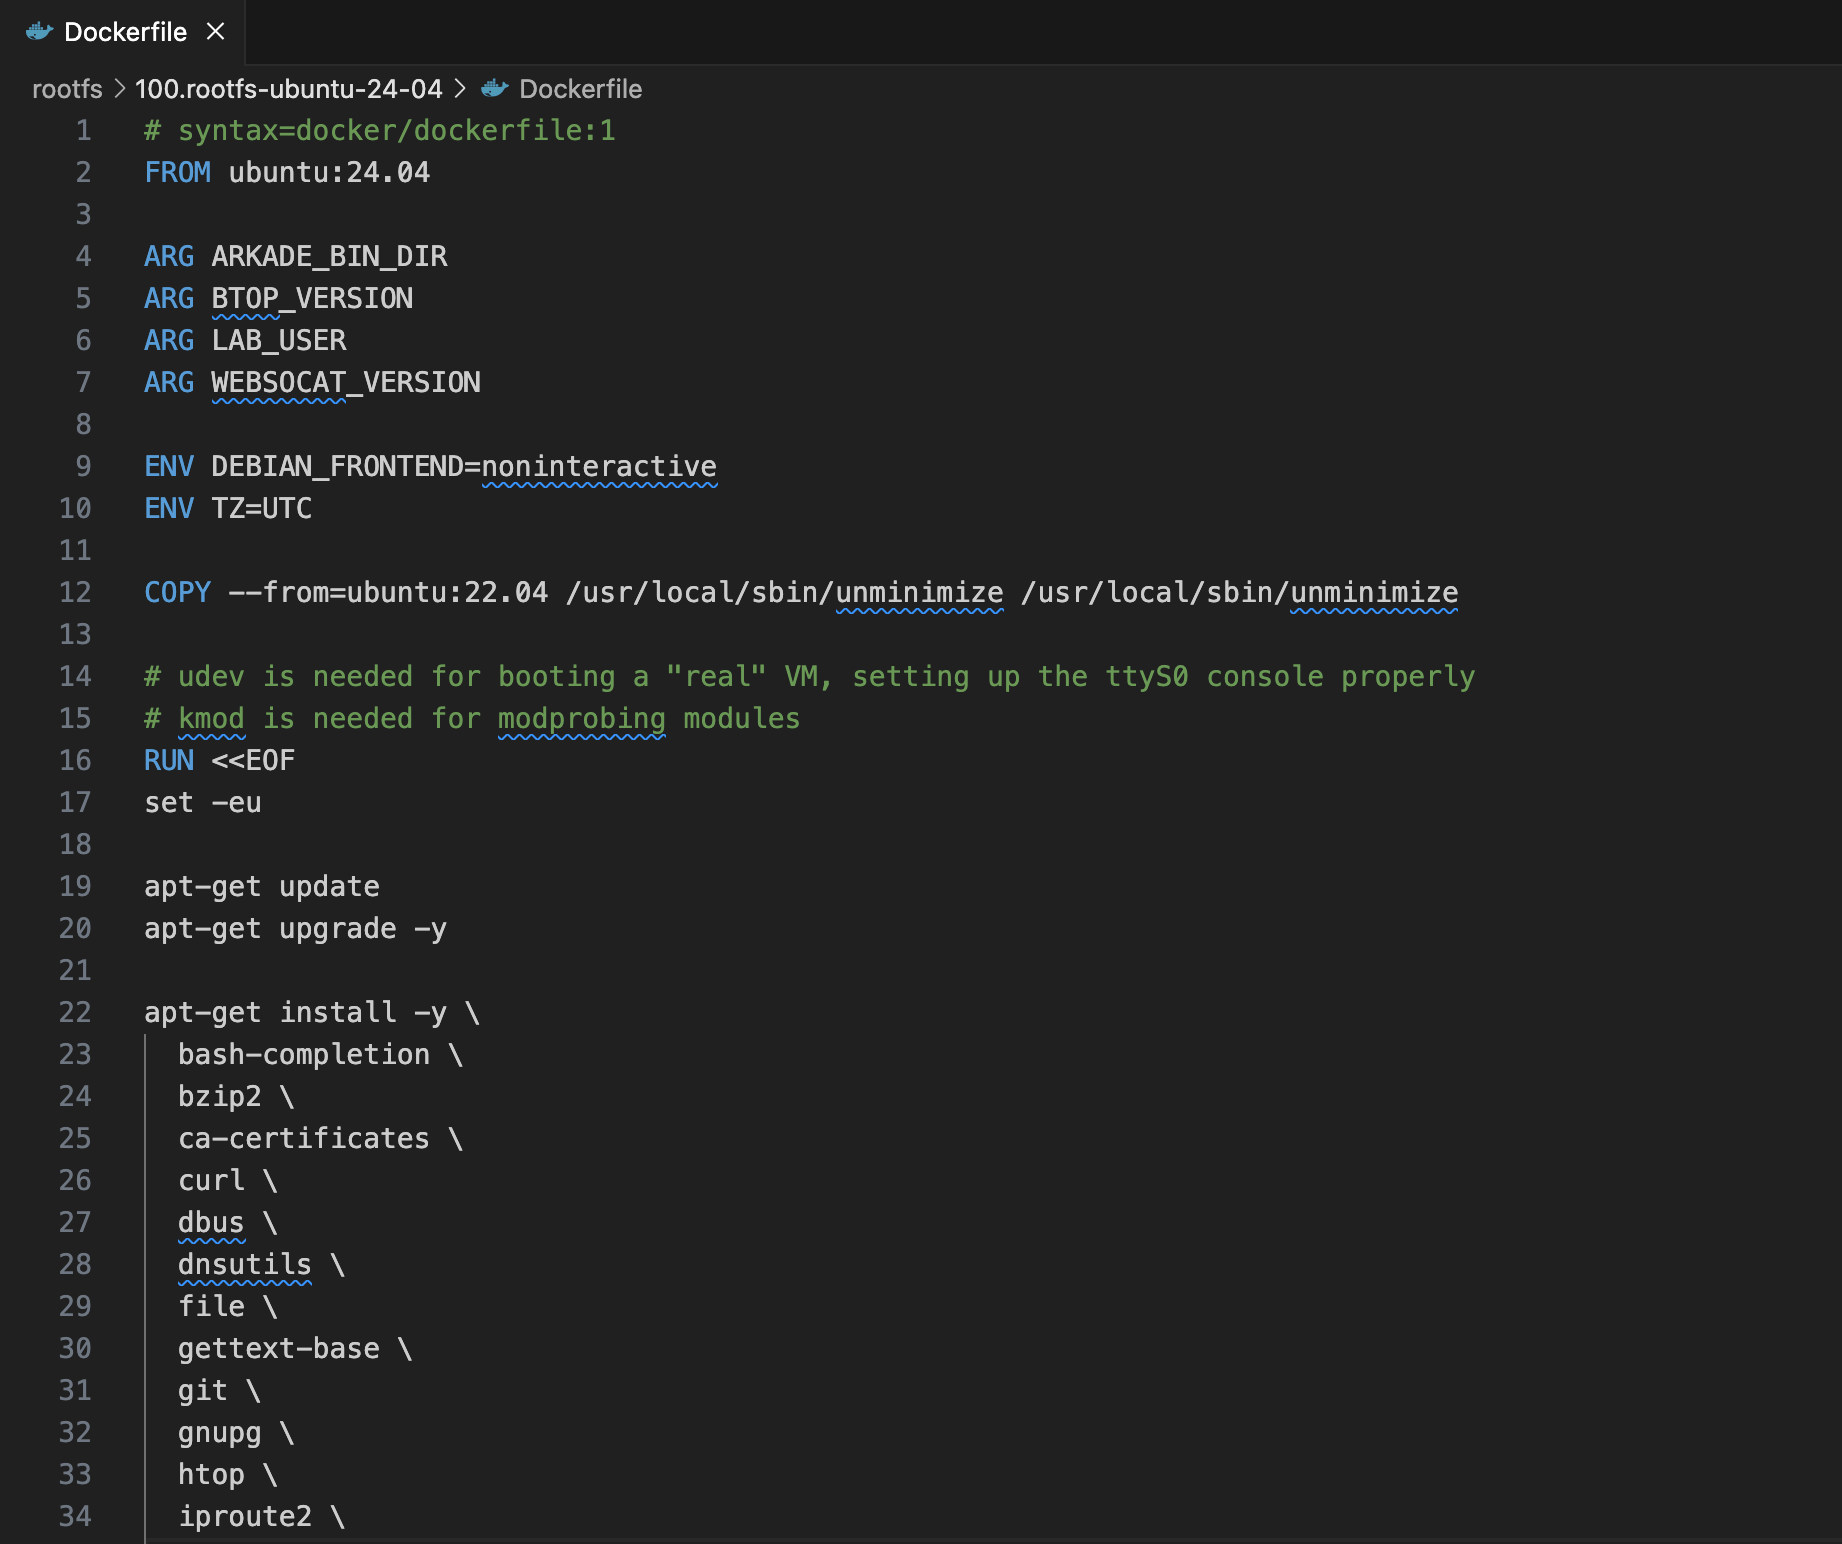
- Create a Dockerfile
FROM ubuntu,debian,fedora, or another mainstream Linux distro. - Install additional system packages using
RUN apt-get, dnf, or yum install(most notably systemd and sshd). - Add static files and scripts (if any) with extra
COPYinstructions. - Build and push the image containing the future VM rootfs to a regular container registry (e.g., GHCR).
Format-wise, the resulting images are pretty much normal container images.
You can try running more lightweight ones with docker run, and they might even work.
However, unlike regular container images, they have numerous user-facing packages installed, including systemd and sshd.
Then, when all (~45 at the moment) images are ready:
- On each bare-metal host, the bender daemon pulls the images and turns them into read-only block devices (e.g., ZFS volumes)
- For each VM run, it clones the needed base volume into a copy-on-write snapshot volume
- ...and injects the kernel binary,
/boot, and/lib/modulesfolders into the copy-on-write clone shortly before booting.
Thus, I heavily (ab)use the container ecosystem to bake semi-traditional VM images:
- Dockerfiles to describe the rootfs
docker build & pushto bake the rootfs- Container image as a storage format
- Container registry as a distribution means
And so can you!
NB: semi-traditional because VM images usually include the kernel, too, while on iximiuz Labs, the kernel and its modules are injected at boot time.
How to Use Official VM rootfs in Your Playgrounds
The above 45 images are known as official sources. All base iximiuz Labs playgrounds use them, and you can also refer to them in your custom playgrounds. To find the complete list of sources, you can query the https://labs.iximiuz.com/api/sources API endpoint or use the dropdown in the Drives tab of the new playground constructor UI:
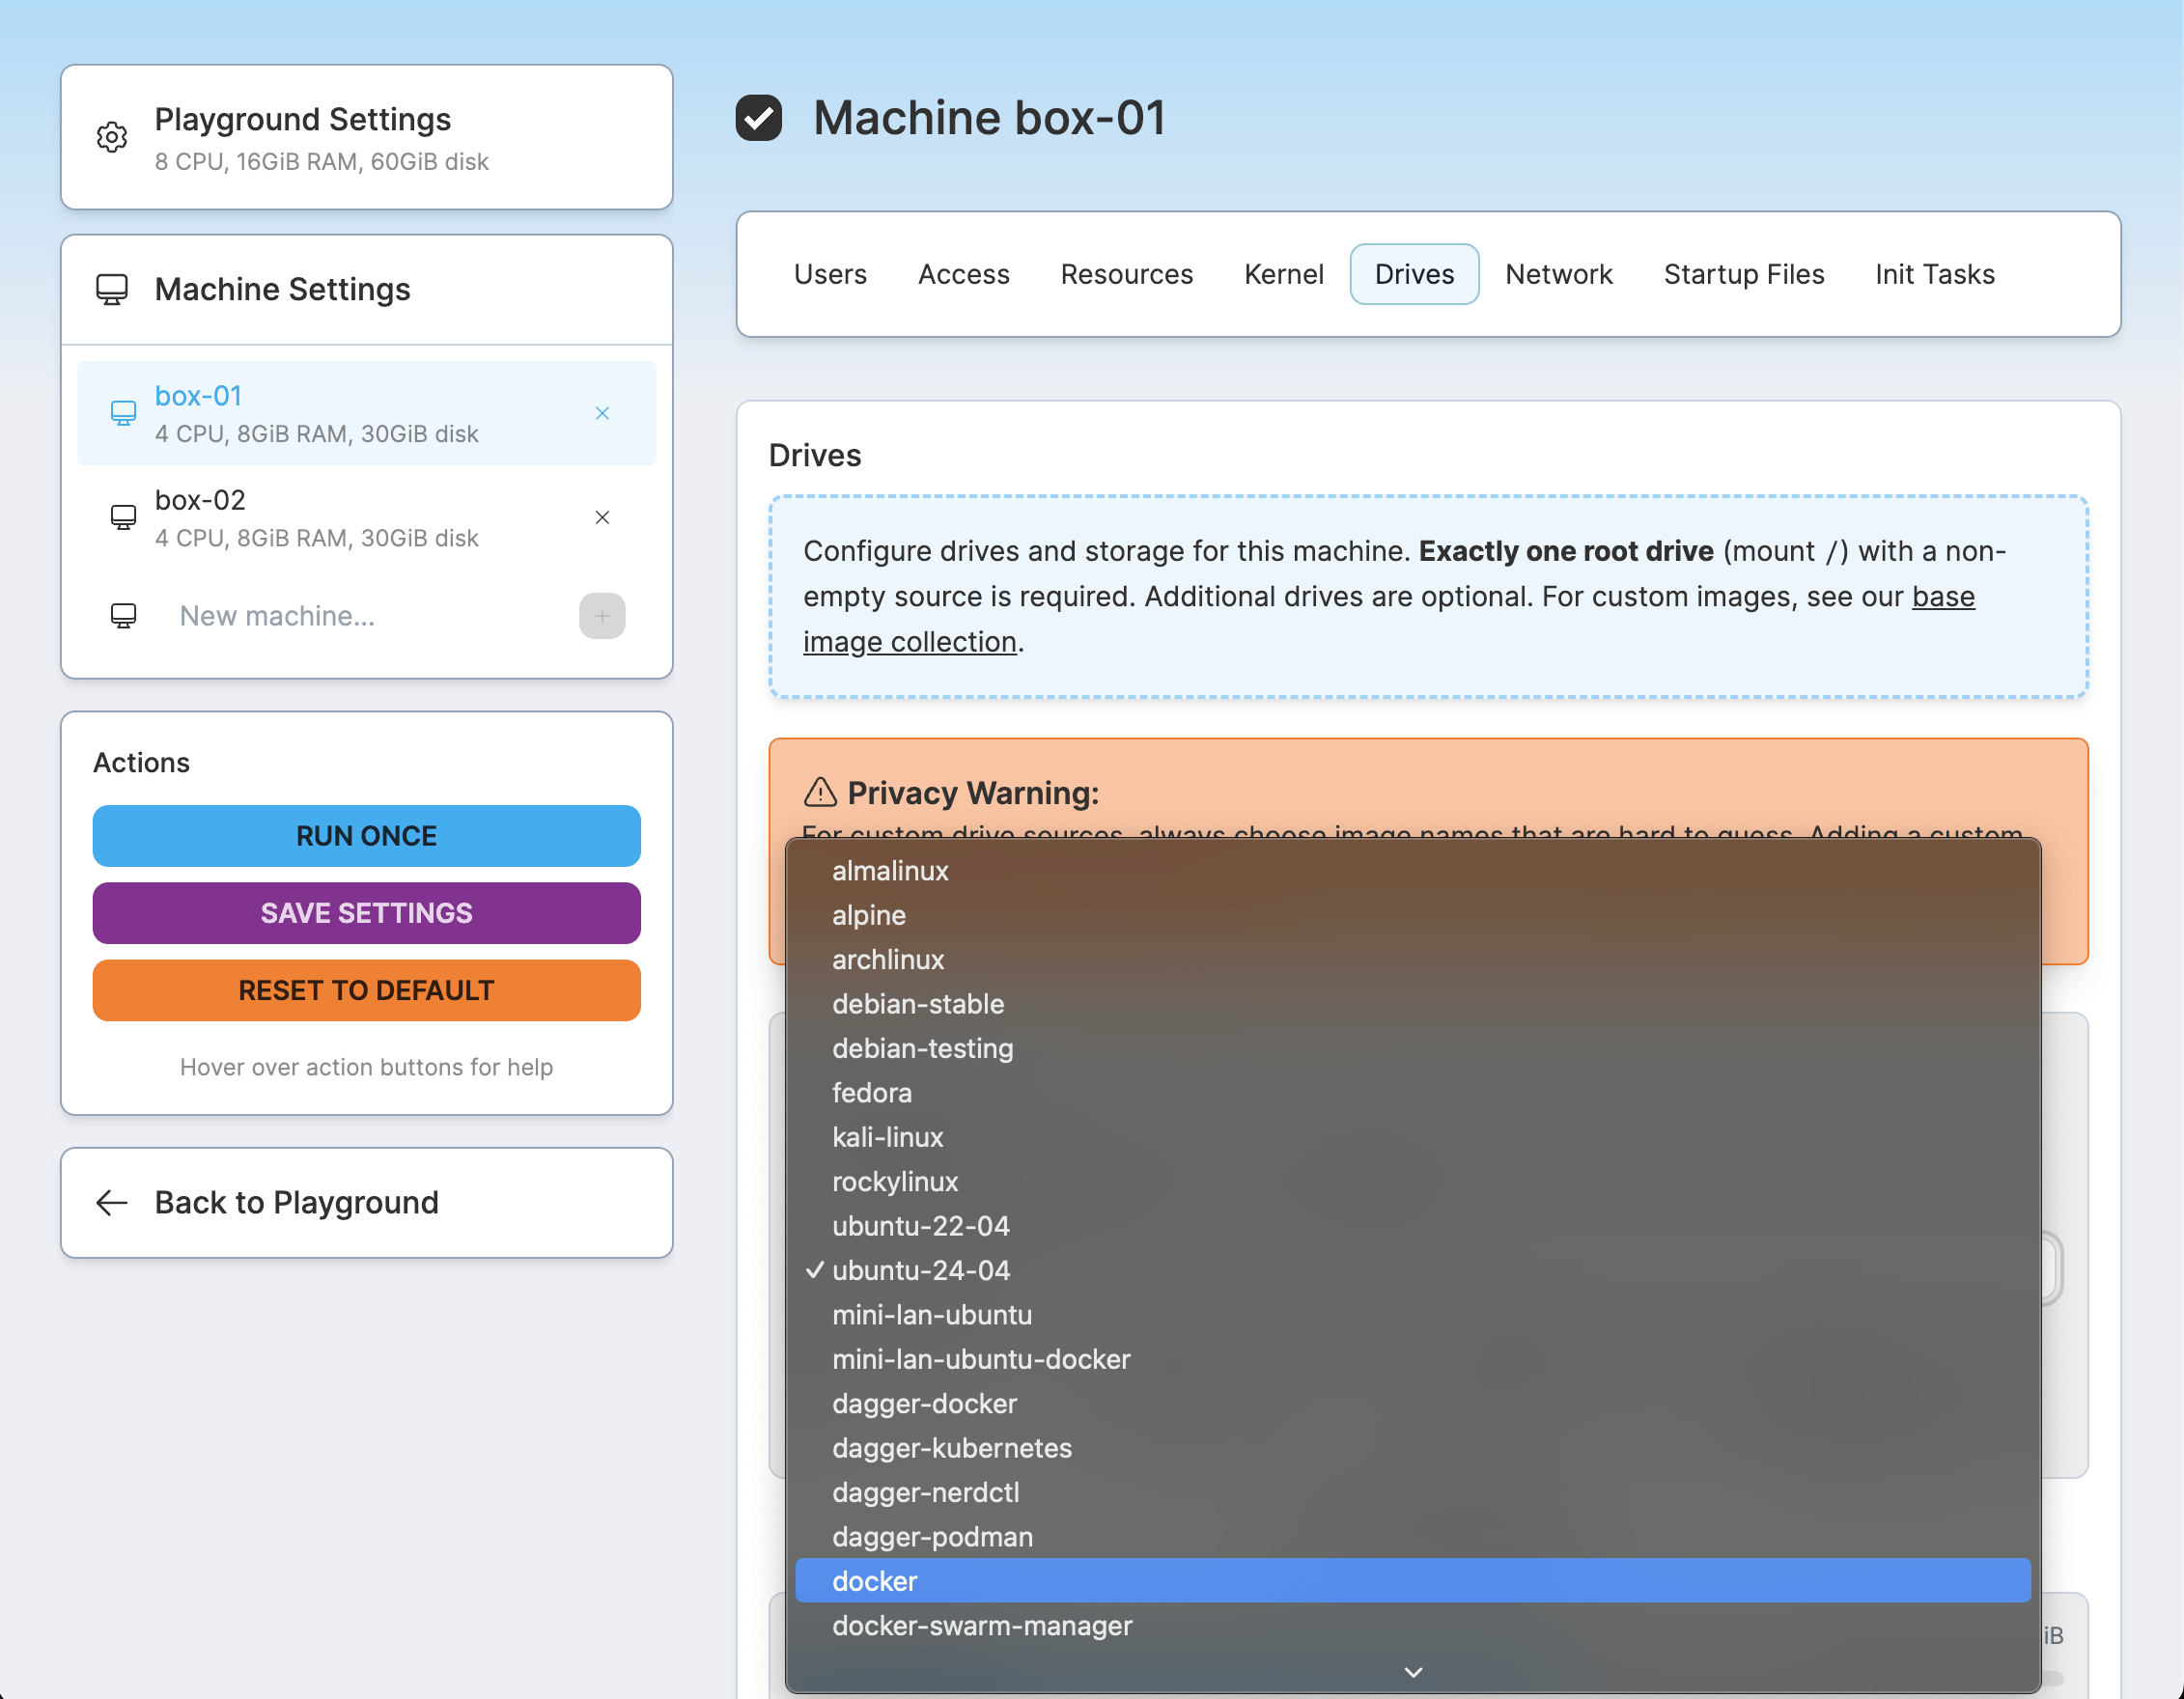
Here is an example of how to run a new playground with a single VM that uses the official ubuntu-24-04 source for its rootfs:
$ labctl playground start flexbox -f -<<EOF
kind: playground
playground:
  machines:
  - name: vm-1
    users:
    - name: root
    default: true
    drives:
    - source: ubuntu-24-04  # <-- this is the line
      mount: /
    network:
    interfaces:
      - network: local
    resources:
    cpuCount: 2
    ramSize: 4G
EOF
The recently added flexbox playground is a special base playground that allows assembling custom playgrounds from an arbitrary set of VMs.
The above labctl playground start command runs a single playground session without persisting its configuration, which may or may not be desirable.
There are two ways of making a certain playground configuration more reusable. You can either:
- Store the (partial) playground manifest in a local YAML file and keep using it with the
labctl playground start -f <base> - Use a (complete) manifest once to create a custom playground and rely on a simple flag-less
labctl playground start <name>afterward.
$ labctl playground create --base flexbox my-custom -f -<<EOF
kind: playground
title: My Awesome Custom Playground
categories:
  - linux
playground:
  accessControl:
  canList:
    - owner
  canRead:
    - owner
  canStart:
    - owner
  machines:
  - name: vm-1
    users:
    - name: root
      default: true
    drives:
    - source: ubuntu-24-04
      mount: /
    network:
    interfaces:
      - network: local
    resources:
    cpuCount: 2
    ramSize: 4G
EOF
While both of the above manifests use just one machine for brevity, you can use up to 5 machines per playground, with multiple drives and different Linux kernels and rootfs sources for each machine.
You can get some inspiration and see all the available manifest attributes by exploring this (pretty advanced) playground:
$ labctl playground manifest k8s-omni
And of course, you can find the same knobs in the playground constructor UI. For instance, here is what it looks like for the same K8s "Omni" playground.
How to Bake and Use Your Own VM rootfs
In many cases, selecting an official source and potentially customizing it with runtime init tasks (a similar concept to cloud-init) would be sufficient. However, for more advanced customizations or when the init scripts slow down the boot too much, you can build your own rootfs images and use them as external drive sources:
See quay.io/my/repo:tag at the bottom of the diagram.
Last week, I made all the official images public, so you can start basing your VM rootfs Dockerfiles on them:
FROM ghcr.io/iximiuz/labs/rootfs:ubuntu-24-04

RUN apt-get install -y my-favorite-tool-a \
  my-favorite-tool-b ...

COPY my-script.sh /usr/local/bin

...
Pro tip: Run crane ls ghcr.io/iximiuz/labs/rootfs for the complete list of rootfs tags.
When you build and push such an image, you can start referring to it in the playground manifest using a special oci:// prefix:
$ labctl playground start --ssh flexbox -f -<<EOF
kind: playground
playground:
  machines:
    - name: etcd-01
      users:
        - name: root
          default: true
      drives:
        - source: oci://ghcr.io/sagikazarmark/iximiuz-labs/playgrounds/etcd:live@sha256:e882b76f3c325dcf1b350838d49d0955b5f4ad090954b63ed9e20bb6716a60aa
          mount: /
      network:
        interfaces:
          - network: local
      resources:
        cpuCount: 2
        ramSize: 4G
EOF
The above source is "borrowed" from the shiny new etcd playground by Sági-Kazár Márk.
Basing your Dockerfile on one of the official images significantly simplifies getting started with a custom rootfs, but technically, it's not required. As the opening section revealed, the VM images are regular Linux distros with just a couple of extra requirements (pretty typical for traditional VMs, actually):
- sshd must be installed and started on
0.0.0.0:22at boot - root user must exist (not even sure if it's important to note)
For the rest, you can improvise as much as you like. And to give you some initial ideas, today, I'm open-sourcing the collection of the "official" Dockerfiles (and the build scripts):
You can fork and modify them as you wish, and also don't forget to explore the community playgrounds - many of them have already started using "external" rootfs sources.
What about Networking 2.0?
Another significant enhancement of the revamped engine is multi-network playgrounds. Earlier, I mentioned that each playground gets its own (isolated) bridge network and all playground VMs are attached to it. In actuality, it's not one but K bridge networks for N playground VMs, with an arbitrary VM-to-network mapping:
Thus, Playgrounds 2.0 came even closer to reproducing a mini-network of servers. Here is an example setup from one of my recent challenges:
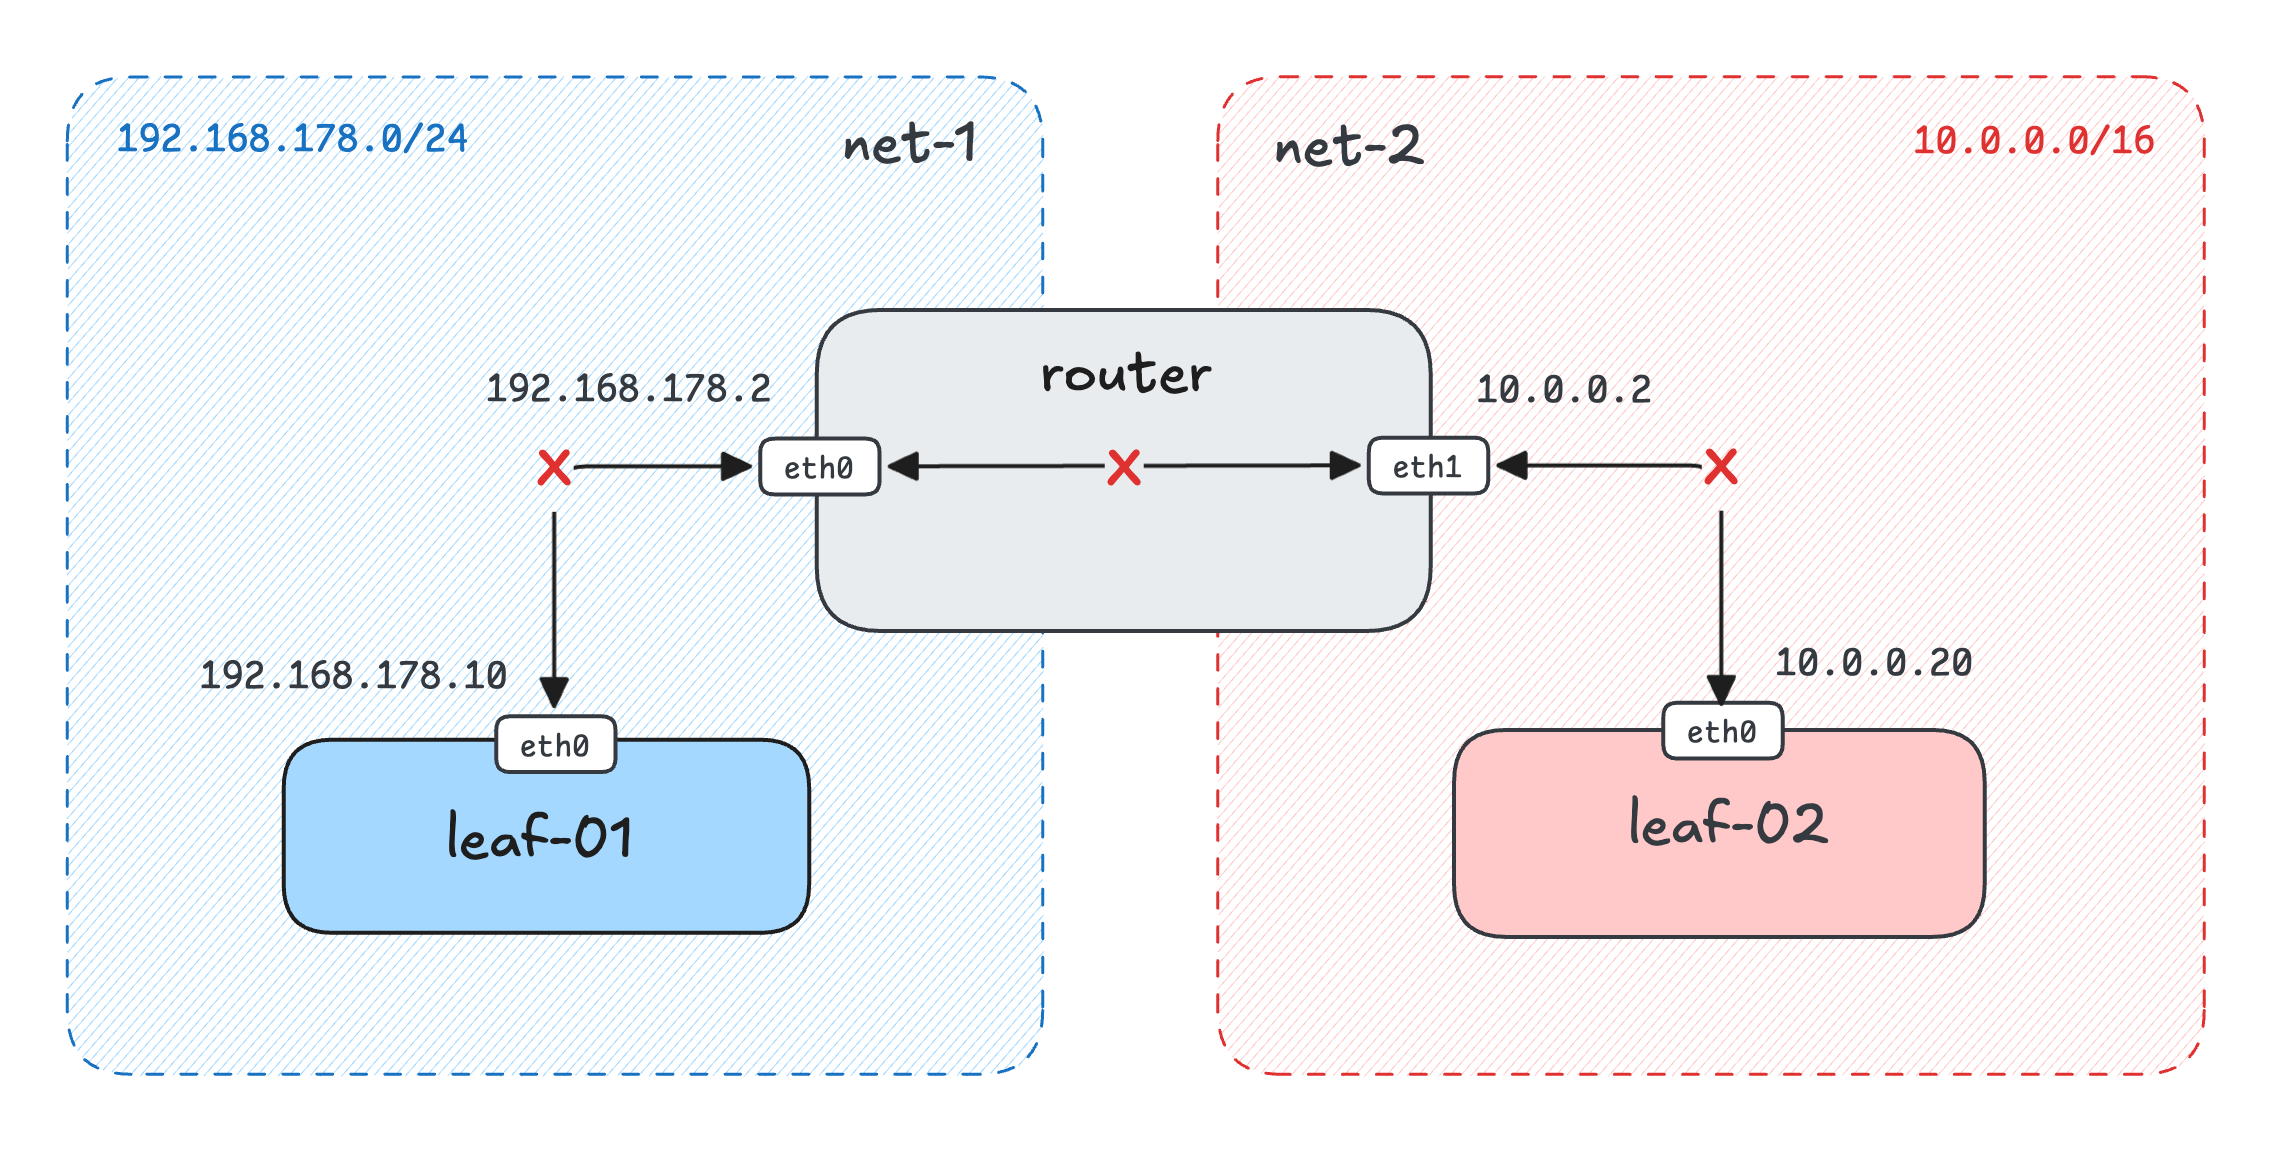
And the corresponding playground manifest (abridged a bit):
$ labctl playground start flexbox my-custom -f -<<EOF
kind: playground
playground:
  # First, define available networks - two in this case.
  networks:
    - name: net-1
      subnet: 192.168.178.0/24
      private: true
    - name: net-2
      subnet: 10.0.0.0/16
      private: true
  machines:
    - name: leaf-01
      users: ...
      drives: ...
      # Then, attach machines to one or more
      # of the playground networks
      network:
        interfaces:
          - network: net-1
            address: '192.168.178.10'
    - name: router
      users: ...
      drives: ...
      # The router machine is attached to both networks
      network:
        interfaces:
          - network: net-1
            address: '192.168.178.2'
          - network: net-2
            address: '10.0.0.2'
    - name: leaf-02
      users: ...
      drives: ...
      network:
        interfaces:
          - network: net-2
            address: '10.0.0.20'
So, for people studying this fascinating part of the craft, it has just become possible to reproduce many more networking scenarios:
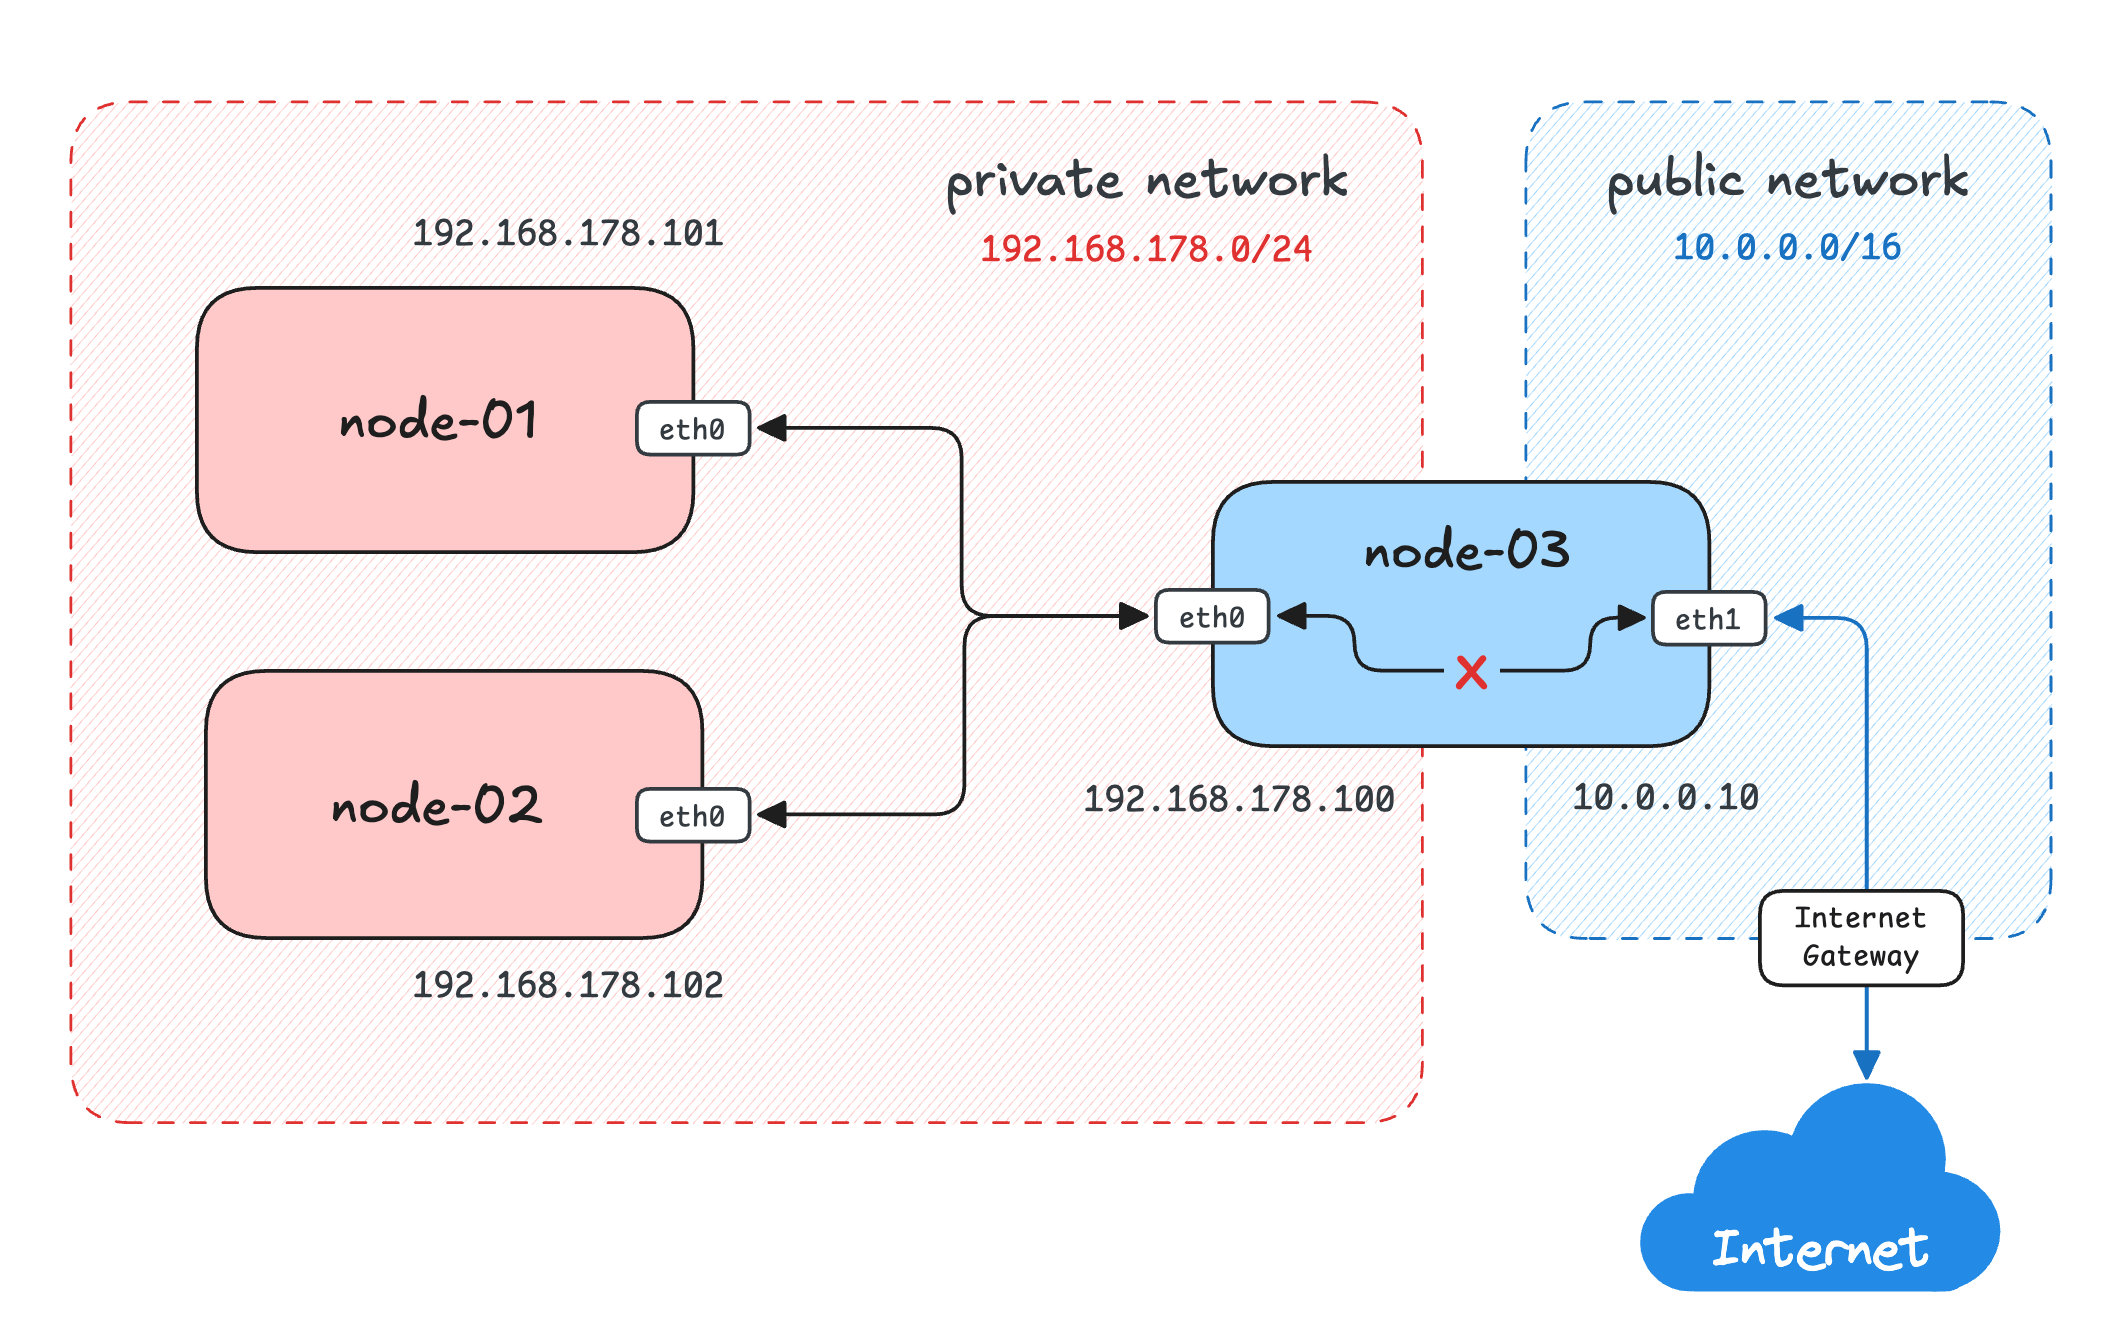
Another example from a recently published networking challenge.
Reasons To Create (More) Playgrounds
The main reason is, of course, to practice! I keep hearing back from people who spent some time setting up their own Kubernetes clusters, Argo CD, ELK, etc., how much they actually learned in the process. The experience you gain from baking the rootfs, writing and troubleshooting init scripts, figuring out the proper UX, and documenting your work to make the playground usable for a broader set of users is very close to solving real-world platform engineering problems. So, I encourage you to give it a try and create at least one playground.
The second reason is that it might be the best way to showcase your work and actual skills,
which is becoming increasingly more important if you're on the market and looking for a new position
(while the value of traditional certifications might be declining with the advances in AI-generated slop manifests).
The format of the iximiuz Labs playgrounds makes them a perfect shareable unit -
you can pack together a crisp markdown description, augment it with an actually runnable environment, and also reveal all the magic behind it.
Happy hacking!
Level up your server-side game — join 10,000 engineers getting insightful learning materials straight to their inbox:
